首先在腾讯企业邮箱注册一个新账号,并且绑定域名。
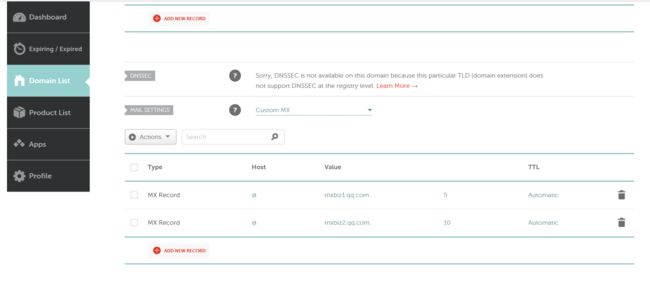
然后去你的域名解析服务商那里按照说明设置解析记录。
如图所示即为正常。
然后你可以通过这个命令来检查自己用的是mailx还是mailutils,本文以mailutils做示范
    $ whereis mail
    mail: /usr/bin/mail.mailutils /usr/bin/mail /usr/share/man/man1/mail.1.gz
接下来我们要配置好 mail-transport-agent ,如果你不知道这是什么你可以查阅维基百科和 6 Best Mail Transfer Agents (MTA’s) for Linux
在这一步我走了一点弯路,因为有人说 ssmtp 容易配置,所以我就选用了 ssmtp,然而实际上,postfix 的配置也非常的简单。
我们先来讲讲 ssmtp 的配置吧!
SSMTP
直接贴配置档
$ cat /etc/ssmtp/ssmtp.conf
#
# Config file for sSMTP sendmail
#
# The person who gets all mail for userids < 1000
# Make this empty to disable rewriting.
[email protected]

# 这里填腾讯企业邮箱的发送服务器
# 注意腾讯企业邮箱和QQ邮箱不是同一个服务器
# 请注意区分
mailhub=smtp.exmail.qq.com:587

# 填写邮箱和密码(如果你用的是QQ邮箱,你可能会需要在这里填写“授权码”或“客户端专用密码”而不是“邮箱密码”)
[email protected]
AuthPass=你的密码

# 启用 STARTTLS
UseTLS=YES
UseSTARTTLS=YES

# Where will the mail seem to come from?
rewriteDomain=demo.com

# The full hostname
hostname=demo.com

# Are users allowed to set their own From: address?
# YES - Allow the user to specify their own From: address
# NO - Use the system generated From: address
FromLineOverride=YES
设置用户别名(否则会出现 501 mail from address must be same as authorization user 错误)
$ cat /etc/ssmtp/revaliases
# sSMTP aliases
#
# Format:   local_account:outgoing_address:mailhub
#
# Example: root:[email protected]:mailhub.your.domain[:port]
# where [:port] is an optional port number that defaults to 25.
eric:[email protected]:smtp.exmail.qq.com:587
root:[email protected]:smtp.exmail.qq.com:587
这里是将系统自动得出的邮箱地址(比如我的是eric@localhost)替换为你真正的邮箱地址。
配置中的所有 demo.com 替换为你的域名,所有 [email protected] 替换为你的邮箱。
参考ArchWiki
Postfix
我直接参考这篇文章配置的,写得很清楚了。我稍微翻译一下。
准备
Debian 7 或更高版本的系统
-
更新软件包列表
sudo apt update -
确保这个库已经安装并且是最新的
sudo apt install libsasl2-modules
注:此篇文章以非特权用户的视角来写,需要特权的命令将会冠以
sudo前缀。如果你对sudo命令感到陌生,请参考这篇文章
安装 Postfix
在本章中,我将会安装 Postfix,设置域名和主机名。
-
安装 Postfix
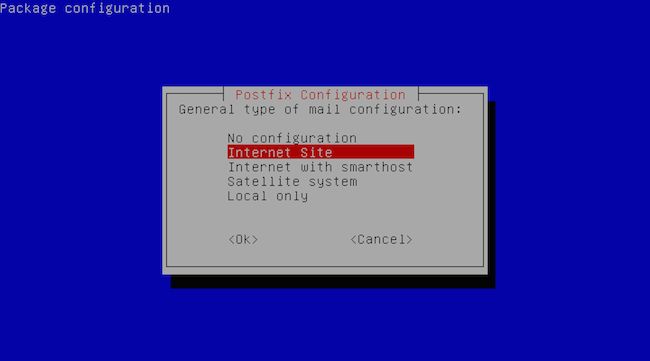
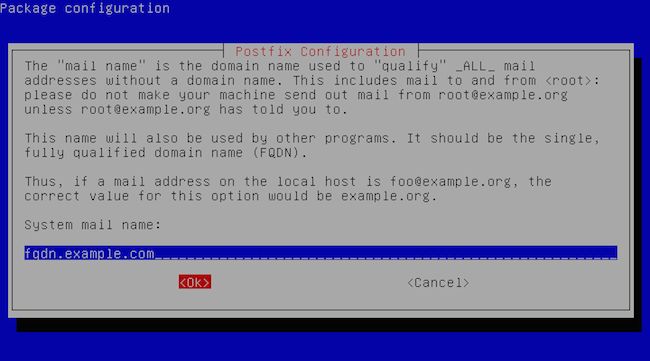
sudo apt-get install postfix 在安装的过程中,一个对话框将会出现,询问你邮箱的配置方式(译注:并没有看到这个界面,也许是被移除了。)
- 我们选择 Internet Site
- 输入你的域名,demo.com
- 当你安装完成的时候,用你喜欢的编辑器打开
/etc/postfix/main.cf
    $ sudo vim /etc/postfix/main.cf
     ...
     myhostname = fqdn.example.com
    ...
确保 myhostname 项是你的域名(如果刚才没有那个配置界面的话,可以直接在这个配置文档里面设置)
配置 SMTP 用户名和密码
-
打开或创建
/etc/postfix/sasl_passwd文件sudo vim /etc/postfix/sasl_passwd 把你的邮箱提供商的服务器(SMTP Host)、用户名、密码按照这个格式填入(记得保留中括号):
[mail.isp.example] [email protected]:password
如果你的邮箱提供商使用的不是一个默认的端口,你可以像这样填写:
[smtp.exmail.qq.com]:587 [email protected]:password
-
用
postmap命令创建哈希数据库文件sudo postmap /etc/postfix/sasl_passwd
如果一切顺利,你现在应该会在 /etc/postfix/ 目录下看到一个 sasl_passwd.db 文件
修改你的密码文件和哈希数据库的权限,以确保安全
上面那一步创建的 sasl_passwd 和 sasl_passwd.db 文件会将你的账号和密码明文存储。
为了安全起见,你需要更改他们的权限,这样,只有 root 用户有权查看这两个文件。
用下面这两条命令来修改权限:
sudo chown root:root /etc/postfix/sasl_passwd /etc/postfix/sasl_passwd.db
sudo chmod 0600 /etc/postfix/sasl_passwd /etc/postfix/sasl_passwd.db
配置中继服务器(Relay Server)
在这一步,我将用腾讯企业邮箱的 SMTP 服务器作为中继服务器来配置。如果你不知道什么是“中继服务器”,请看这篇文章。
-
打开
/etc/postfix/main.cf配置文件sudo vim /etc/postfix/main.cf
-
找到 relayhost 参数进行设置(记得保留中括号)
specify SMTP relay host
relayhost = [smtp.exmail.qq.com]:587
-
在配置文件的末尾加上这些参数来开启认证
# enable SASL authentication
smtp_sasl_auth_enable = yes
# disallow methods that allow anonymous authentication.
smtp_sasl_security_options = noanonymous
# where to find sasl_passwd
smtp_sasl_password_maps = hash:/etc/postfix/sasl_passwd
# Enable STARTTLS encryption
smtp_use_tls = yes
# where to find CA certificates
smtp_tls_CAfile = /etc/ssl/certs/ca-certificates.crt
保存并退出
-
重启 Postfix 服务
sudo systemctl restart postfix
试着发送一封邮件
测试你的配置最快的方式是发一封邮件给你的另一个邮箱地址,使用 mail 命令
echo "hello world" | mail -s "This is a test mail" -a "From: [email protected]" [email protected]
番外篇:添加别名和修改邮件发送人
添加别名(可选)
这一步的作用是你可以把原本发给其他用户的邮件转发到你的收件箱。
vim /etc/aliases
里面内容类似于这样
$ cat /etc/aliases
# See man 5 aliases for format
postmaster:    root
root:               YourName
这里有个技巧,如果按照上文这样配置的话,root用户将会收不到邮件,如果想实现类似于“抄送”的效果,可以这么写:
$ cat /etc/aliases
# See man 5 aliases for format
postmaster:    root
root:               eric, root
然后生成数据库,重启服务
$ sudo newaliases
$ sudo systemctl restart postfix
修改 SMTP 邮件发送人
在 /etc/postfix/main.cf 中添加以下内容
# Rewrite outgoing mail from
smtp_generic_maps = hash:/etc/postfix/generic
然后新建 /etc/postfix/generic 这个文件
$ sudo vim /etc/postfix/generic
里面填上
@demo.com   [email protected]
@localhost        [email protected]
当然 demo.com 要换成你的域名
然后,生成数据库文件,重启 postfix 服务
$ sudo postmap /etc/postfix/generic
$ sudo systemctl restart postfix
至此,我们在服务器上发送邮件的需求已达成,本篇结束。
EOF


