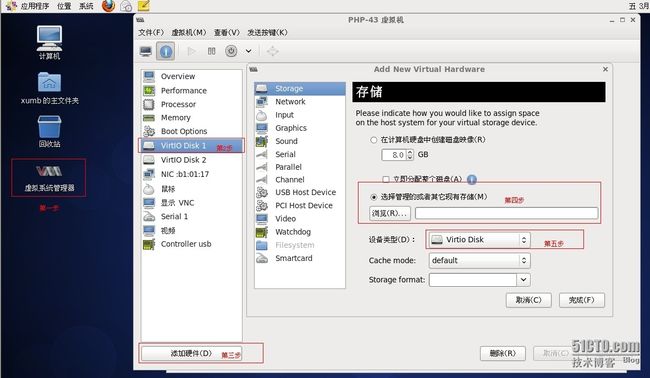
第一步:打开kvm虚拟系统管理工具(如图)
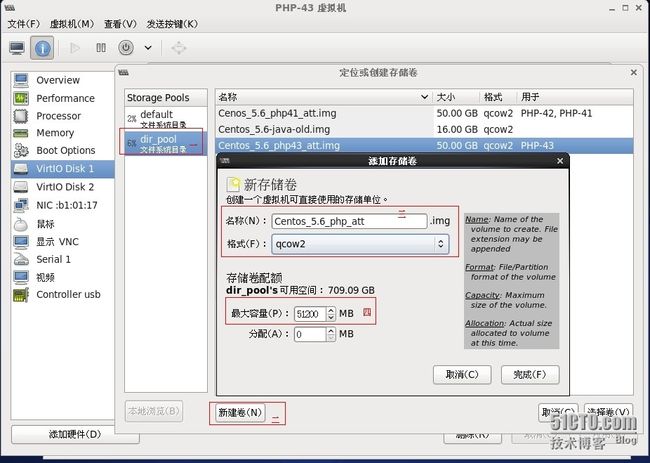
第二步:新建扩盘的存储卷并设置大小
然后点击完成,重启机器(reboot)
第三步:重启机器后,用fdisk -l命令查看到添加的硬盘信息
[root@localhost ~]# fdisk -l
Disk /dev/vda: 17.1 GB, 17179869184 bytes 服务器本身的硬盘信息,名称叫做: /dev/vda
255 heads, 63 sectors/track, 2088 cylinders
Units = cylinders of 16065 * 512 = 8225280 bytes
Device Boot Start End Blocks Id System 这些是 /dev/vda 分区信息
/dev/vda1 * 1 13 104391 83 Linux
/dev/vda2 14 2088 16667437+ 8e Linux LVM
Disk /dev/vdb: 53.6 GB, 53687091200 bytes 新发现的增加硬盘的设备名称 :/dev/vdb
16 heads, 63 sectors/track, 104025 cylinders
Units = cylinders of 1008 * 512 = 516096 bytes
Disk /dev/vdb doesn't contain a valid partition table 因为没有分区,所以现在暂时还不能用
Disk /dev/vdc: 53.6 GB, 53687091200 bytes 新发现的增加硬盘的设备名称: /dev/vdc
16 heads, 63 sectors/track, 104025 cylinders
Units = cylinders of 1008 * 512 = 516096 bytes
Disk /dev/vdc doesn't contain a valid partition table
[root@localhost ~]#
(单纯的简单扩容操作记录)
第四步:要是只想实现简单的扩容,只需对它分区,格式化,重启,然后挂载即可
[root@localhost ~]# fdisk /dev/vdb
Device contains neither a valid DOS partition table, nor Sun, SGI or OSF disklabel
Building a new DOS disklabel. Changes will remain in memory only,
until you decide to write them. After that, of course, the previous
content won't be recoverable.
The number of cylinders for this disk is set to 104025.
There is nothing wrong with that, but this is larger than 1024,
and could in certain setups cause problems with:
1) software that runs at boot time (e.g., old versions of LILO)
2) booting and partitioning software from other OSs
(e.g., DOS FDISK, OS/2 FDISK)
Warning: invalid flag 0x0000 of partition table 4 will be corrected by w(rite)
Command (m for help): m //显示菜单
Command action
a toggle a bootable flag
b edit bsd disklabel
c toggle the dos compatibility flag
d delete a partition
l list known partition types
m print this menu
n add a new partition
o create a new empty DOS partition table
p print the partition table
q quit without saving changes
s create a new empty Sun disklabel
t change a partition's system id
u change display/entry units
v verify the partition table
w write table to disk and exit
x extra functionality (experts only)
Command (m for help): n //增加一个新的分区
Command action
e extended
p primary partition (1-4)
p //创建一个主分区
Partition number (1-4): 1
First cylinder (1-104025, default 1): //这里直接按Enter键
Using default value 1
Last cylinder or +size or +sizeM or +sizeK (1-104025, default 104025): //这里直接按Enter键
Using default value 104025
Command (m for help): w //将分区信息写到磁盘里
The partition table has been altered!
Calling ioctl() to re-read partition table.
WARNING: Re-reading the partition table failed with error 16: 设备或资源忙.
The kernel still uses the old table.
The new table will be used at the next reboot.
Syncing disks.
第五步:将分区信息写到磁盘后,再执行下fdisk -l我们会发现下面多了个 /dev/vdb1 已经可以用来存储了()接下来我们只需执行下 mkfs.ext3 /dev/vdb 格式化下磁盘 然后在 mount /dev/vdb1 /mnt (将新增加的/vdb1磁盘挂载到/mnt下)
一、
[root@localhost ~]# fdisk -l
Disk /dev/vda: 17.1 GB, 17179869184 bytes
255 heads, 63 sectors/track, 2088 cylinders
Units = cylinders of 16065 * 512 = 8225280 bytes
Device Boot Start End Blocks Id System
/dev/vda1 * 1 13 104391 83 Linux
/dev/vda2 14 2088 16667437+ 8e Linux LVM
Disk /dev/vdb: 53.6 GB, 53687091200 bytes
16 heads, 63 sectors/track, 104025 cylinders
Units = cylinders of 1008 * 512 = 516096 bytes
Device Boot Start End Blocks Id System
/dev/vdb1 1 104025 52428568+ 83 Linux
Disk /dev/vdc: 53.6 GB, 53687091200 bytes
16 heads, 63 sectors/track, 104025 cylinders
Units = cylinders of 1008 * 512 = 516096 bytes
Disk /dev/vdc doesn't contain a valid partition table
[root@localhost ~]#
二、
[root@localhost ~]# mkfs.ext3 /dev/vdb
mke2fs 1.39 (29-May-2006)
Filesystem label=
OS type: Linux
Block size=4096 (log=2)
Fragment size=4096 (log=2)
6553600 inodes, 13107200 blocks
655360 blocks (5.00%) reserved for the super user
First data block=0
Maximum filesystem blocks=4294967296
400 block groups
32768 blocks per group, 32768 fragments per group
16384 inodes per group
Superblock backups stored on blocks:
32768, 98304, 163840, 229376, 294912, 819200, 884736, 1605632, 2654208,
4096000, 7962624, 11239424
Writing inode tables: done
Creating journal (32768 blocks): done
Writing superblocks and filesystem accounting information: done
This filesystem will be automatically checked every 28 mounts or
180 days, whichever comes first. Use tune2fs -c or -i to override.
[root@localhost ~]#
三、
[root@localhost ~]# df -h
文件系统 容量 已用 可用 已用% 挂载点
/dev/mapper/VolGroup00-LogVol00
12G 2.9G 8.2G 27% /
/dev/vda1 99M 13M 82M 14% /boot
tmpfs 2.0G 0 2.0G 0% /dev/shm
[root@localhost ~]# mount /dev/vdb1 /mnt
[root@localhost ~]# df -h
文件系统 容量 已用 可用 已用% 挂载点
/dev/mapper/VolGroup00-LogVol00
12G 2.9G 8.2G 27% /
/dev/vda1 99M 13M 82M 14% /boot
tmpfs 2.0G 0 2.0G 0% /dev/shm
/dev/vdb1 50G 180M 47G 1% /mnt //这里显示已经挂载成功了。
[root@localhost ~]#
(复杂的扩容操作记录)
http://www.linuxidc.com/Linux/2013-10/91060.htm
一、LVM配置
1、基本步骤:PV -> VG -> LV -> 格式化挂载使用
2、创建LVM卷
pvcreate /dev/sdb1
vgcreate myvg /dev/sdb1 #加-s指定PE块大小,默认是4M
lvcreate -n mylv -L 10G myvg #-L指定逻辑卷的大小
mkfs.ext4 /dev/myvg/mylv
mount /dev/myvg/mylv /data
查看命令:pvdisplay,vgdisplay,lvdisplay
3、扩容卷组
使用fdisk /dev/sdc分区并指定8e类型(Linux LVM)
pvcreate /dev/sdc1
pvextend myvg /dev/sdc1
vgdisplay #查看扩容成功
4、扩容逻辑卷LV
lvextend -L 5G /dev/myvg/mylv #-L增加5G的容量
resize2fs /dev/myvg/mylv #更新扩容的文件系统
lvdisplay #查看扩容成功
第一步:查找新的磁盘
[root@localhost ~]# fdisk -l
Disk /dev/vda: 17.1 GB, 17179869184 bytes
255 heads, 63 sectors/track, 2088 cylinders
Units = cylinders of 16065 * 512 = 8225280 bytes
Device Boot Start End Blocks Id System
/dev/vda1 * 1 13 104391 83 Linux
/dev/vda2 14 2088 16667437+ 8e Linux LVM
Disk /dev/vdb: 53.6 GB, 53687091200 bytes
16 heads, 63 sectors/track, 104025 cylinders
Units = cylinders of 1008 * 512 = 516096 bytes
Device Boot Start End Blocks Id System
/dev/vdb1 1 104025 52428568+ 83 Linux
Disk /dev/vdc: 53.6 GB, 53687091200 bytes
16 heads, 63 sectors/track, 104025 cylinders
Units = cylinders of 1008 * 512 = 516096 bytes
Device Boot Start End Blocks Id System
/dev/vdc1 1 104025 52428568+ 83 Linux
[root@localhost ~]#
第二步:创建物理卷(PV)(并将创建的pv,加到VG组中去)
[root@localhost ~]# pvcreate /dev/vdc1
Physical volume "/dev/vdc1" successfully created
# pvdisplay,查看本机的物理卷信息,已经看到刚才创建的物理卷了。
[root@localhost ~]# pvdisplay
--- Physical volume ---
PV Name /dev/vda2
VG Name VolGroup00
PV Size 15.90 GB / not usable 20.79 MB
Allocatable yes (but full)
PE Size (KByte) 32768
Total PE 508
Free PE 0
Allocated PE 508
PV UUID 42it1K-OZLV-GHTz-4dRM-kD7K-mG5Y-nzoJ27
"/dev/vdc1" is a new physical volume of "50.00 GB"
--- NEW Physical volume ---
PV Name /dev/vdc1
VG Name
PV Size 50.00 GB
Allocatable NO
PE Size (KByte) 0
Total PE 0
Free PE 0
Allocated PE 0
PV UUID 5llwok-4bp2-6H7A-0sqW-UKuh-mY0p-gap2L4
# vgdisplay,查看本机的VG组信息。
[root@localhost ~]# vgdisplay
--- Volume group ---
VG Name VolGroup00
System ID
Format lvm2
Metadata Areas 1
Metadata Sequence No 3
VG Access read/write
VG Status resizable
MAX LV 0
Cur LV 2
Open LV 2
Max PV 0
Cur PV 1
Act PV 1
VG Size 15.88 GB
PE Size 32.00 MB
Total PE 508
Alloc PE / Size 508 / 15.88 GB
Free PE / Size 0 / 0
VG UUID AGaZvE-UHTX-Ycph-PkvZ-T65x-NiFv-kyJbfj
[root@localhost ~]#
# lvdisplay,查看本机的逻辑卷信息
[root@localhost ~]# lvdisplay
--- Logical volume ---
LV Name /dev/VolGroup00/LogVol00
VG Name VolGroup00
LV UUID 63Tufe-HMbJ-uOqd-rIPx-KaIU-tVNT-Vb89oh
LV Write Access read/write
LV Status available
# open 1
LV Size 11.97 GB
Current LE 383
Segments 1
Allocation inherit
Read ahead sectors auto
- currently set to 256
Block device 252:0
--- Logical volume ---
LV Name /dev/VolGroup00/LogVol01
VG Name VolGroup00
LV UUID EzmdoA-AqPl-EIV5-SIsc-NRFe-Irvo-3auKkt
LV Write Access read/write
LV Status available
# open 1
LV Size 3.91 GB
Current LE 125
Segments 1
Allocation inherit
Read ahead sectors auto
- currently set to 256
Block device 252:1
[root@localhost ~]#
[root@localhost ~]# vgextend VolGroup00 /dev/vdc1 //将新创建的PV(物理卷),增加到VG VolGroup00(组)中
Volume group "VolGroup00" successfully extended
[root@localhost ~]# pvdisplay
--- Physical volume ---
PV Name /dev/vda2
VG Name VolGroup00
PV Size 15.90 GB / not usable 20.79 MB
Allocatable yes (but full)
PE Size (KByte) 32768
Total PE 508
Free PE 0
Allocated PE 508
PV UUID 42it1K-OZLV-GHTz-4dRM-kD7K-mG5Y-nzoJ27
--- Physical volume ---
PV Name /dev/vdc1
VG Name VolGroup00
PV Size 50.00 GB / not usable 31.77 MB
Allocatable yes
PE Size (KByte) 32768
Total PE 1599
Free PE 1599
Allocated PE 0
PV UUID 5llwok-4bp2-6H7A-0sqW-UKuh-mY0p-gap2L4
[root@localhost ~]#
第三步:创建逻辑卷(lv)
[root@localhost ~]# lvcreate -L 50000M -n lvdata VolGroup00 //在VG(VolGroup00)组中创建一个49G的lvdata逻辑卷
Rounding up size to full physical extent 48.84 GB
Logical volume "lvdata" created
[root@localhost ~]#
注意点:
(注意逻辑卷的大小要比实际的小点才可以成功)
[root@localhost ~]# pvscan
PV /dev/vda2 VG VolGroup00 lvm2 [15.88 GB / 0 free]
PV /dev/vdc1 VG VolGroup00 lvm2 [49.97 GB / 49.97 GB free]
Total: 2 [65.84 GB] / in use: 2 [65.84 GB] / in no VG: 0 [0 ]
[root@localhost ~]# lvcreate -L 51500M -n lvdata VolGroup00
Rounding up size to full physical extent 50.31 GB
Insufficient free extents (1599) in volume group VolGroup00: 1610 required (这里出现的错误就是 创建的空间大于 free的空间 )
第四步:格式化为ext3(Centos5.0系列的) ext4(Centos6.0系列)文件系统并挂载
[root@localhost ~]# lvdisplay
--- Logical volume ---
LV Name /dev/VolGroup00/LogVol00
VG Name VolGroup00
LV UUID 63Tufe-HMbJ-uOqd-rIPx-KaIU-tVNT-Vb89oh
LV Write Access read/write
LV Status available
# open 1
LV Size 11.97 GB
Current LE 383
Segments 1
Allocation inherit
Read ahead sectors auto
- currently set to 256
Block device 252:0
--- Logical volume ---
LV Name /dev/VolGroup00/LogVol01
VG Name VolGroup00
LV UUID EzmdoA-AqPl-EIV5-SIsc-NRFe-Irvo-3auKkt
LV Write Access read/write
LV Status available
# open 1
LV Size 3.91 GB
Current LE 125
Segments 1
Allocation inherit
Read ahead sectors auto
- currently set to 256
Block device 252:1
--- Logical volume ---
LV Name /dev/VolGroup00/lvdata
VG Name VolGroup00
LV UUID al1K36-d9cD-27Hh-tViB-QhYG-QzAm-dFMIKu
LV Write Access read/write
LV Status available
# open 0
LV Size 48.84 GB
Current LE 1563
Segments 1
Allocation inherit
Read ahead sectors auto
- currently set to 256
Block device 252:2
[root@localhost ~]#
[root@localhost ~]# mkfs.ext3 /dev/VolGroup00/lvdata //将磁盘格式化为ext3的文件系统
mke2fs 1.39 (29-May-2006)
Filesystem label=
OS type: Linux
Block size=4096 (log=2)
Fragment size=4096 (log=2)
6406144 inodes, 12804096 blocks
640204 blocks (5.00%) reserved for the super user
First data block=0
Maximum filesystem blocks=4294967296
391 block groups
32768 blocks per group, 32768 fragments per group
16384 inodes per group
Superblock backups stored on blocks:
32768, 98304, 163840, 229376, 294912, 819200, 884736, 1605632, 2654208,
4096000, 7962624, 11239424
Writing inode tables: done
Creating journal (32768 blocks): done
Writing superblocks and filesystem accounting information: done
This filesystem will be automatically checked every 32 mounts or
180 days, whichever comes first. Use tune2fs -c or -i to override. //格式化ext3文件系统成功
[root@localhost ~]#
第五步:接下来就是挂载系统(mount /dev/VolGroup00/lvdata /test)
[root@localhost ~]# mount /dev/VolGroup00/lvdata /test 注意这个设备的名称是 /dev/VolGroup00/lvdata ,而不是 mount /dev/vdc1 /test
[root@localhost ~]# df -h
文件系统 容量 已用 可用 已用% 挂载点 上面的简单的挂载是mount /dev/vdb1 /mnt 那是因为没有对磁盘它进行改名分组。
/dev/mapper/VolGroup00-LogVol00
12G 2.9G 8.2G 27% /
/dev/vda1 99M 13M 82M 14% /boot
tmpfs 2.0G 0 2.0G 0% /dev/shm
/dev/mapper/VolGroup00-lvdata
49G 180M 46G 1% /test //成功挂载
[root@localhost ~]#
这样就已经大功告成了!!!!
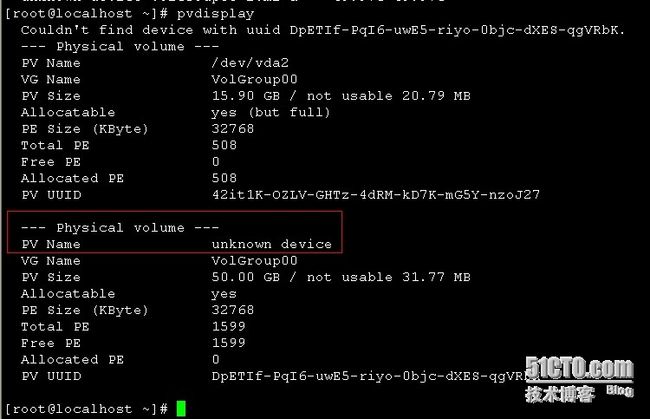
当扩容时出现这样的错误 unknown device时 ,可以执行这步操作
[root@localhost ~]# vgreduce --removemissing VolGroup00
Volume group "VolGroup00" is already consistent
[root@localhost ~]# 命令说明:
命令说明:
pvcreate (创建物理卷)
pvdisplay (显示物理卷信息)
pvscan (扫描物理卷)
pvremove (删除物理卷)
vgcreate (创建卷组)
vgdisplay (显示卷组信息)
vgscan (扫描卷组)
vgextend (扩展卷组)
vgextend vg1 /dev/sdb7 (把物理卷/dev/sdb7 加到vg1卷组中)
vgreduce (删除卷组中的物理卷)
vgreduce vg1 /dev/sdb7 (把物理卷/dev/sdb7 从卷组vg1中删除)
vgremove (删除卷组)
vgremove vg1 (删除卷组vg1)
lvcreate (创建逻辑卷)
lvdisplay (显示逻辑卷信息)
lvscan (扫描逻辑卷)
lvextend (扩展逻辑卷)
lvextend -l +5G /dev/vg1/lvm1 (扩展逻辑卷/dev/vg1/lvm1 5个G)
lvreduce (减少LV大小)
lvreduce -L-50M /dev/vg1/lvm1,调整lvm1分区大小,减小50M
lvremove (删除逻辑卷)
