一、前提:
公司安全扫描扫出ssh漏洞,需升级openssh到7版本及以上。有1000+服务器,Redhat6.2/6.4/6.5 centos6.4/6.5/7.1/7.4。可以说是很复杂。无奈写出100+行脚本批量执行。
二、脚本内容。
#!/bin/bash
############## yum源必须配置好 ###############
yum install -y gcc openssl-devel pam-devel rpm-build
if [ $? -ne 0 ]; then
echo "Please check your software source!"
exit
fi
#必须root用户
if [  "whoami" != "root"];then
        echo "Installtion this package needs root user."
        exit 1
        fi

#---------------              关闭selinux               --------------
setenforce 0
#file exist problem
if [ ! -f /tmp/zlib-1.2.11.tar.gz  ];then
    echo "The sources of zlib-1.2.11.tar.gz is not exist."
        exit
        fi

cd /tmp; tar xzf /tmp/zlib-1.2.11.tar.gz

#测试是否解压成功

if [ ! -d /tmp/zlib-1.2.11 ];then
    echo "zlib-1.2.11.tar.gz is not uncompressed."
        exit
fi

#编译安装zlib

cd /tmp/zlib-1.2.11
/tmp/zlib-1.2.11/configure --prefix=/usr/local/zlib
make && make install
#编译安装openssl
#file exist problem
if [ ! -f /tmp/openssl-1.0.2n.tar.gz  ];then
    echo "The sources of openssl-1.0.2n.tar.gz is not exist."
        exit
fi
cd /tmp; tar xzf /tmp/openssl-1.0.2n.tar.gz

#test tar right or not

if [ ! -d /tmp/openssl-1.0.2n ];then
    echo "openssl-1.0.2n.tar.gz is not uncompressed."
        exit
fi
cd /tmp/openssl-1.0.2n
./config --prefix=/usr/local/openssl --shared
make
make test
if [ $? -ne 0 ]; then
    echo "fail"
        exit
fi
make install   /tmp/zlib-1.2.11/openssl-1.0.2n/apps

cp -dpr /tmp/openssl-1.0.2n/apps/openssl /usr/bin/openssl
mkdir -p /usr/local/ssl/lib; chmod 755 -R /usr/local/ssl/lib
cp -dpr /tmp/openssl-1.0.2n/libssl.so* /usr/local/ssl/lib/
cp -dpr /tmp/openssl-1.0.2n/libcrypto.so* /usr/local/ssl/lib/
chmod 755 -R /usr/local/ssl; chmod 755 -R /usr/local/openssl
echo "/usr/local/ssl/lib" >> /etc/ld.so.conf; ldconfig

sleep 3
#file exist problem
if [ ! -f /tmp/openssh-7.4p1.tar.gz  ];then
    echo "The sources of openssh-7.4p1.tar.gz is not exist."
        exit
fi
cd /tmp; tar xzf /tmp/openssh-7.4p1.tar.gz

#test tar right or not

if [ ! -d /tmp/openssh-7.4p1 ];then
    echo "openssh-7.4p1.tar.gz is not uncompressed."
        exit
fi
cd /tmp/openssh-7.4p1
./configure --prefix=/usr --sysconfdir=/etc/ssh --with-pam --with-zlib=/usr/local/zlib --with-ssl-dir=/usr/local/openssl --with-md5-passwords --without-hardening

make && make install

if [ $? -ne 0 ]; then
    echo "fail"
        exit
fi

cp -r /tmp/openssh-7.4p1/contrib/redhat/sshd.init /etc/init.d/sshd
chmod u+x /etc/init.d/sshd
chkconfig --add sshd
chkconfig sshd on

sed -i '/^GSSAPICleanupCredentials/s/GSSAPICleanupCredentials yes/#GSSAPICleanupCredentials yes/' /etc/ssh/sshd_config
sed -i '/^GSSAPIAuthentication/s/GSSAPIAuthentication yes/#GSSAPIAuthentication yes/' /etc/ssh/sshd_config
sed -i '/^GSSAPIAuthentication/s/GSSAPIAuthentication no/#GSSAPIAuthentication no/' /etc/ssh/sshd_config

service sshd restart

SSHD_version="OpenSSH_7.4p1, OpenSSL 1.0.1e-fips 11 Feb 2013"
LAST_version=`ssh -V`

if [ "$SSHD_version" -ne "$LAST_version"]; then
    echo "Upgrade faild"
else
    echo "Upgrade success"
fi
#centos7及上需执行下yum remove openssh -y systemd会与service冲突导致sshd启不来
一键升级,完全没有问题。
三、排坑指南:
1、
需注意的是centos7和centos6还是有区别的。centos7需要yum remore openssh -y。
启动过程中如果发现/usr/bin或者是/usr/sbin 没有相关的命令,可以去/tmp/openssh-7.4p1/下找到相关的命令cp到对应的目录下。
2、
sshd启动报错:
Unsupported option GSSAPIAuthentication
Unsupported option GSSAPICleanupCredentials
解决方法:
注销sshd的配置文件(sshd_config)的如下配置:
#GSSAPIAuthentication yes
#GSSAPICleanupCredentials yes
#UsePAM yes
然后重启服务:service sshd restart
3、centos7 报错
Dec 21 15:48:32 sshd[21833]: Permissions 0640 for '/etc/ssh/ssh_host_ed25519_key' are too open.
Dec 21 15:48:32 sshd[21833]: It is required that your private key files are NOT accessible by others.
Dec 21 15:48:32 sshd[21833]: This private key will be ignored.
Dec 21 15:48:32 sshd[21833]: key_load_private: bad permissions
Dec 21 15:48:32 sshd[21833]: Could not load host key: /etc/ssh/ssh_host_ed25519_key
Dec 21 15:48:32 sshd[21833]: sshd: no hostkeys available -- exiting.
Dec 21 15:48:32 systemd[1]: Failed to start OpenSSH server daemon.
Dec 21 15:48:32 systemd[1]: Unit sshd.service entered failed state.
Dec 21 15:48:32 systemd[1]: sshd.service failed.
解决:
cd /etc/ssh/
chmod 600 ./*
4、gitlab服务宕
我在升级centos7.4的时候因为remove了openssh。导致openssh-server也被卸载掉。
知识点:gitlab依靠openssh-server,一旦卸载gitlab相应的服务也会被卸载掉。
解决:别慌三条条命令恢复。
yum install openssh-server -y
rpm -ivh gitlab-ce-9.0.1-ce.0.el7.x86_64.rpm
sudo gitlab-ctl start
安装了openssh-server之后openssh的版本不受影响还是升级后的版本号。
5、
这里就是报错找不到什么就去/tmp/openssh-7.4p1拷贝什么,然后修改即可。
6、xshell或CRT不能登录
解决:清下之前的缓存,远程工具保存的秘钥已经不能用了。之前保存的连接文件不能用了。最好是
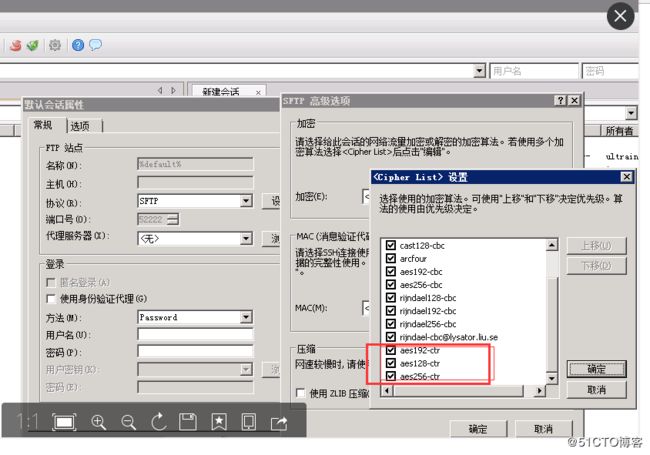
7、xftp报错找不到算法,不能连接
1)对于xshell,点击:属性—类别—安全性—加密—编辑,将那些与aes相关的加密算法选上,就能基本上解决这个问题了。如果找不到这几个选项,说明你要升级Xshell了。
2)对于Xftp,点击:菜单文件—属性—设置—>编辑加密算法,将aes相关的选项勾上。不行同样也需要升级。