实验环境:我系统的系统是CentOS6.5的系统,ip为192.168.137.191。安装的所有软件都是官网下载的RPM包,软件分别是Elasticsearch,Logstash,Kibana还有JDK(JRE)。因为Logstash是依赖JDK的所以这个必须安装,在这里安装JRE就可以了,但是我有下载好的JDK包就直接使用了。在实验开始之前依然是要调整服务器时间的。
在此次实验里面我将所有的RPM包都放在了/opt/路径下了,而且在安装的时候并没有指定安装路径。
#rpm -ivh jdk-8u102-linux-x64.rpm
Preparing...                ########################################### [100%]
   1:jdk1.8.0_102           ########################################### [100%]
Unpacking JAR files...
tools.jar...
plugin.jar...
javaws.jar...
deploy.jar...
rt.jar...
jsse.jar...
charsets.jar...
localedata.jar...
#rpm -ivh elasticsearch-2.3.4.rpm
warning: elasticsearch-2.3.4.rpm: Header V4 RSA/SHA1 Signature, key ID d88e42b4: NOKEY
Preparing...                ########################################### [100%]
Creating elasticsearch group... OK
Creating elasticsearch user... OK
   1:elasticsearch          ########################################### [100%]
### NOT starting on installation, please execute the following statements to configure elasticsearch service to start automatically using chkconfig
 sudo chkconfig --add elasticsearch
### You can start elasticsearch service by executing
 sudo service elasticsearch start
#cd /usr/share/elasticsearch/
#./bin/plugin install mobz/elasticsearch-head
安装head插件,这是负责集群管理的插件
-> Installing mobz/elasticsearch-head...
Trying https://github.com/mobz/elasticsearch-head/archive/master.zip ...
Downloading ............................................................................DONE
Verifying https://github.com/mobz/elasticsearch-head/archive/master.zip checksums if available ...
NOTE: Unable to verify checksum for downloaded plugin (unable to find .sha1 or .md5 file to verify)
Installed head into /usr/share/elasticsearch/plugins/head
#./bin/plugin install lmenezes/elasticsearch-kopf
安装kopf插件,在elasticsearch搜索查询日志的插件
-> Installing lmenezes/elasticsearch-kopf...
Trying https://github.com/lmenezes/elasticsearch-kopf/archive/master.zip ...
Downloading ..................................................................................DONE
Verifying https://github.com/lmenezes/elasticsearch-kopf/archive/master.zip checksums if available ...
NOTE: Unable to verify checksum for downloaded plugin (unable to find .sha1 or .md5 file to verify)
Installed kopf into /usr/share/elasticsearch/plugins/kopf
#mkdir /es/data -p
#mkdir /es/logs -p
#cp /etc/elasticsearch/elasticsearch.yml /etc/elasticsearch/elasticsearch.yml.bak
将原有的配置文件备份
#vim /etc/elasticsearch/elasticsearch.yml
因为配置文件内都是注释掉的内容直接在最下面添加如下内容
cluster.name: es
node.name: node-0
path.data: /es/data
path.logs: /es/logs
network.host: 192.168.137.191
network.port: 9200
#chkconfig --add elasticsearch
#chkconfig elasticsearch on
因为是rpm包安装的所以启动脚本都有的在/etc/init.d/目录下
#chown -R elasticsearch.elasticsearch elasticsearch/
#chown -R elasticsearch.elasticsearch /etc/elasticsearch/
#chown -R elasticsearch.elasticsearch /es
将安装文件,配置文件归属给elasticsearch用户,因为服务启动都是依赖于elasticsearch用户的
#service elasticsearch start
启动elasticsearch服务
#netstat -luntp
看到下面开始监听来了9200和9300的端口就表示成功了
Active Internet connections (only servers)
Proto Recv-Q Send-Q Local Address               Foreign Address             State       PID/Program name
tcp        0      0 0.0.0.0:22                  0.0.0.0:*                   LISTEN      982/sshd
tcp        0      0 127.0.0.1:25                0.0.0.0:*                   LISTEN      1058/master
tcp        0      0 ::ffff:192.168.137.191:9200 :::*                        LISTEN      1920/java
tcp        0      0 ::ffff:192.168.137.191:9300 :::*                        LISTEN      1920/java
tcp        0      0 :::22                       :::*                        LISTEN      982/sshd
tcp        0      0 ::1:25                      :::*                        LISTEN      1058/master
在浏览器地址栏输入http://192.168.137.191:9200/ 就会出现如下信息
{
  "name" : "node-0",
  "cluster_name" : "es",
  "version" : {
    "number" : "2.3.4",
    "build_hash" : "e455fd0c13dceca8dbbdbb1665d068ae55dabe3f",
    "build_timestamp" : "2016-06-30T11:24:31Z",
    "build_snapshot" : false,
    "lucene_version" : "5.5.0"
  },
  "tagline" : "You Know, for Search"
}
以上elasticsearch就安装好了,下面开始安装kibana。
#rpm -ivh kibana-4.5.3-1.x86_64.rpm
安装kibana安装包
#chkconfig --add kibana
#chkconfig kibana on
RPM包就是这点好,自动生成启动文件
#service kibana start
启动kibana
#netstat -luntp
发现系统开始监听5601端口了表示kibana正常启动了
Active Internet connections (only servers)
Proto Recv-Q Send-Q Local Address               Foreign Address             State       PID/Program name
tcp        0      0 0.0.0.0:22                  0.0.0.0:*                   LISTEN      982/sshd
tcp        0      0 127.0.0.1:25                0.0.0.0:*                   LISTEN      1058/master
tcp        0      0 0.0.0.0:5601                0.0.0.0:*                   LISTEN      2095/node
tcp        0      0 ::ffff:192.168.137.191:9200 :::*                        LISTEN      1920/java
tcp        0      0 ::ffff:192.168.137.191:9300 :::*                        LISTEN      1920/java
tcp        0      0 :::22                       :::*                        LISTEN      982/sshd
tcp        0      0 ::1:25                      :::*                        LISTEN      1058/master
下面开始安装logstash。
#rpm -ivh logstash-all-plugins-2.3.4-1.noarch.rpm
安装logstash
#vim /etc/logstash/conf.d/logstash-test.conf
创建一个logstash的配置文件,测试一下,文件内输入一下内容
input { stdin { } }
output {
   elasticsearch {hosts => "192.168.137.191" }
   stdout { codec=> rubydebug }
}
#/opt/logstash/bin/logstash --configtest -f /etc/logstash/conf.d/logstash-test.conf
测试配置文件是否正常,出现如下内容表示正常
Configuration OK
#/opt/logstash/bin/logstash -f /etc/logstash/conf.d/logstash-test.conf
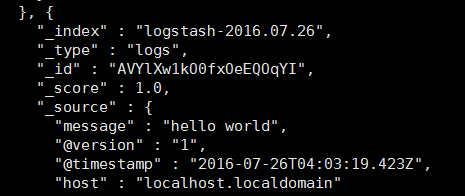
使用-f命令指定配置文件,然后输入hello world后系统会打印出输入的内容,使用ctrl+c终止执行
#curl 'http://192.168.137.191:9200/_search?pretty'
输入以上命令后会打印出所有ES接收到的信息
完成以上操作就证明ELK都已经安装好了,但是ES还是不能接受日志,下面调试一些配置文件让ELK工作起来
#vim /opt/kibana/config/kibana.yml
kibana配置文件内都是被注释的内容直接在最下面添加如下内容即可
server.port: 5601
server.host: "192.168.137.191"
elasticsearch.url: "http://192.168.137.191:9200"
kibana.defaultAppId: "discover"
elasticsearch.requestTimeout: 300000
elasticsearch.shardTimeout: 0
#service kibana restart
重启kibana
#vim /etc/logstash/conf.d/logstash-local.conf
重新创建一个logstash的配置文件,让本机的messages和secure日志信息通过5944(我就试试)端口传到ES里面
input {
  file {
     type => "syslog"
     path => ["/var/log/messages", "/var/log/secure" ]
  }
  syslog {
     type => "syslog"
     port => "5944"
  }
}
output {
  elasticsearch { hosts => "192.168.137.191" }
  stdout { codec => rubydebug }
}
#/opt/logstash/bin/logstash --configtest /etc/logstash/conf.d/logstash-local.conf
测试配置文件的语法格式
#nohup /opt/logstash/bin/logstash -f /etc/logstash/conf.d/logstash-local.conf &
使用后台静默的方式启动logstash
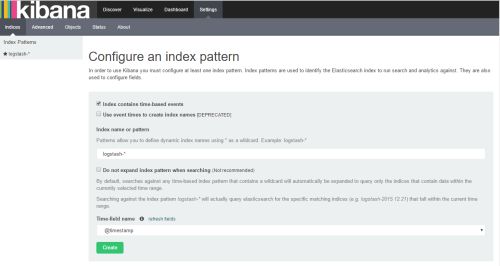
点击绿色的创建按钮
看到以上界面就证明创建索引完成了可以按照如下操作了。
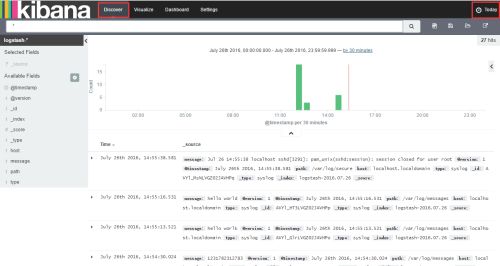
点击Discover按钮后就可以查看日志了,如果提示没有日志的话就点击右上角的按钮修改显示日志的时间
稍后更新ELK收集nginx日志的方法


