1、演示环境:
IP |
操作系统 |
主机名 |
部署服务 |
192.168.1.143 |
CentOS 7.6 x86_64 |
node1 |
keepalived、nginx |
192.168.1.144 |
CentOS 7.6 x86_64 |
node2 |
keepalived、nginx |
192.168.1.145 |
CentOS 7.6 x86_64 |
web1 |
httpd |
192.168.1.146 |
CentOS 7.6 x86_64 |
web2 |
httpd |
2、各节点通过chrony服务同步时间
3、各节点关闭firewalld和SELinux
4、node1和node2实现通过主机名互相通信:
# vim /etc/hosts
192.168.1.143 node1
192.168.1.144 node2
node1 ping node2:# ping -c 3 node2
node2 ping node1:# ping -c 3 node1
5、确保配置keepalived服务的node1和node2用于集群服务的接口支持MULTICAST(多播或组播)通信:
node1:# ip a l | grep MULTICAST
![]()
node2:# ip a l | grep MULTICAST
![]()
备注:如果网卡没有开启多播功能,可通过命令# ip link set multicast on dev ens160开启
6、web1安装部署httpd:
# yum -y install httpd
# vim /var/www/html/index.html --> web1
# systemctl start httpd.service
# ss -tunlp | grep -w :80
# systemctl enable httpd.service
7、web2安装部署httpd:
# yum -y install httpd
# vim /var/www/html/index.html --> web2
# systemctl start httpd.service
# ss -tunlp | grep -w :80
# systemctl enable httpd.service
8、node1访问web1和web2:
# curl http://192.168.1.145
![]()
# curl http://192.168.1.146
![]()
9、web1调整内核参数:
# cd /root
# vim kernel.sh
#!/bin/bash
vip='192.168.1.118'
netmask='255.255.255.255'
iface='lo:0'
case $1 in
start)
echo 1 > /proc/sys/net/ipv4/conf/all/arp_ignore
echo 1 > /proc/sys/net/ipv4/conf/lo/arp_ignore
echo 2 > /proc/sys/net/ipv4/conf/all/arp_announce
echo 2 > /proc/sys/net/ipv4/conf/lo/arp_announce
ifconfig $iface $vip netmask $netmask broadcast $vip up
route add -host $vip dev $iface
;;
stop)
ifconfig $iface down
echo 0 > /proc/sys/net/ipv4/conf/all/arp_ignore
echo 0 > /proc/sys/net/ipv4/conf/lo/arp_ignore
echo 0 > /proc/sys/net/ipv4/conf/all/arp_announce
echo 0 > /proc/sys/net/ipv4/conf/lo/arp_announce
;;
*)
exit 1
;;
esac
# chmod +x kernel.sh
# bash -n kernel.sh
# bash -x kernel.sh start
# ifconfig
# route -n
# scp -p /root/kernel.sh [email protected]:/root
备注:web2同样需要调整内核参数,在web2上执行# ./kernel.sh start
10、node1安装keepalived和ipvsadm:# yum -y install keepalived ipvsadm
备注:
Ø 此处ipvsadm仅用于查看IPVS规则,而非用于生成IPVS规则
Ø node2同样需要安装keepalived和ipvsadm
11、node1配置virtual_server和real_server:
# cd /etc/keepalived
# mv keepalived.conf{,.bak}
# openssl rand -base64 7 --> IDDf1j+yfw==
# vim keepalived.conf
global_defs {
notification_email {
root@localhost
}
notification_email_from node1@localhost
smtp_server 127.0.0.1
smtp_connect_timeout 30
router_id node1
vrrp_mcast_group4 224.1.100.88
}
vrrp_instance VI_1 {
state MASTER
interface ens160
virtual_router_id 50
priority 100
advert_int 1
authentication {
auth_type PASS
auth_pass IDDf1j+yfw==
}
virtual_ipaddress {
192.168.1.118
}
notify_master "/etc/keepalived/notify.sh master"
notify_backup "/etc/keepalived/notify.sh backup"
notify_fault "/etc/keepalived/notify.sh fault"
}
virtual_server 192.168.1.118 80 {
delay_loop 1
lb_algo wrr
lb_kind DR
protocol TCP
sorry_server 127.0.0.1 80
real_server 192.168.1.145 80 {
weight 1
HTTP_GET {
url {
path /index.html
status_code 200
}
connect_timeout 3
nb_get_retry 3
delay_before_retry 2
}
}
real_server 192.168.1.146 80 {
weight 1
TCP_CHECK {
connect_timeout 3
retry 3
delay_before_retry 2
}
}
}
备注:常用指令说明
Ø delay_loop:服务轮询的时间间隔,单位秒
Ø lb_algo:定义的调度算法
Ø lb_kind:定义的集群类型
Ø protocol TCP:仅支持TCP协议
Ø sorry_server:备用服务器地址和端口
Ø HTTP_GET:定义当前主机的健康状态检测方法为应用层检测
Ø path:定义要监控的URL
Ø status_code:判断上述检测方法为健康状态的响应码
Ø connect_timeout:连接请求的超时时长
Ø nb_get_retry:重试次数
Ø delay_before_retry:每次重试的时间间隔,单位秒
Ø TCP_CHECK:定义当前主机的健康状态检测方法为传输层检测
Ø connect_ip:向当前real_server的哪个IP地址发起健康状态检测请求
Ø connect_port:向当前real_server的哪个端口发起健康状态检测请求
Ø bindto:发出健康状态检测请求时使用的源地址
Ø bind_port:发出健康状态检测请求时使用的源端口
12、node2配置virtual_server和real_server:
# cd /etc/keepalived
# mv keepalived.conf{,.bak}
# vim keepalived.conf
global_defs {
notification_email {
root@localhost
}
notification_email_from node2@localhost
smtp_server 127.0.0.1
smtp_connect_timeout 30
router_id node2
vrrp_mcast_group4 224.1.100.88
}
vrrp_instance VI_1 {
state BACKUP
interface ens160
virtual_router_id 50
priority 98
advert_int 1
authentication {
auth_type PASS
auth_pass IDDf1j+yfw==
}
virtual_ipaddress {
192.168.1.118
}
notify_master "/etc/keepalived/notify.sh master"
notify_backup "/etc/keepalived/notify.sh backup"
notify_fault "/etc/keepalived/notify.sh fault"
}
virtual_server 192.168.1.118 80 {
delay_loop 1
lb_algo wrr
lb_kind DR
protocol TCP
sorry_server 127.0.0.1 80
real_server 192.168.1.145 80 {
weight 1
HTTP_GET {
url {
path /index.html
status_code 200
}
connect_timeout 3
nb_get_retry 3
delay_before_retry 2
}
}
real_server 192.168.1.146 80 {
weight 1
TCP_CHECK {
connect_timeout 3
retry 3
delay_before_retry 2
}
}
}
13、node1配置sorry_server:
# yum -y install nginx
# cd /usr/share/nginx/html
# mv index.html index.html.bak
# vim index.html --> sorry_server-node1
# systemctl start nginx.service
# ss -tunlp | grep -w :80
# systemctl enable nginx.service
14、node2配置sorry_server:
# yum -y install nginx
# cd /usr/share/nginx/html
# mv index.html index.html.bak
# vim index.html --> sorry_server-node2
# systemctl start nginx.service
# ss -tunlp | grep -w :80
# systemctl enable nginx.service
15、node1定义邮件通知脚本:
# cd /etc/keepalived
# vim notify.sh
#!/bin/bash
contact='root@localhost'
notify() {
local mailsubject="$(hostname) to be $1, vip floating"
local mailbody="$(date +'%F %T'): vrrp transition, $(hostname) changed to be $1"
echo "$mailbody" | mail -s "$mailsubject" $contact
}
case $1 in
master)
notify master
;;
backup)
notify backup
;;
fault)
notify fault
;;
*)
echo "Usage: $(basename $0) {master|backup|fault}"
exit 1
;;
esac
# chmod +x notify.sh
# bash -n notify.sh
# scp -p notify.sh [email protected]:/etc/keepalived
16、启动优先级较低的node2上的keepalived服务,并查看VIP信息和IPVS规则:
# systemctl start keepalived.service
# systemctl enable keepalived.service
# ip a l
备注:由于node1没有启动,所以在默认的抢占模式下,node2启动后由BACKUP变成MASTER。
# ipvsadm -ln
17、用其它主机访问VIP:# for i in {1..6}; do curl http://192.168.1.118; done
18、启动优先级较高的node1上的keepalived服务,并查看VIP信息和IPVS规则:
# systemctl start keepalived.service
# systemctl enable keepalived.service
# ip a l
# ipvsadm -ln
备注:node1和node2都具有IPVS规则(除非停止keepalived服务),且具有VIP的MASTER提供服务。
19、用其它主机访问VIP:# for i in {1..6}; do curl http://192.168.1.118; done
20、停止web1上的httpd服务:# systemctl stop httpd.service
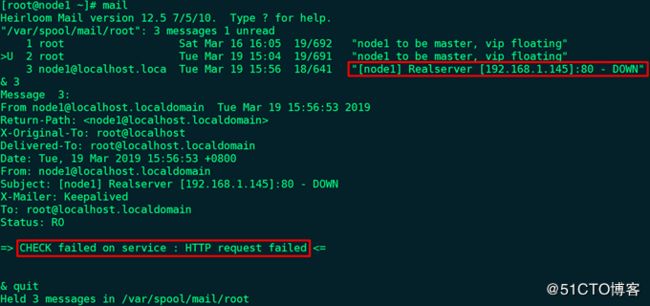
21、node1查看IPVS规则及邮件信息:
# ipvsadm -ln
22、用其它主机访问VIP:# for i in {1..6}; do curl http://192.168.1.118; done
23、停止web2上的httpd服务:# systemctl stop httpd.service
24、node1查看IPVS规则及邮件信息:
# ipvsadm -ln
备注:后端的real_server(web1和web2)服务都宕了,sorry_server才会提供服务。
25、用其它主机访问VIP:# for i in {1..6}; do curl http://192.168.1.118; done
26、启动web1上的httpd服务:# systemctl start httpd.service
27、node1查看IPVS规则及邮件信息:
# ipvsadm -ln
28、用其它主机访问VIP:# for i in {1..6}; do curl http://192.168.1.118; done
29、启动web2上的httpd服务:# systemctl start httpd.service
30、node1查看IPVS规则及邮件信息:
# ipvsadm -ln
31、用其它主机访问VIP:# for i in {1..6}; do curl http://192.168.1.118; done


