抽空把以前的笔记整理了一下
一. 提交审核注意点
(1)注意版本号,和 build
(2)工程是否有断点
(3)工程里的请求网络的环境是否是正式环境
(4)APPStore上的描述说明,填好
(5)APPStore上的介绍图,每个尺寸都要换
(6)选择手动还是自动发布版本
(7)隐私权限问题:在plist文件中修改(iOS11系统还要加个相册权限)
      访问通讯录
      访问相册
      访问相机
二. APP被拒后,语言组织
三. CocoaPods安装以及使用
1.安装CocoaPods
(1)查看电脑上所有的镜像源
sudo gem sources -l
(2)移除系统自带的 rubygem.org/ 源
sudo gem sources --remove http://rubygem.org/
(3)替换添加 china 源,之前是 淘宝源,但是现在淘宝源已经不能用了
sudo gem sources -a https://gems.ruby-china.org/
(4)安装cocoapods
sudo gem install cocoapods
2.使用CocoaPods
(1)利用终端命令切到工程目录下,即输入cd ,接着把路径拖到里面
cd /Users/MyFlower/Documents/Demos
(2)在终端里新建一个Podfile, touch Podfile 创建一个Podfile文件
touch Podfile
(3)这时可以去检查下有没有这个文件
ls
(4)进入编辑这个文件
vi Podfile
(5)编辑内容
platform:ios,’8.0’
target “QingHai” do
pod 'AFNetworking', '~>2.6.3'
pod 'JSONModel','~>1.1.2'
pod 'SDWebImage','~>3.7.3'
pod 'MJRefresh','~>3.0.8'
pod 'UMengSocial','~>4.3’
end
(6)编辑这完后,点击 esc键退出,同时保存 :wq
(7)退出后,可以浏览下
cat Podfile
(8)安装三方库(时间比较漫长,耐心等待)
pod install --verbose --no-repo-update
如果不知道安装的库的版本的话,可以采用
pod search AFNetworking命令去搜索,会显示最高版本
安装完之后,要在工程里
build Settings里面搜索header search paths下,输入${PODS_ROOT}, 把后面的改一下,才有提示
3.若CocoaPods版本太低,更新CocoaPods,分别执行以下命令
sudo gem update --system
sudo gem install -n /usr/local/bin ocoapods --pre
pod version
pod setup
若出现下面问题,先去检查一遍Podfile文件里是否有不合适的地方,如引号是否用了中文的,工程名字是否对
四. 显示隐藏的文件/不显示隐藏的文件
在终端,输入以下命令
显示隐藏的文件:defaults write com.apple.finder AppleShowAllFiles Yes && killall Finder
不显示隐藏文件:defaults write com.apple.finder AppleShowAllFiles No && killall Finder
五. OC与H5互调
- OC 调用H5
NSString *jsonStr = @"titleStr";
[self.webView stringByEvaluatingJavaScriptFromString: [NSString stringWithFormat: @"uploadFileSuccess('%@');", jsonStr]];
(uploadFileSuccess为h5的函数名字,jsonStr 为传过去的参数)
- H5调用OC
在一个类里调用,先引入头文件
import
添加属性
@property (strong, nonatomic) JSContext *jsContext;
实例化
self.jsContext = [webView valueForKeyPath:@"documentView.webView.mainFrame.javaScriptContext"];
没有参数的调用方法
self.jsContext[@"change4GCardScanCode"] = ^(){}
有参数的调用方法
self.jsContext[@"showSharePopup"] = ^(NSString *url,NSString *title,NSString *content) {NSLog(@“%@-%@-%@",url,title,content);
}
六. 多线程
dispatch_queue_t myQueue = dispatch_queue_create(DISPATCH_QUEUE_PRIORITY_DEFAULT, 0);

dispatch_sync(myQueue, ^{

});

dispatch_async(dispatch_get_global_queue(DISPATCH_QUEUE_PRIORITY_DEFAULT, 0), ^{

});
七. 产生随机颜色
[UIColor colorWithRed:arc4random()%255/255.0 green:arc4random()%255/255.0 blue:arc4random()%255/255.0 alpha:1]
define RGBCOLOR(r,g,b) [UIColor colorWithRed:r/255.0 green:g/255.0 blue:b/255.0 alpha:1]
define RGBACOLOR(r,g,b,a) [UIColor colorWithRed:r/255.0 green:g/255.0 blue:b/255.0 alpha:a]
16进制颜色
define UIColorFromRGB(rgbValue) [UIColor colorWithRed:((float)((rgbValue & 0xFF0000) >> 16))/255.0 green:((float)((rgbValue & 0xFF00) >> 8))/255.0 blue:((float)(rgbValue & 0xFF))/255.0 alpha:1.0]
八. 手动添加xib
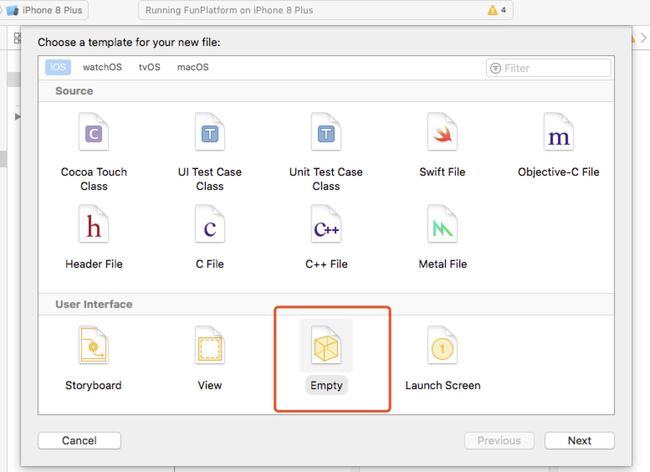
(1)新建Empty文件
注意:取的名字最好跟控制器的名字一致。
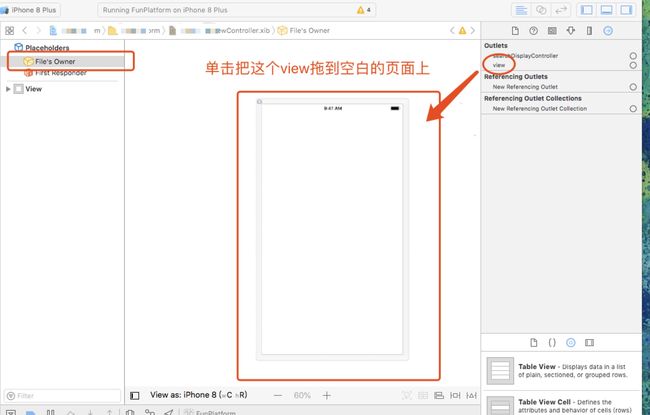
(2)跟控制器连接
(3) 同时也要连 View
九. 加载图片,释放内存的方法
//用下面的方法获取图片,会释放内存
    UIImage * image=[UIImage imageWithContentsOfFile:[[NSBundle mainBundle]pathForResource:@"1001" ofType:@"jpg"]];
十. 获取手机相关信息
//手机序列号
NSString* identifierNumber = [[UIDevice currentDevice] uniqueIdentifier];
NSLog(@"手机序列号: %@",identifierNumber);
//手机别名: 用户定义的名称
NSString* userPhoneName = [[UIDevice currentDevice] name];
NSLog(@"手机别名: %@", userPhoneName);
//设备名称
NSString* deviceName = [[UIDevice currentDevice] systemName];
NSLog(@"设备名称: %@",deviceName );
//手机系统版本
NSString* phoneVersion = [[UIDevice currentDevice] systemVersion];
NSLog(@"手机系统版本: %@", phoneVersion);
//手机型号
NSString* phoneModel = [[UIDevice currentDevice] model];
NSLog(@"手机型号: %@",phoneModel );
//地方型号  (国际化区域名称)
NSString* localPhoneModel = [[UIDevice currentDevice] localizedModel];
NSLog(@"国际化区域名称: %@",localPhoneModel );
 NSDictionary *infoDictionary = [[NSBundle mainBundle] infoDictionary];
 // 当前应用名称
 NSString *appCurName = [infoDictionary objectForKey:@"CFBundleDisplayName"];
NSLog(@"当前应用名称:%@",appCurName);
// 当前应用软件版本  比如:1.0.1
NSString *appCurVersion = [infoDictionary objectForKey:@"CFBundleShortVersionString"];
NSLog(@"当前应用软件版本:%@",appCurVersion);
// 当前应用版本号码   int类型
NSString *appCurVersionNum = [infoDictionary objectForKey:@"CFBundleVersion"];
NSLog(@"当前应用版本号码:%@",appCurVersionNum);
2012-10-19 14:07:47.622 myDemo[5779:707] 手机序列号: 6685c75e34104be0b04c6ceb72985dc381f0f746
2012-10-19 14:07:47.624 myDemo[5779:707] 手机别名: “spring sky”的 iPod
2012-10-19 14:07:47.627 myDemo[5779:707] 设备名称: iPhone OS
2012-10-19 14:07:47.629 myDemo[5779:707] 手机系统版本: 5.1.1
2012-10-19 14:07:47.641 myDemo[5779:707] 手机型号: iPod touch
2012-10-19 14:07:47.642 myDemo[5779:707] 国际化区域名称: iPod touch
2012-10-19 14:07:47.643 myDemo[5779:707] 当前应用名称:myDemo
2012-10-19 14:07:47.645 myDemo[5779:707] 当前应用软件版本:1.0.1
十一. 循环创建按钮
  for (int i = 0; i < pics.count; i++) {

       CGFloat x = 15*autoSizeScaleX;
       CGFloat y = 15*autoSizeScaleX;
       CGFloat spaceWidth = 15*autoSizeScaleX;
       CGFloat spaceHeight = 15*autoSizeScaleX;
       CGFloat width = (SCREEN_WIDTH-2*x-2*spaceWidth)/3;

        //按钮
       UIButton *btn = [UIButton buttonWithType:UIButtonTypeCustom];
       btn.tag = i;
       btn.frame = CGRectMake(x+i%3*(spaceWidth+width), y+i/3*(spaceHeight+width), width, width);
}
十二. set,get方法
在扩展里面定义属性,要重写他的set,get方法,set,get方法如下;

先引入头文件
#import

定义一个静态变量
static NSString *titleKey = @"titleKey";
//标题
- (void)setBtnTitle:(NSString *)btnTitle
{
    objc_setAssociatedObject(self, &titleKey, btnTitle, OBJC_ASSOCIATION_COPY_NONATOMIC);
}

- (NSString *)btnTitle
{
    return objc_getAssociatedObject(self, &titleKey);
}
十三. 拨打电话
// 拨打电话,iOS8以后用这个方法
NSString *string = [NSString stringWithFormat:@"tel:%@", telPhone];// 要打的电话号码
[[UIApplication sharedApplication] openURL:[NSURL URLWithString:string]];
十四. 父视图透明, 子视图不透明
在父视图上设置,
 layerView.backgroundColor = [[UIColor blackColor] colorWithAlphaComponent:0.5];
十五. NSData转NSString为空的处理方法
NSString *string = [data1 base64EncodedStringWithOptions:0];
十六. UITableView顶留白问题
 第一种处理方法
- (CGFloat)tableView:(UITableView *)tableView heightForHeaderInSection:(NSInteger)section {
    return 0.01;
}

- (CGFloat)tableView:(UITableView *)tableView heightForFooterInSection:(NSInteger)section {
    return 0.01;
}
若第一种方法不管用
 第二种处理方法,前提是第一种方法也要加上
 UIView *headerView = [[UIView alloc] initWithFrame:CGRectMake(0, 0, SCREEN_WIDTH, 0.01)];
 tableView.tableHeaderView = headerView;

UIView *footView = [[UIView alloc] initWithFrame:CGRectMake(0, 0, SCREEN_WIDTH, 0.01)];
tableView.tableFooterView = footView;
若以上2种方法不管用
该方法禁止系统自动调整  contentInset 的值, 在controller里面调用
self.automaticallyAdjustsScrollViewInsets = NO;


