1.前言
故事要从远古时代的Java说起。
首先随便写一个简单的Java程序,编译后运行,程序“嗖”的一下执行完毕,接着就退出运行。这时候,如果我们在代码中添加一个无限循环的函数,再次编译运行,会发生什么事呢?程序会一直执行着直到天荒地老,那颗象征着程序运行的红灯将永远亮着。
现在回到Android程序中,随便写一个简单的程序,编译后运行,哇,那颗象征着程序运行的红灯一直在亮啊。
众所周知,ActivityThread的main()方法是应用程序的入口函数。所以在这个方法里一定存在着一个死循环:
 public static void main(String[] args) {
        ...

        Looper.prepareMainLooper();

        ActivityThread thread = new ActivityThread();
        thread.attach(false);

        ...
        Looper.loop();

        ...
    }
从名字上就可以看出, Looper就是你没跑了!
不过问题又来了,既然是死循环,那为什么我的手机屏幕还能响应点击事件,还能执行各种各样的操作呢?
这就是Looper的神奇之处了,下面听我缓缓道来。
2.Looper与它的朋友们
先总体的介绍下这家人的情况
每一个主线程都绑定了一个Looper循环器,每一个Looper循环器又拥有一个MessageQueue消息队列,Looper做的就是不停的从MessageQueue中拿出Message并交给主线程进行处理。
因此如果需要让主线程执行操作的话,只要向MessageQueue发送Message即可。
发送Message就需要Handler了。Handler分系统与客户端两种,多个Handler可以向同一个MessageQueue发送Message。同时,Handler也负责Message的处理,即Handler会在主线程执行具体的操作。
2.1系统级!H
在ActivityThread中有这样一个饿加载
final H mH = new H();
点进去看看,发现这是继承自Handler的一个类,其本身长得不得了。找到他的handleMessage()方法,里面有一万个对消息类型的判断。
 public void handleMessage(Message msg) {
            if (DEBUG_MESSAGES) Slog.v(TAG, ">>> handling: " + codeToString(msg.what));
            switch (msg.what) {
                case LAUNCH_ACTIVITY: {
                    Trace.traceBegin(Trace.TRACE_TAG_ACTIVITY_MANAGER, "activityStart");
                    final ActivityClientRecord r = (ActivityClientRecord) msg.obj;

                    r.packageInfo = getPackageInfoNoCheck(
                            r.activityInfo.applicationInfo, r.compatInfo);
                    handleLaunchActivity(r, null);
                    Trace.traceEnd(Trace.TRACE_TAG_ACTIVITY_MANAGER);
                } break;

                ...省略剩余9999个...
}
仔细阅读这些类型,发现其大多数与四大组件的生命周期有关。也就是说,系统级Handler H负责了四大组件生命周期的操作,还包括一些进程间通信、应用的退出等等,总之功能强大。
这里有必要提一下应用退出:
  case EXIT_APPLICATION:
                    if (mInitialApplication != null) {
                        mInitialApplication.onTerminate();
                    }
                    Looper.myLooper().quit();
                    break;
其实应用退出的逻辑与代码都很简单,就是粗暴的退出了消息循环。此时循环已结束,程序就运行完了,相应的进程也会被虚拟机回收。所以说,整个应用都说结束就结束了,Activity的onDestory是不能保证一定会被执行的!Service的一些回调也是同样的道理,千万别在这些地方做什么不可描述的操作!
2.2Message
2.2.1 Message的获取
下面介绍Message,先来看看如何获取一个Message:
 public static Message obtain() {
        synchronized (sPoolSync) {
            if (sPool != null) {
                Message m = sPool;
                sPool = m.next;
                m.next = null;
                m.flags = 0; // clear in-use flag
                sPoolSize--;
                return m;
            }
        }
        return new Message();
    }
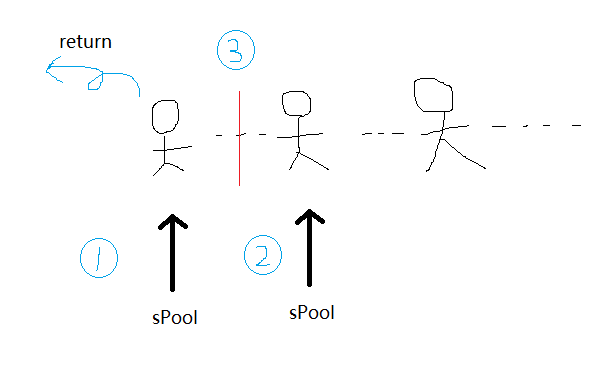
这是一个典型的获取链表对象的操作。开始sPool指向第一个message m, 接着让sPool指向m的next,然后将m.next赋空(为了将m拿出来),最后返回m。还不能理解的话只能看我随手画的图了。
2.2.2 Message的回收
接着看看消息的回收,也是同样的道理,这里就不再多做解释(不想画图)
 void recycleUnchecked() {
        // Mark the message as in use while it remains in the recycled object pool.
        // Clear out all other details.
       ...

        synchronized (sPoolSync) {
            if (sPoolSize < MAX_POOL_SIZE) {
                next = sPool;
                sPool = this;
                sPoolSize++;
            }
        }
    }
看到这个方法,有人也许会好奇,哪来的?我咋从来没用过呢?
当然啦,回收的操作Google工程师已经给安顿好了,当Handler处理完成以后,Message会自动执行回收操作。
在下面的loop()方法中,先来看注释五msg.recycleUnchecked(),message的回收操作就是在这里自动进行的,在loop()的死循环过程中,首先是通过queue.next()获取msg,接着通过dispatchMessage()让相应的handler进行消息的处理,最后调用msg.recycleUnchecked()完成消息的回收。
2.3Looper
Looper中loop()方法的内容非常丰富,且慢慢学习。
 public static void loop() {
//注释一
        final Looper me = myLooper();
        if (me == null) {
            throw new RuntimeException("No Looper; Looper.prepare() wasn't called on this thread.");
        }
//注释二
        final MessageQueue queue = me.mQueue;

        ...
//注释三
        for (;;) {
            Message msg = queue.next(); // might block
            if (msg == null) {
                // No message indicates that the message queue is quitting.
                return;
            }
         ...
            try {
//注释四
                msg.target.dispatchMessage(msg);
            }
         ...
//注释五
            msg.recycleUnchecked();
        }
    }
2.3.1 Looper与ThreadLocal的故事
注释一,获取looper对象是通过myLooper()这个方法
public static @Nullable Looper myLooper() {
        return sThreadLocal.get();
    }
进去一看,发现这里有一个叫做sThreadLocal的东西,去查一查他的三代
// sThreadLocal.get() will return null unless you've called prepare().
    static final ThreadLocal sThreadLocal = new ThreadLocal();
跟着上面的注释,找到prepare()方法。类似的还有一个叫prepareMainLooper()的家伙,区别是后者会将当前线程作为主线程,在ActivityThread的main()方法中会调用后者。
private static void prepare(boolean quitAllowed) {
        if (sThreadLocal.get() != null) {
            throw new RuntimeException("Only one Looper may be created per thread");
        }
        sThreadLocal.set(new Looper(quitAllowed));
    }
从上面的set、get可以大致猜测出,sThreadLocal是一个类似于map的数据结构,它的作用就是将looper与thread进行绑定。来看看具体的set()方法
public void set(T value) {
        Thread t = Thread.currentThread();
        ThreadLocalMap map = getMap(t);
        if (map != null)
            map.set(this, value);
        else
            createMap(t, value);
    }
果然这里出现了ThreadLocalMap ,map对象是通过getMap(t)获取的。
 ThreadLocalMap getMap(Thread t) {
        return t.threadLocals;
    }
也就是说,每个Thread中都有一个ThreadLocalMap ,在set()中,首先获取当前Thread,在从Thread中获取其ThreadLocalMap,如果为空则创建,最后向ThreadLocalMap中插入键值对,键是当前的ThreadLocal对象,值就是通过参数传入的新建的Looper对象。要注意,每新建一个Looper对象,就会在其内部新建一个ThreadLocal与之对应!
这样做的意义是什么呢?是将Looper与Thread绑定,使得每一个Thread都有且只有一个Looper与之对应,借此来解线程安全的问题。
2.3.2 Looper与其他人的故事
注释二,从Looper对象中获取了MessageQueue,这里验证了之前所说的,每一个Looper循环器又拥有一个MessageQueue消息队列。
注释三,各单位注意!这里就是Android程序真正进行死循环的地方!这个死循环写的很死,只能从内部通过return语句打破循环。比如当queue中的msg为null时,就可以结束循环退出程序了。
2.4Handler
2.4.1 Handler处理消息的三种方式
注释四,msg.target是封装在message中的handler对象,来看看handler的dispatchMessage()方法:
public void dispatchMessage(Message msg) {
        if (msg.callback != null) {
            handleCallback(msg);
        } else {
            if (mCallback != null) {
                if (mCallback.handleMessage(msg)) {
                    return;
                }
            }
            handleMessage(msg);
        }
    }
handler一共有三种处理message的方式
第一种方式中,出现了一个叫msg.callback的玩意儿,这是一个runnable对象
/*package*/ Runnable callback;
message是handler发送的,所以说这个runnable应该也是handler传进来的。还记得handler中有一个post()方法吗
 public final boolean post(Runnable r)
    {
       return  sendMessageDelayed(getPostMessage(r), 0);
    }
private static Message getPostMessage(Runnable r) {
        Message m = Message.obtain();
        m.callback = r;
        return m;
    }
这两块代码是不是特别简洁明了,根本不需要多余的解释。
再来看看具体执行调用的handleCallback(msg)
private static void handleCallback(Message message) {
        message.callback.run();
    }
哇!写的不能再清楚了!
这种情况下,我们不需要handler来执行具体的处理,而是回调了runnable对象的run方法来做些特别的事情。一般可以在这里执行一些循环调用的操作。
第二种方式,就是通过handler中自带的mCallback来处理message。这个mCallback是在handler初始化的时候调用的
 public Handler(Callback callback, boolean async) {
    ...
        mCallback = callback;
    ...
如果在创建handler的时候没有指定,那就会执行第三种,也就是最常用的方式,直接通过重写handleMessage(msg)来完成对消息的处理。
2.4.2 Handler发送消息
上面讲了handler处理消息的三种方式,现在就顺便理一理其发送消息的过程。
发送message从sendMessage()开始经历一系列简单的回调,这里有个关于时间的参数需要格外注意
private boolean enqueueMessage(MessageQueue queue, Message msg, long uptimeMillis) {
        msg.target = this;
        if (mAsynchronous) {
            msg.setAsynchronous(true);
        }
        return queue.enqueueMessage(msg, uptimeMillis);
    }
queue.enqueueMessage(msg, uptimeMillis)又会涉及到链表的操作,uptimeMillis决定了message开始进行处理的时间。
boolean enqueueMessage(Message msg, long when) {
  ...
            msg.markInUse();
            msg.when = when;
            Message p = mMessages;
            boolean needWake;
            if (p == null || when == 0 || when < p.when) {
                // New head, wake up the event queue if blocked.
                msg.next = p;
                mMessages = msg;
                needWake = mBlocked;
            } else {
                // Inserted within the middle of the queue.  Usually we don't have to wake
                // up the event queue unless there is a barrier at the head of the queue
                // and the message is the earliest asynchronous message in the queue.
                needWake = mBlocked && p.target == null && msg.isAsynchronous();
                Message prev;
                for (;;) {
                    prev = p;
                    p = p.next;
                    if (p == null || when < p.when) {
                        break;
                    }
                    if (needWake && p.isAsynchronous()) {
                        needWake = false;
                    }
                }
                msg.next = p; // invariant: p == prev.next
                prev.next = msg;
            }

  ...
    }
p是头指针,首先判断p是否存在,如果不存在,则让传进来的message成为头指针;否则的话进入循环,如果当前message的开始执行时间小于链表中p的开始执行时间,就将message插入到p的前面,否则的话再将message插入到链表的最后。
既然发送消息涉及到了开始执行时间,那么取出消息一定也和这个参数有关。
MessageQueue.next()方法并不只是简单的根据进入消息队列的顺序来取出message,而是还要考虑到他们具体执行的时间。如果当前时间小于mesaage开始执行的时间,那就继续获取下一个message。
 if (now < msg.when) {
                        // Next message is not ready.  Set a timeout to wake up when it is ready.
                        nextPollTimeoutMillis = (int) Math.min(msg.when - now, Integer.MAX_VALUE);
                    } else {
                        // Got a message.
                        mBlocked = false;
                        if (prevMsg != null) {
                            prevMsg.next = msg.next;
                        } else {
                            mMessages = msg.next;
                        }
                        msg.next = null;
                        if (DEBUG) Log.v(TAG, "Returning message: " + msg);
                        msg.markInUse();
                        return msg;
                    }
2.4.3 Handler与Looper是怎么勾搭起来的
看到这里,认真阅读的同学一定有一个疑问,既然MessageQueue与Looper绑定,Looper又与Thread绑定,那么Handler是怎么与Looper进行绑定的呢?换句话说,Handler怎么知道自己要将消息发给哪个Looper对象中的MessageQueue,而这个Looper从MessageQueue中取出消息之后,又怎么知道要让哪一个Handler来进行处理呢?
我们来看Handler的构造方法
public Handler() {
        this(null, false);
    }
其重载了下面这个两个参数的构造方法
public Handler(Callback callback, boolean async) {
       ...
        mLooper = Looper.myLooper();
        if (mLooper == null) {
            throw new RuntimeException(
                "Can't create handler inside thread that has not called Looper.prepare()");
        }
        mQueue = mLooper.mQueue;
        mCallback = callback;
        mAsynchronous = async;
    }
可见,Looper对象是通过静态方法myLooper()获取到的。
  public static @Nullable Looper myLooper() {
        return sThreadLocal.get();
    }
文章在注释一处就介绍了这个方法,如果没什么印象了要回去再看一遍,前面讲了如何set,这里就涉及到如何get,现在深入进去看看
 public T get() {
        Thread t = Thread.currentThread();
        ThreadLocalMap map = getMap(t);
        if (map != null) {
            ThreadLocalMap.Entry e = map.getEntry(this);
            if (e != null)
                return (T)e.value;
        }
        return setInitialValue();
    }
看明白了吧!Handler在初始化的时候,会从当前线程获取到ThreadLocalMap,由于一般我们都是在主线程初始化Handler,而主线程在创建的时候已经通过Looper.prepareMainLooper()将ThreadLocal与Looper以键值对的形式set()进ThreadLocalMap,所以此时就可以轻松的get()到Looper对象了!
2.4.4 Handler与Looper是怎么在子线程勾搭起来的
好事者这时候又会问了,那如果我要在子线程中使用Handler呢?别急,我们回到Looper的源码,读一读最上面的官方注释:
  *  class LooperThread extends Thread {
  *      public Handler mHandler;
  *
  *      public void run() {
  *          Looper.prepare();
  *
  *          mHandler = new Handler() {
  *              public void handleMessage(Message msg) {
  *                  // process incoming messages here
  *              }
  *          };
  *
  *          Looper.loop();
  *      }
  *  }
这下通畅了吧!在子线程中,首先通过Looper.prepare()将Looper与Thread绑定,接着创建的Handler就与Looper对应了起来,最后就可以通过Looper.loop()开启循环。这个步骤和ActivityThread的main()方法一模一样,只是前者由系统代劳,而在子线程中则需要我们自己动手。
2.5总结
没有总结
完结撒花~