前言
本节我们学习使用WeMos D1连接网络,我这里使用手机开WIFI热点,SSID为sand,passwd为12345678,连接时候需要将模块设置为STA模式(Station模式)。
一、基础知识
1.Station模式简介
WeMos D1处于Station模式时候能够连接WIFI热点,Station模式也叫做STA站点,每一个连接到无线网络中的终端(如笔记本电脑、PDA及其它可以联网的用户设备)都可称为一个STA站点。
在STA连接WiFi热点过程中,首先WiFI热点会发出信标帧(beacon),同时STA也会发出Probe Request帧,然后STA会收到信标帧(beacon)或者WiFi热点回复的Probe Response数据帧,之后根据收到的信号强度决定连接哪一个热点,同一环境下不同WiFi热点可能含有相同的SSID,模块连接信号强度最强的WiFi热点。
2.ESP8266WiFi库
从上图中可以看出ESP8266WiFi库主要包含Station、Soft AP、config、WiFiClient、WiFiServer、scan、hostname,本节主要介绍Station相关的函数使用。
二、实例
1.应用程序1
1.1 动态IP方式连接WiFi热点
#include "ESP8266WiFi.h"
char* ssid = "sand";
char* passwd = "12345678";
void setup() {
  Serial.begin(115200);
  // Set WiFi to station mode
  WiFi.mode(WIFI_STA);
  WiFi.begin(ssid, passwd);
  while (WiFi.status() != WL_CONNECTED)
  {
    delay(500);
    Serial.println("connecting......");
  }
  Serial.println("Connect to router successfully!");
  Serial.println(String("mac address is ")+WiFi.macAddress());
}
void loop() {
  if (WiFi.status() == WL_CONNECTED)
  {
    Serial.println("Connect to router success");
    Serial.println(String("Subnet mask is ")+WiFi.subnetMask().toString());
    Serial.println(String("gatewayIP address is ")+WiFi.gatewayIP().toString());
    Serial.println(String("dnsIP address is ")+WiFi.dnsIP().toString());
    Serial.println(String("SSID is ") + WiFi.SSID());
    Serial.println(String("PSK is ") + WiFi.psk());
    Serial.println(String("BSSID is ") + WiFi.BSSIDstr());
    Serial.println(String("RSSI is ") + WiFi.RSSI());
  }else
  {
    Serial.println("Connect to router failed");
  }
  // Wait a bit before scanning again
  delay(1000);
}
上述程序中,首先设置模块为WIFI_STA模式,然后程序调用WiFi.begin()连网后等待,直到WiFi.status()等于WL_CONNECTED,程序继续往下执行,然后打印MAC地址,并在loop()函数中循环打印IP地址网络信息。
1.2编译运行
程序编译上传后设备执行Log如下:
2.应用程序2
2.1 静态IP方式连接WiFi热点程序
#include "ESP8266WiFi.h"
char* ssid = "sand";
char* passwd = "12345678";
IPAddress local_static_ip(192, 168, 43, 10);
IPAddress local_gateway(192, 168, 43, 1);
IPAddress local_subnet(255, 255, 255, 0);
IPAddress local_dns_ip(192, 168, 43, 1);
void setup() {
  Serial.begin(115200);
  // Set WiFi to station mode
  WiFi.mode(WIFI_STA);
  WiFi.begin(ssid, passwd);
  WiFi.config(local_static_ip, local_gateway, local_subnet, local_dns_ip);
  while (WiFi.status() != WL_CONNECTED)
  {
    delay(500);
    Serial.println("connecting......");
  }
  Serial.println("Connect to router successfully!");
  Serial.println(String("mac address is ")+WiFi.macAddress());
}
void loop() {
  if (WiFi.status() == WL_CONNECTED)
  {
    Serial.println("Connect to router success");
    Serial.println(String("IP address is ")+WiFi.localIP().toString());
    Serial.println(String("Subnet mask is ")+WiFi.subnetMask().toString());
    Serial.println(String("gatewayIP address is ")+WiFi.gatewayIP().toString());
    Serial.println(String("dnsIP address is ")+WiFi.dnsIP().toString());
    Serial.println(String("SSID is ") + WiFi.SSID());
    Serial.println(String("PSK is ") + WiFi.psk());
    Serial.println(String("BSSID is ") + WiFi.BSSIDstr());
    Serial.println(String("RSSI is ") + WiFi.RSSI());
  }else
  {
    Serial.println("Connect to router failed");
  }
  // Wait a bit before scanning again
  delay(1000);
}
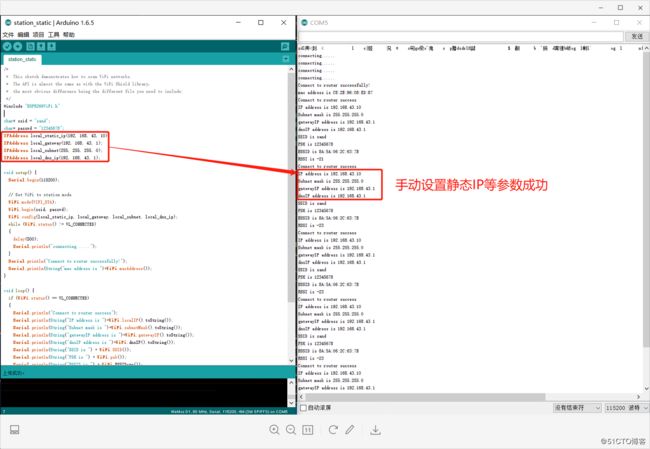
上述程序中,首先设置模块为WIFI_STA模式,然后程序调用WiFi.begin()连网后,设置固定IP地址后等待,直到WiFi.status()等于WL_CONNECTED,程序继续往下执行,然后打印MAC地址,并在loop()函数中循环打印IP地址网络信息。
2.2编译运行
程序编译上传后设备执行Log如下:
3.应用程序3
3.1 修改hostname程序
#include "ESP8266WiFi.h"
char* ssid = "sand";
char* passwd = "12345678";
char *host = "ESP8266_TEST1";
void setup() {
  Serial.begin(115200);
  // Set WiFi to station mode
  WiFi.mode(WIFI_STA);
  WiFi.begin(ssid, passwd);
  while (WiFi.status() != WL_CONNECTED)
  {
    delay(500);
    Serial.println("connecting......");
  }
  Serial.println("Connect to router successfully!");
  Serial.println(String("mac address is ")+WiFi.macAddress());
  Serial.println(String("hostname is ")+WiFi.hostname());
  WiFi.hostname(host);
}
void loop() {
  if (WiFi.status() == WL_CONNECTED)
  {
    Serial.println("Connect to router success");
    Serial.println(String("hostname is ")+WiFi.hostname());
  }else
  {
    Serial.println("Connect to router failed");
  }
  // Wait a bit before scanning again
  delay(1000);
}
上述程序中,首先设置模块为WIFI_STA模式,然后程序调用WiFi.begin()连网后后等待,直到WiFi.status()等于WL_CONNECTED,程序继续往下执行,然后打印MAC地址和hostname,之后设置hostname为"ESP8266_TEST1",并在loop()函数中循环打印hostname信息。
3.2编译运行
程序编译上传后设备执行Log如下:
程序联网成功后获取hostname为ESP_08ED87,手机开的热点截图如下
程序修改hostname后,手机开的热点截图如下
三、结语
1.总结:
本节完,实际操作过程中需要注意的地方有如下几点:
(1)获取网络状态?
程序需要在loop()函数中循环获取网络状态,如果网络发生变化,程序需要做出相应动作。
(2)配置静态IP地址等?
参考程序,注意WiFi.config()的参数设置。
2.后记:
如您在使用过程中有任何问题,请加QQ群进一步交流,也可以github提Issue。
QQ交流群:906015840 (备注:物联网项目交流)
获取源码:关注公众号,回复wemos即可
一叶孤沙出品:一沙一世界,一叶一菩提


