haproxy(base源)
  ha高可用
  负载均衡的解决方案
  与nginx的proxy/stream的功能类似
    nginx--实现七层调度
    haproxy工作于mod_httpd--实现七层调度
    nginx基于stream模块--伪四层调度
    haproxy工作于mod_tcp--实现伪四层调度

centos7.3--192.168.1.6
centos7.4--haproxy--192.168.1.9
centos7.4-2和centos7.4-3--实现7层代理--httpd/nginx--提供web服务--192.168.1.5
  nginx--web+反代
  haproxy--纯粹的反代,无web-server的功能

同步时间
centos7: systemctl restart chronyd.service 或 ntpdate ntp1.aliyun.com

yum info haproxy  伪四层调度支持udp
  基于cookie做会话绑定
  负载均衡,高可用
  支持sorry server(down,backup)
  连接至特定端口,而非服务端口,做健康检测
  不影响已经连接的请求,停止接受新的请求--发布
  添加,修改,删除http首部
    (两类首部:请求首部--代理-->后端服务器;响应首部--代理-->客户端)
  匹配到特定模式的请求--按需阻塞(acl做访问控制)
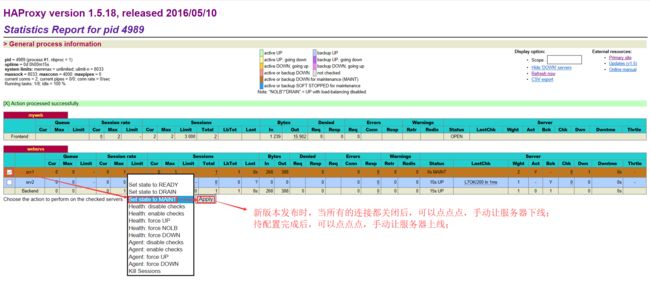
  特有功能: haproxy states页面--报告详细的状态信息--图形界面--点点点--服务器上下线
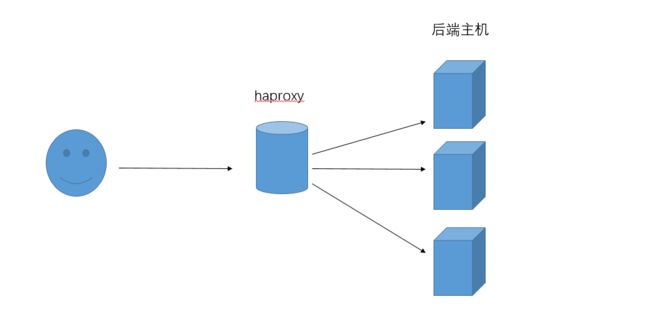
拓扑图
centos7.4(192.168.1.9)
yum -y install haproxy
centos7.4-2(192.168.1.5)和centos7.4-3(192.168.1.7)
yum -y install httpd
vim /var/www/html/index.html
Backend Server 1/2
systemctl start httpd

centos7.4
curl 192.168.1.5  ok
rpm -ql haproxy
/etc/haproxy/haproxy.cfg  主配置文件
/usr/lib/systemd/system/haproxy.service  服务
/etc/sysconfig/haproxy  服务的环境配置文件
/usr/bin/iprange  对IP地址段做解析
/usr/bin/halog  管理日志的文件
/usr/sbin/haproxy  核心程序
cp /etc/haproxy/haproxy.cfg{,.bak}
vim /etc/haproxy/haproxy.cfg
  log         127.0.0.1 local2  全局配置的日志没有生效
  日志没有生效的原因:
    1. local2--rsyslog没有启用--haproxy把日志发送给local2-->
        --需要本地"local2 facility"启用--指明存储于何处
    2. 本地日志服务器工作起来--通过套接字接收发来的日志存储请求
vim /etc/rsyslog.conf
启用udp或tcp,二选一(此处启用了udp,去掉注释即可)--如下图1
    $ModLoad imudp
    $UDPServerRun 514
启用local2,添加如下信息:--如下图2
    local2.*                                                /var/log/haproxy.log
systemctl restart rsyslog.service
ss -unl  514端口

centos7.4
vim /etc/haproxy/haproxy.cfg
默认的配置不变,光标移动至"frontend"行,从此行至尾行都注释掉
:.,$s@^[^#]@#&@g
定义前端配置和后端配置--负载均衡--如图3
frontend myweb(内键的id)
        bind *:80
        default_backend websrvs
backend websrvs
        balance roundrobin(算法)
        server srv1 192.168.1.5:80 check
        server srv2 192.168.1.7:80 check
systemctl restart haproxy.service
ss -ntl  80端口
确保haproxy监听80端口之前,没有被其他进程监听
浏览器:192.168.1.9  ok
centos7.3: for i in {1..10};do curl 192.168.1.9;sleep 0.5;done  轮询
图1
图2
图3
调度算法
centos7.4
vim /etc/haproxy/haproxy.cfg
frontend myweb *:80  (另一种写法,不过,bind可以写多个,精确定义)
        default_backend websrvs
backend websrvs
        balance first
        server srv1 192.168.1.5:80 check maxconn 3
        server srv2 192.168.1.7:80 check
systemctl restart haproxy.service
centos7.3  使用ab做压测
yum -y install httpd(先安装httpd,否则不能使用ab)
ab -c 20 -n 10000 http://192.168.1.9/
centos7.4
tail /var/log/haproxy.log

centos7.4
vim /etc/haproxy/haproxy.cfg
更改backend
backend websrvs
        balance uri  (动/静态取决于"hash type")
        server srv1 192.168.1.5:80 check maxconn 3
        server srv2 192.168.1.7:80 check
        hash-type consistent(动态)
    无论哪个客户端,访问同一个url--发往同一个后端主机--提高缓存命中率
systemctl restart haproxy.service
centos7.4-2和centos7.4-3
for i in {1..10};do echo "Test Page $i @BES 1/2" > /var/www/html/test$i.html;done
centos7.3
for i in {1..10};do curl 192.168.1.9/test1.html;sleep 0.5;done  请求都发往同一台主机

centos7.4
vim /etc/haproxy/haproxy.cfg
更改backend
backend websrvs
        balance hdr(User-Agent)
        server srv1 192.168.1.5:80 check maxconn 3
        server srv2 192.168.1.7:80 check
        hash-type consistent
    浏览器相同--发往同一个后端主机
systemctl restart haproxy.service
centos7.3
for i in {1..10};do curl 192.168.1.9/test4.html;sleep 0.5;done  请求都发往同一台主机
图形界面:firefox 192.168.1.9/test5.html  请求发往另一个主机(浏览器不同了)

centos7.4
vim /etc/haproxy/haproxy.cfg
更改frontend,和backend的调度算法
frontend myweb
        bind *:80
        compression algo gzip
        compression type text/html text/plain application/xml application/javascript
        default_backend websrvs
backend websrvs
        balance roundrobin
        server srv1 192.168.1.5:80 check maxconn 3
        server srv2 192.168.1.7:80 check
systemctl restart haproxy.service
浏览器:192.168.1.9--F12--Content-Type--Content-Encoding

centos7.4
vim /etc/haproxy/haproxy.cfg
更改backend
backend websrvs
        balance roundrobin
        server srv1 192.168.1.5:80 check
        server srv2 192.168.1.7:80 check backup
    sorry server--备用服务器--当srv1故障时,才会上线
systemctl restart haproxy.service
centos7.3
for i in {1..10};do curl 192.168.1.9/test1.html;sleep 0.5;done  请求都发往srv1
centos7.4-2
systemctl stop httpd.service  srv1故障
centos7.3
for i in {1..10};do curl 192.168.1.9/test1.html;sleep 0.5;done  请求都发往srv2
centos7.4-2
systemctl start httpd.service  srv1恢复
centos7.3
for i in {1..10};do curl 192.168.1.9/test1.html;sleep 0.5;done  请求都发往srv1

centos7.4
vim /etc/haproxy/haproxy.cfg
更改backend
backend websrvs
        balance roundrobin
        option httpchk  对主页做检查
          或者 option httpchk GET /test1.html HTTP/1.0  对/test1.html做检查,GET方法,协议版本1.0(不能用1.1版本,避免长连接)
        server srv1 192.168.1.5:80 check (inter 3000 rise 1 fall 2)  括号内可不设定,使用默认值即可
        server srv2 192.168.1.7:80 check backup
systemctl restart haproxy.service
centos7.4-2
tail -f /var/log/httpd/access_log  每隔几秒就会出现日志--日志分析时,就是干扰项
  对主页做检查--显示"OPTIONS / HTTP/1.0"
  对/test1.html做检查--显示"GET /test1.html HTTP/1.0"

centos7.4
vim /etc/haproxy/haproxy.cfg
更改backend--访问srv1的请求,重定向至一个新的url
backend websrvs
        balance roundrobin
        option httpchk GET /test1.html HTTP/1.0
        server srv1 192.168.1.5:80 check inter 3000 rise 1 fall 2 redir  http://www.baidu.com
        server srv2 192.168.1.7:80 check backup
systemctl restart haproxy.service
浏览器:192.168.1.9  ok
    192.168.1.9-->http://www.baidu.com
    192.168.1.9/log.html-->有内容
    http://www.baidu.com/-->无内容

centos7.4
vim /etc/haproxy/haproxy.cfg
更改backend--算法--wrr加权轮询
backend websrvs
        balance roundrobin
        option httpchk GET /test1.html HTTP/1.0
        server srv1 192.168.1.5:80 check inter 3000 rise 1 fall 2 weight 2
        server srv2 192.168.1.7:80 check weight 1
systemctl restart haproxy.service
centos7.3
for i in {1..10};do curl 192.168.1.9/test1.html;sleep 0.5;done  wrr

stats
centos7.4-2(IP--dhcp:192.168.1.10)
centos7.4
vim /etc/haproxy/haproxy.cfg
更改frontend
frontend myweb
        bind *:80
        stats enable  新加信息
        (stats uri /myproxy?admin  自定义默认页面路径)
        stats realm "HAProxy Stats Page"
        stats auth admin:admin
        (stats admin if TRUE  启用管理功能,一直为真--漏洞--acl弥补)
        compression algo gzip
        compression type text/html text/plain application/xml application/javascript
        default_backend websrvs
backend websrvs
        balance roundrobin
        option httpchk GET /test1.html HTTP/1.0
        server srv1 192.168.1.5:80 check inter 3000 rise 1 fall 2 weight 2
        server srv2 192.168.1.10:80 check weight 1 (backup)
systemctl restart haproxy.service
浏览器:
http://192.168.1.9/haproxy?stats  (没有stats uri)
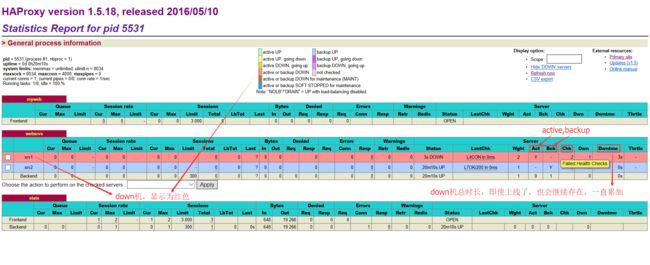
  /haproxy?stats是默认主页--backup和active在页面上显示不同的颜色(如下图1)
http://192.168.1.9/myproxy?admin  (有stats uri)--自定义页面
  输入账号和密码
  启用"stats admin"后,点点点--操作服务器的上线或者下线(如下图2)
centos7.4-2
systemctl stop httpd.service  srv1故障
浏览器:刷新--srv1变为黄颜色--再刷新--变为红色

centos7.4
vim /etc/haproxy/haproxy.cfg
  单独设定套接字+认证
  定义一个listen专门提供stats,不提供任何后端主机--安全
  避免处心积虑的人--知道我们端口80和更改的默认页面/myproxy?admin
frontend myweb
        bind *:80
        compression algo gzip
        compression type text/html text/plain application/xml application/javascript
        default_backend websrvs
backend websrvs
        balance roundrobin
        option httpchk GET /test1.html HTTP/1.0
        server srv1 192.168.1.5:80 check inter 3000 rise 1 fall 2 weight 2
        server srv2 192.168.1.10:80 check weight 1 backup
listen stats
        bind *:9909
        stats enable
        stats uri /myproxy?admin
        stats realm "HAProxy Stats Page"
        stats auth admin:admin
        stats admin if TRUE
systemctl restart haproxy.service
ss -ntl  9909端口
浏览器:192.168.1.9:9909/myproxy?admin  输入账号和密码--如下图3
centos7.4-2
systemctl stop httpd.service  srv1故障
刷新浏览器(如图4)
centos7.4-2
systemctl start httpd.service  srv1恢复
刷新浏览器(如图5)
图1
图2
图3
图4
图5
图6
centos7.4
vim /etc/haproxy/haproxy.cfg
再添加一个listen信息,4层和7层混用--(如下图1)
listen sshsrvs
        bind *:22322
        mode tcp(四层代理;前面没有定义,默认是http--7层代理)
        balance leastconn(适合长连接算法)
        server sshsrv1 192.168.1.5:22 check
        server sshsrv2 192.168.1.10:22 check
systemctl restart haproxy.service
ss -ntl  22322端口
centos7.3
ssh [email protected] -p 22322--输入账号和密码
ip a  查看IP地址--连接至后端主机1--ok
centos7.4-4
ssh [email protected] -p 22322--输入账号和密码
ip a  查看IP地址--连接至后端主机2--ok
恢复--删除listen sshsrvs的信息

centos7.4
vim /etc/haproxy/haproxy.cfg
更改backend--如下图2
backend websrvs
        cookie SRV insert indirect nocache
        balance roundrobin
        option httpchk GET /test1.html HTTP/1.0
        server srv1 192.168.1.5:80 check inter 3000 rise 1 fall 2 weight 2 cookie srv1
        server srv2 192.168.1.10:80 check weight 1 cookie srv2
    后端主机响应的set-cookie(如上图6--上图)
    haproxy对此set-cookie如何做调整
    cookie的键值是"SRV",haproxy调整cookie--键值等于srv1/srv2
    haproxy响应给客户端的cookie添加信息:SRV=srv1,保证session一致性
systemctl restart haproxy.service
浏览器:http://192.168.1.9/test1.html  访问test$i,都显示Cookie:SRV=srv1

centos7.4
vim /etc/haproxy/haproxy.cfg
更改defaults默认配置,添加if-none(如果没有,才添加)
    option forwardfor       except 127.0.0.0/8  if-none
      except 127.0.0.0/8--本机请求不要添加
centos7.4-2
vim /etc/httpd/conf/httpd.conf
/LogFormat--%h-->%{X-Forwarded-For}i
systemctl restart httpd
tail -f /var/log/httpd/access_log  ok显示出client-ip
centos7.3
for i in {1..10};do curl 192.168.1.9/test1.html;sleep 0.5;done


自定义错误页面--貌似没什么用
centos7.4
mkdir /etc/haproxy/errorfiles
vim /etc/haproxy/errorfiles/403.html
  Forbidden;How are you!
vim /etc/haproxy/haproxy.cfg
frontend内部添加信息:如图3
frontend myweb
        bind *:80
        compression algo gzip
        compression type text/html text/plain application/xml application/javascript
        errorfile 403 /etc/haproxy/errorfiles/403.html
        errorloc 403 http://192.168.1.9:10086/errorloc/403.html(haproxy本机响应--安装nginx)
          或errorloc 403 http://192.168.1.9/errorloc/403.html(调度至后端主机--不过后端主机就需要配置/errorloc/403.html网页)
        default_backend websrvs
yum -y install nginx
vim /etc/nginx/nginx.conf(可以直接在此处配置,我们没有,又写了一个配置文件)
  server中的listen更改为8080端口
vim /etc/nginx/conf.d/errsrv.conf
server {
        listen 10086;
        server_name error.fgq.com;
        root "/data/nginx/html";
}
mkdir -p /data/nginx/html/errorloc
vim /data/nginx/html/errorloc/403.html
  403 Forbidden From Nginx
systemctl restart haproxy.service
systemctl start nginx.service
ss -ntl  10086端口


centos7.4
vim /etc/haproxy/haproxy.cfg
在frontend内部添加信息--如图5
frontend myweb
        bind *:80
        compression algo gzip
        compression type text/html text/plain application/xml application/javascript
        errorfile 403 /etc/haproxy/errorfiles/403.html
        errorloc 403 http://192.168.1.9:10086/errorloc/403.html
        reqadd X-Proxy-By:\ HAProxy  新加
        rspadd X-Proxy-By:\ HAProxy-1.5  新加
        (rspidel ^Server:.*  新加--删除响应报文中的server的信息)
        default_backend websrvs
systemctl restart haproxy.service ; ss -ntl
centos7.4-2
vim /etc/httpd/conf/httpd.conf
/LogFormat--行后添加信息:%{X-Proxy-By}i,如图4
systemctl restart httpd
tail -f /var/log/httpd/access_log  ok显示出"HAProxy"
浏览器:http://192.168.1.9/test1.html
    F12--"X-Proxy-By"--有server信息
    刷新--server信息消除
图1
图2
图3
图4
图5
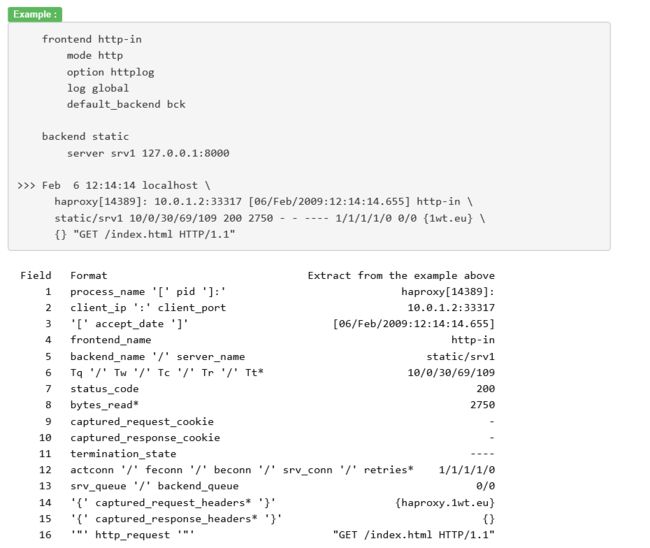
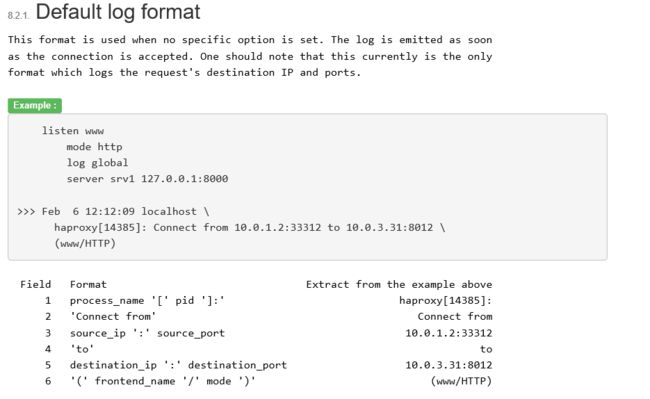
日志系统看--网络文档1.5版本的Log foramts
发送rsyslog/日志服务器
log至多使用两次
TCP format--下图2
HTTP format--原有基础+额外捕获哪些数据--下图1
默认日志--下图3
图1
图2
图3
acl
if ! = except


centos7.4
vim /etc/haproxy/haproxy.cfg
listen中修改  如下图1
listen stats
        bind *:9909
        acl allow_client src 192.168.1.4  允许本机访问
        block if ! allow_client  不加!--本机访问就阻塞; 加!--不是本机访问就阻塞
        (errorloc 403 http://192.168.1.9:10086/errorloc/403.html  自定义的错误页面--本机访问阻塞用)
        stats enable
        stats uri /myproxy?admin
        stats realm "HAProxy Stats Page"
        stats auth admin:admin
        stats admin if TRUE
systemctl restart haproxy.service ; ss -ntl
浏览器:http://192.168.1.9:9909/myproxy?admin--刷新--自定义的错误页面

centos7.4
vim /etc/haproxy/haproxy.cfg
listen中修改--如下图2
listen stats
        bind *:9909
        acl allow_client src 192.168.1.4
        http-request allow if allow_client  允许本机访问,但其他人也可认证访问
        (http-request deny  结合allow--允许本机访问,不允许其他人访问)
          或者 http-request deny unless allow_client  "allow+deny"的结合
        stats enable
        stats uri /myproxy?admin
        stats realm "HAProxy Stats Page"
        stats auth admin:admin
        stats admin if TRUE
systemctl restart haproxy.service ; ss -ntl
浏览器:192.168.1.9:9909/myproxy?admin
centos7.3:
图形界面 firefox 192.168.1.9:9909/myproxy?admin  输入账号和密码--可以访问
命令行 curl --basic --user admin:admin 192.168.1.9:9909/myproxy?admin

------------------------------------------------------------------------------------

centos7.4-2--支持两个动态服务器--192.168.1.5
centos7.4-3--支持两个静态服务器--图片内容服务--192.168.1.10
centos7.4-2
yum -y install php
mkdir -p /data/web/vhost{1,2}
vim /data/web/vhost1/info.php
Application Server 1

cp /data/web/vhost{1,2}/info.php
vim /data/web/vhost2/info.php
    把1改为2即可
vim /etc/httpd/conf.d/vhost1.conf

        ServerName www.fgq.com
        DocumentRoot "/data/web/vhost1"

                Options FollowSymLinks
                AllowOverride None
                Require all granted


cp /etc/httpd/conf.d/vhost{1,2}.conf
vim /etc/httpd/conf.d/vhost2.conf
Listen 8080

        ServerName www2.fgq.com
        DocumentRoot "/data/web/vhost2"

                Options FollowSymLinks
                AllowOverride None
                Require all granted


systemctl restart httpd.service
ss -ntl
浏览器:
http://192.168.1.5/info.php  ok
http://192.168.1.5:8080/info.php  ok

centos7.4-3
mkdir -p /data/web/vhost{1,2}
find /usr/share/ -iname "*.jpg" -exec cp {} /data/web/vhost1/ \;
find /usr/share/ -iname "*.jpg" -exec cp {} /data/web/vhost2/ \;
cd /data/web/vhost1 ; mv sky.jpg skys.jpg ; cp chess.jpg sky.jpg(后面验证用)

vim /data/web/vhost1/test.txt
    Image Server 1
vim /data/web/vhost2/test.txt
    Image Server 2
centos7.4-2: scp /etc/httpd/conf.d/vhost* 192.168.1.10:/etc/httpd/conf.d/
systemctl restart httpd.service
ss -ntl
浏览器:
http://192.168.1.10/test.txt  ok
http://192.168.1.10:8080/test.txt  ok

path
centos7.4
vim /etc/haproxy/haproxy.cfg
修改frontend和backend--如下图3--动静分离
frontend myweb
        bind *:80
        compression algo gzip
        compression type text/html text/plain application/xml application/javascript
        errorfile 403 /etc/haproxy/errorfiles/403.html
        errorloc 403 http://192.168.1.9:10086/errorloc/403.html
        reqadd X-Proxy-By:\ HAProxy
        rspadd X-Proxy-By:\ HAProxy-1.5
        rspidel ^Server:.*
        acl static_thing path_end .jpg .jpeg .png .gif .txt .html .css .js .javascript
          仅是以什么结尾的文件,不够全面
        acl static_thing path_beg /imgs /images /css /javascripts
          放在特定路径下的文件,以/imgs开头......
          acl名称一样,符合条件之一即可,即使是动态的也会被调度过去
          匹配更加复杂的url--path_reg  正则模式匹配
        use_backend stasrvs if static_thing
        default_backend dysrvs
backend dysrvs
        cookie SRV insert indirect nocache
        balance roundrobin
        option httpchk  此处注意
        server dysrv1 192.168.1.5:80 check weight 2 cookie dysrv1
        server dysrv2 192.168.1.5:8080 check weight 1 cookie dysrv2
backend stasrvs
        balance roundrobin
        server stasrv1 192.168.1.10:80 check
        server stasrv2 192.168.1.10:8080 check
systemctl restart haproxy.service ; ss -ntl
浏览器:192.168.1.9:9909/myproxy?admin  如下图4
http://192.168.1.9/info.php--刷新后不变--cookie绑定--F12--cookie
http://192.168.1.9/test.txt--刷新后--轮询
http://192.168.1.9/sky.jpg--刷新后--轮询

req.hdr
centos7.3
curl 192.168.1.9/test.txt  ok
拒绝使用curl命令来访问
centos7.4
vim /etc/haproxy/haproxy.cfg
修改frontend,添加如下信息--如下图5
        acl bad_browsers hdr_reg(User-Agent) .*curl.*
        block if bad_browsers
    User-Agent中有"curl",则阻塞
systemctl restart haproxy.service ; ss -ntl
浏览器:http://192.168.1.9/sky.jpg--ok
centos7.3: curl 192.168.1.9/test.txt  no,不能访问

refer引用,不是我们定义的,invalid refer
centos7.4
vim /etc/haproxy/haproxy.cfg
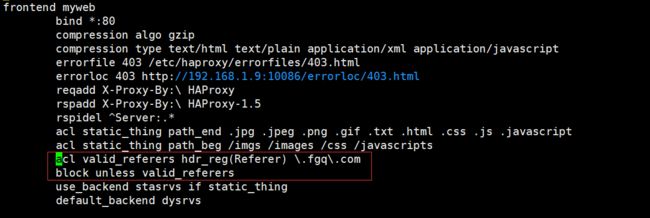
修改frontend,如下信息--如下图6
        acl valid_referers hdr_reg(Referer) \.fgq\.com
        block unless valid_referers
  referers值为".fgq.com",才可以访问,否则不能访问
systemctl restart haproxy.service ; ss -ntl
浏览器:http://192.168.1.9/sky.jpg  no,不能访问-- referers值为空
centos7.3:
curl 192.168.1.9/test.txt  no,不能访问
curl -e www.fgq.com 192.168.1.9/test.txt  ok
curl -e .fgq.com 192.168.1.9/test.txt  ok
     -e, --referer     Referer URL  指定引用的rul--即referer
图1
图2
图3
图4
图5
图6
www.bing.com
搜索:haproxy example configure  /haproxy keepalive
haproxy--解析ssl
client--haproxy--后端主机

centos7.3  192.168.1.5
centos7.4  192.168.1.6  haproxy
centos7.4-2  192.168.1.7  后端主机1
centos7.4-3  192.168.1.8  后端主机2

centos7.4
vim /etc/haproxy/haproxy.cfg
添加信息,保存原来,不动--如下图1
frontend https
        bind *:443 ssl crt /etc/haproxy/certs/haproxy.pem
        acl static_thing path_end .jpg .jpeg .png .gif .txt .html .css .js .javascript
        acl static_thing path_beg /imgs /images /css /javascripts
        use_backend stasrvs if static_thing
        default_backend dysrvs
frontend http
        bind *:8080
        redirect scheme https if !{ ssl_fc }
mkdir /etc/haproxy/certs
cd /etc/pki/CA
(umask 077;openssl genrsa -out private/cakey.pem 4096)
openssl req -new -x509 -key private/cakey.pem -out cacert.pem -days 365
CN,HA,ZZ,FGQ,Ops,ca.fgq.com
touch index.txt
echo 01 > serial
cd /etc/haproxy/certs/
openssl genrsa -out haproxy.key 2048
openssl req -new -key haproxy.key -out haproxy.csr
N,HA,ZZ,FGQ,Ops,www.fgq.com,回车...
一会打入文件中,此处不用umask
openssl ca -in haproxy.csr -out haproxy.crt
y,y
cat haproxy.crt haproxy.key > haproxy.pem
chmod 600 haproxy.pem
systemctl restart haproxy.service
ss -ntl  8080,443端口
浏览器:https://192.168.1.6/test.txt--不安全--继续访问
http://192.168.1.9:8080/test.txt--跳转至https,但不能访问--8080端口的协议问题

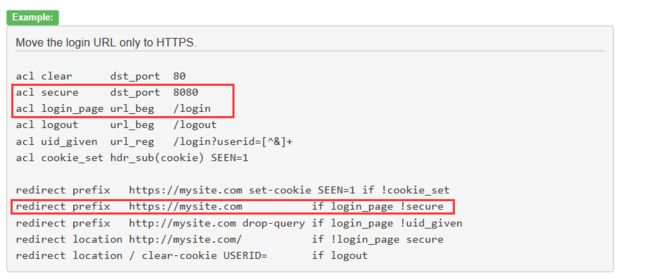
redirect指令网络文档--如下图2

vim /etc/haproxy/haproxy.cfg
frontend http
        bind *:8080
        redirect location https://192.168.1.6/ if !{ ssl_fc }
systemctl restart haproxy.service
ss -ntl  8080,443端口
浏览器:http://192.168.1.6:8080/test.txt--对非ssl的任何url的访问,重定向至https://192.168.1.6/

---------------------------------------------------------------------------------------------

生产环境
加密,跳转,访问控制,条件式转发(不同内容--不同服务器,states页面--本地地址)
向请求报文,添加首部,X-Proxy-By
向响应报文,移除首部,server,隐藏states页面的版本号states-hide-version

服务器--定义最大并发连接数--压测--可以承载多大的并发请求,每个后端主机承载的并发连接请求maxconn

peath_beg/end
url_beg/end
调度请求至varnish--方法:uri,hash-type--consistent,
调度请求至动态服务器--session保持--roundrobin+cookie(不用source)
session server--前面直接roundrobin即可
haproxy--http协议--80端口重定向至443主页或对应页面(根据自己需要)

---------------------------------------------------------------------------------------------

一台主机 --虚拟启动好几个用户空间--独立专用的IP地址--物理网卡
yum info lxc  -->linuxcontainers

centos7.4-4  192.18.1.14
关机--设置为"仅桥接模式"下,操作
cdnet
rm -rf ifcfg-ens33
vim ifcfg-ens34
添加以下信息,其他不变:
IPADDR=192.168.1.14
PREFIX=24
GATEWAY=192.168.1.1
vim /etc/resolv.conf
# Generated by NetworkManager
nameserver 8.8.8.8  添加
search 4-4.fgq.com
systemctl restart network
ping www.qq.com  ok

cp ifcfg-ens34 ifcfg-br0
vim ifcfg-br0
DEVICE=br0
TYPE=Bridge
uuid删除,name删除,其他不变

vim ifcfg-ens34  --物理网卡(192.18.1.14)
删除 IPADDR,PREFIX,GATEWAY,DNS,
添加一项:
BRIDGE=br0
systemctl restart network  重启--出错--再次重启即可
ifconfig  显示br0和ens34

yum -y install lxc lxc-templates  (epel源)
lxc-create -h
  Usage: lxc-create --name=NAME -t template [-w] [-r] [-P lxcpath]
rpm -ql lxc-templates
  /usr/share/lxc/templates/lxc-centos  文件--网络yum仓库--可以更改为自己的仓库
cp /usr/share/lxc/templates/lxc-centos{,.bak}
vim /usr/share/lxc/templates/lxc-centos
搜索--/baseurl,[base]中注释mirrorlist,添加自己的base源(网络太慢,使用本地源)
[base]
name=CentOS-$release - Base
#mirrorlist=...  修改
baseurl=http://192.168.1.4/centos/7/  添加
禁用updates,不要做任何的更新
[updates]
name=CentOS-$release - Updates
mirrorlist=...
enabled=0  添加

创建用户空间
lxc-create --name=c1 -t /usr/share/lxc/templates/lxc-centos  最小化安装
  或者 lxc-create --name c1 -t /usr/share/lxc/templates/lxc-centos
  新的用户空间--相当于另一台主机--docker--会细讲
安装完成后,不用临时密码,可以自己设定:
chroot /var/lib/lxc/c1/rootfs passwd  更改密码
lxc-start -h
  Usage: lxc-start --name=NAME -- COMMAND
lxc-start --name c1  启动
    注意本机没有virbr0时,"lxc-start"启动时会出错--原因:此网卡名ifcfg-br0
    只要ifcfg-br0-->ifcfg-virbr0即可
    本机有virbr0时,正常启动即可
显示登陆--输入账号和密码--提示符变为"[root@c1 ~]# "
c1主机:
ip a  显示新的IP地址
yum -y install httpd--完全新地址--当作新的主机用

原主机操作
lxc-info --name c1  显示c1的信息
lxc-checkconfig  检查是否能用--都是enabled--ok
lxc-stop  关闭c1主机
lxc-freeze  冻结在内存中
lxc-unfreeze  解冻,继续使用
lxc-snapshot  快照
lxc-clone  克隆
lxc-destroy  拔电源|删除此主机?
lxc-top  显示各个主机用的资源--排序
其他命令
lxc-attach  lxc-config  lxc-wait  lxc-autostart  lxc-console
lxc-cgroup  lxc-monitor  lxc-unshare  lxc-execute  lxc-usernsexec

步骤:
生成物理桥
安装lxc lxc-templates
yum 仓库
创建新的主机
启动(virbr0有无的不同之处)
图1
图2


