安装apache2
我使用的是apache作为web容器。
安装apache2
mysql上创建用户bugzilla
- 使用root登录
mysql -utoot -p//确定后输入密码 - 使用grant创建用户并授权
GRANT SELECT, INSERT, UPDATE, DELETE, INDEX, ALTER, CREATE, LOCK TABLES, CREATE TEMPORARY TABLES, DROP, REFERENCES ON bugs.* TO bugzilla@localhost IDENTIFIED BY 'password';
mysql创建用户详解 - 查看所有用户
select * from mysql.user; - 删除用户
delete from mysql.user where User="bugs" and Host="localhost"; - 刷新系统权限表
FLUSH PRIVILEGES;
创建,删除,查看,授权用户
安装bugzilla
1.下载bugzilla源码包
可使用此链接下载Bugzilla源码包:bugzilla-5.0.2.tar.gz
2.安装
- 解压源码包到/opt/目录下
sudo tar xvf bugzilla-5.0.2.tar.gz -C /opt/ - 检查所需Perl模块是否安装
sudo ./checksetup.pl
按照提示修改localconfig文件
# If this is set to 0, checksetup.pl will not create .htaccess files.
$create_htaccess = 0;

# Who we connect to the database as.
$db_user = 'bugzilla';  //默认为bugs,但是我们创建数据库用户是名为bugzilla,所以修改一下
$db_pass = 'bugzilla123';
$webservergroup = 'www-data';
3. 关于配置webservergroup
修改/bugzilla/localconfig文件中的一句话:$webservergroup = 'www-data';
这里为什么填www-data呢,这是由我们安装好的apache2的环境变数决定的,该变数存在文件/etc/apache2/envvars中,文件的内容如下:
# settings are defined via environment variables and then used in apache2ctl,
# /etc/init.d/apache2, /etc/logrotate.d/apache2, etc.
export APACHE_RUN_USER=www-data
export APACHE_RUN_GROUP=www-data
这就是我们要填www-data的原因了
修改bugzilla访问权限
必须要设定buzilla文件的访问权限 。否则报错You don't have permission to access /bugzilla/ on this server
需要修改bugzilla目录的owner和groups。因为apache2环境变数决定是其是用www-data用户组来执行的。修改的命令为:sudo chgrp -R root.www-data bugzilla。
或者简单粗暴:
修改用户访问权限chmod -R 777 /var/www/html/bugzilla
修改apache服务器访问权限chown apache.apche /var/www/html/bugzilla –R
最后在终端执行下面的命令:sudo perl checksetup.pl,运行完毕bugzilla将会顺利的安装好,在安装的最后会让你输入bugzilla系统的管理员帐号和密码,这个必须记好了。
访问并使用bugzilla
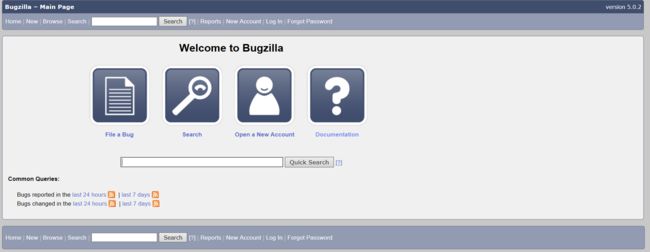
访问http://servername/bugzilla/进入界面
访问时出现了一段源码
#!/usr/bin/perl -T
# This Source Code Form is subject to the terms of the Mozilla Public
# License, v. 2.0. If a copy of the MPL was not distributed with this
# file, You can obtain one at http://mozilla.org/MPL/2.0/.
#
# This Source Code Form is "Incompatible With Secondary Licenses", as
# defined by the Mozilla Public License, v. 2.0.

use 5.10.1;
use strict;
use warnings;

use lib qw(. lib);

use Bugzilla;
use Bugzilla::Constants;
use Bugzilla::Error;
use Bugzilla::Update;

# Check whether or not the user is logged in
my $user = Bugzilla->login(LOGIN_OPTIONAL);
my $cgi = Bugzilla->cgi;
my $template = Bugzilla->template;
my $vars = {};

# And log out the user if requested. We do this first so that nothing
# else accidentally relies on the current login.
if ($cgi->param('logout')) {
    Bugzilla->logout();
    $user = Bugzilla->user;
    $vars->{'message'} = "logged_out";
    # Make sure that templates or other code doesn't get confused about this.
    $cgi->delete('logout');
}

# Return the appropriate HTTP response headers.
print $cgi->header();

if ($user->in_group('admin')) {
    # If 'urlbase' is not set, display the Welcome page.
    unless (Bugzilla->params->{'urlbase'}) {
        $template->process('welcome-admin.html.tmpl')
          || ThrowTemplateError($template->error());
        exit;
    }
    # Inform the administrator about new releases, if any.
    $vars->{'release'} = Bugzilla::Update::get_notifications();
}

if ($user->id) {
    my $dbh = Bugzilla->dbh;
    $vars->{assignee_count} =
      $dbh->selectrow_array("SELECT COUNT(*) FROM bugs WHERE assigned_to = ?
                             AND resolution = ''", undef, $user->id);
    $vars->{reporter_count} =
      $dbh->selectrow_array("SELECT COUNT(*) FROM bugs WHERE reporter = ?
                             AND resolution = ''", undef, $user->id);
    $vars->{requestee_count} =
      $dbh->selectrow_array('SELECT COUNT(DISTINCT bug_id) FROM flags
                             WHERE requestee_id = ?', undef, $user->id);
}

# Generate and return the UI (HTML page) from the appropriate template.
$template->process("index.html.tmpl", $vars)
  || ThrowTemplateError($template->error());
这是因为cgi没有启动,解决方案:
# sudo a2enmod cgi
# sudo /etc/init.d/apache2 restart
好了,现在可以访问了,如下图
Bugzilla的使用
在新建用户的时候,出现如下错误是因为163的服务器认为该邮件为垃圾邮件,被拒绝接收,因为我才改换了qq邮箱。
出现如下错误是因为设置smtp_password的时候,填写的是邮箱密码,导致授权失败。正确的做法为:data/params.json中smtp_password值为申请QQ邮箱的授权码。
使用163作为smtp服务器,总是发送不成功,后来使用了qq的smtp,发送成功了。
QQ邮箱开通SMTP需要一个授权码,对应 的是POP3/SMTP协议。如下配置:
我使用的邮箱账号是:[email protected]
"smtp_password" : "your auth code",
"smtp_username" : "[email protected]",
bugzilla使用SMTP发送邮件
bugzilla 发送邮件配置
Bugzilla 不能发送邮件
参考:
在Ubuntu14.04上搭建Bugzilla
如果有啥不明白的,欢迎交流指正!


