solrcloud集群搭建
1 什么是SolrCloud
1.1 什么是SolrCloud
SolrCloud(solr 云)是Solr提供的分布式搜索方案,当你需要大规模,容错,分布式索引和检索能力时使用 SolrCloud。当一个系统的索引数据量少的时候是不需要使用SolrCloud的,当索引量很大,搜索请求并发很高,这时需要使用SolrCloud来满足这些需求。
1.2 SolrCloud结构
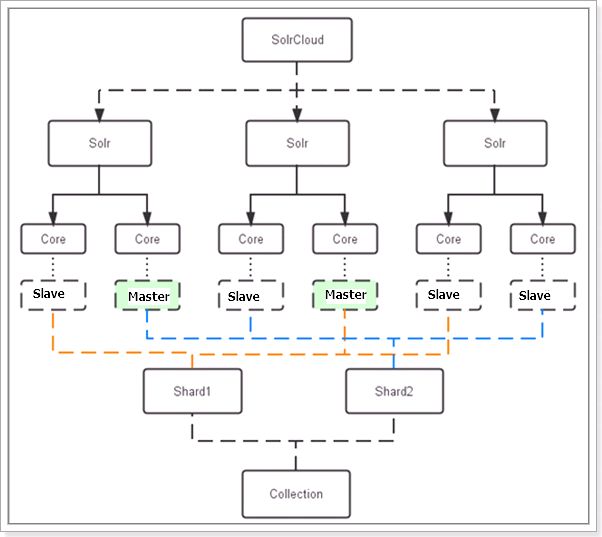
SolrCloud为了降低单机的处理压力,需要由多台服务器共同来完成索引和搜索任务。实现的思路是将索引数据进行Shard(分片)拆分,每个分片由多台的服务器共同完成,当一个索引或搜索请求过来时会分别从不同的Shard的服务器中操作索引。
SolrCloud需要Solr基于Zookeeper部署,Zookeeper是一个集群管理软件,由于SolrCloud需要由多台服务器组成,由zookeeper来进行协调管理。
下图是一个SolrCloud应用的例子:
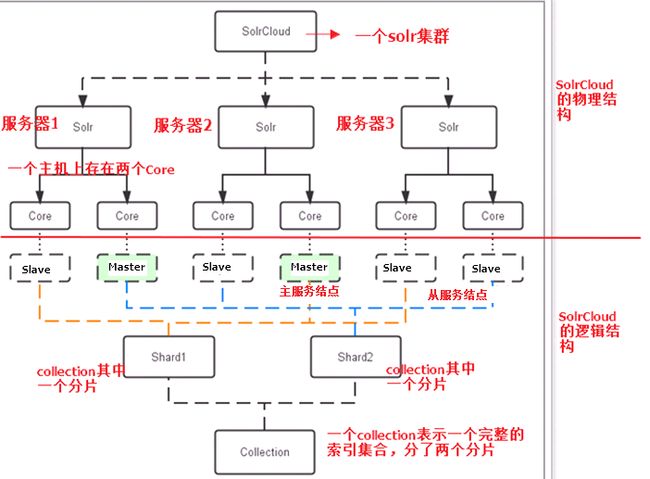
对上图进行图解,如下:
1.2.1 物理结构
三个Solr实例( 每个实例包括两个Core),组成一个SolrCloud。
1.2.2 逻辑结构
索引集合包括两个Shard(shard1和shard2),shard1和shard2分别由三个Core组成,其中一个Leader两个Replication,Leader是由zookeeper选举产生,zookeeper控制每个shard上三个Core的索引数据一致,解决高可用问题。
用户发起索引请求分别从shard1和shard2上获取,解决高并发问题。
1.2.2.1collection
Collection在SolrCloud集群中是一个逻辑意义上的完整的索引结构。它常常被划分为一个或多个Shard(分片),它们使用相同的配置信息。
比如:针对商品信息搜索可以创建一个collection。
collection=shard1+shard2+....+shardX
1.2.2.2Core
每个Core是Solr中一个独立运行单位,提供 索引和搜索服务。一个shard需要由一个Core或多个Core组成。由于collection由多个shard组成所以collection一般由多个core组成。
1.2.2.3Master或Slave
Master是master-slave结构中的主结点(通常说主服务器),Slave是master-slave结构中的从结点(通常说从服务器或备服务器)。同一个Shard下master和slave存储的数据是一致的,这是为了达到高可用目的。
1.2.2.4Shard
Collection的逻辑分片。每个Shard被化成一个或者多个replication,通过选举确定哪个是Leader。
2 SolrCloud搭建
SolrCloud结构图如下:
2.1 环境准备
CentOS-6.5-i386-bin-DVD1.iso
jdk-7u72-linux-i586.tar.gz
apache-tomcat-7.0.57.tar.gz
zookeeper-3.4.6.tar.gz
solr-4.10.3.tgz
服务器7台:
zookeeper三台:192.168.0.5,192.168.0.6,192.168.0.7
Solr四台:192.168.0.1,192.168.0.2,192.168.0.3,192.168.0.4
2.2 环境安装
2.3 CentOs 6.5安装
略
2.4 jdk7安装
略
2.5 zookeeper集群安装
2.5.1 解压zookeeper 安装包
tar -zxvf zookeeper-3.4.6.tar.gz
将zookeeper-3.4.6拷贝到/usr/local下并将目录 名改为zookeeper
至此zookeeper的安装目录为/usr/local/zookeeper
2.5.2 进入zookeeper文件夹,创建data 和logs
创建目录并赋于写权限
指定zookeeper的数据存放目录和日志目录
2.5.3 拷贝zookeeper配制文件zoo_sample.cfg
拷贝zookeeper配制文件zoo_sample.cfg并重命名zoo.cfg
cp /usr/local/zookeeper/conf/zoo_sample.cfg /usr/local/zookeeper /conf/zoo.cfg
2.5.4 修改zoo.cfg
  加入 dataDir=/usr/local/zookeeper/data

 dataLogDir=/ usr/local/zookeeper/logss

 server.1=192.168.0.5:2888:3888

 server.2=192.168.0.6:2888:3888

 server.3=192.168.0.7:2888:3888

zoo.cfg配制完后如下:

# The number of milliseconds of each tick

tickTime=2000

# The number of ticks that the initial

# synchronization phase can take

initLimit=10

# The number of ticks that can pass between

# sending a request and getting an acknowledgement

syncLimit=5

# the directory where the snapshot is stored.

# do not use /tmp for storage, /tmp here is just

# example sakes.

dataDir=/usr/local/zookeeper/data

# the port at which the clients will connect

clientPort=2181

# the maximum number of client connections.

# increase this if you need to handle more clients

#maxClientCnxns=60

#

# Be sure to read the maintenance section of the

# administrator guide before turning on autopurge.

#

# http://zookeeper.apache.org/doc/current/zookeeperAdmin.html#sc_maintenance

#

# The number of snapshots to retain in dataDir

#autopurge.snapRetainCount=3

# Purge task interval in hours

# Set to "0" to disable auto purge feature

#autopurge.purgeInterval=1

#dataLogDir=/usr/local/zookeeper/logs

server.1=192.168.0.5:2888:3888

server.2=192.168.0.6:2888:3888

server.3=192.168.0.7:2888:3888

### 2.5.5 进入data文件夹 建立对应的myid文件

 例如server.1为192.168.0.5则 data文件夹下的myid文件内容为1

server.2为192.168.0.6则 data文件夹下的myid文件内容为2

依此类推

### 2.5.6 拷贝zookeeper文件夹到其他机器(192.168.0.6和192.168.0.7)

### 2.5.7 开启zookeeper的端口

/sbin/iptables -I INPUT -p tcp --dport 2181 -j ACCEPT

/sbin/iptables -I INPUT -p tcp --dport 2888 -j ACCEPT

/sbin/iptables -I INPUT -p tcp --dport 3888 -j ACCEPT

/sbin/iptables -I INPUT -p tcp --dport 8080 -j ACCEPT --这里开启tomcat 8080端口

/etc/rc.d/init.d/iptables save #将更改进行保存

/etc/init.d/iptables restart #重启防火墙以便改动生效

### 2.5.8 启动三台服务器的zookeeper

进入/usr/local/zookeeper /bin

./zkServer.sh start

查看集群状态

./zkServer.sh status

刚启动可能会有错误,集群中其他节点一并起来后就正常了

## 2.6 tomcat安装

将apache-tomcat-7.0.57.tar.gz拷贝到/usr/local下并解压

cd /usr/local

tar -zxvf apache-tomcat-7.0.57.tar.gz
2.7 solr单机部署
2.7.1 解压solr.4.10.3.tgz
在其中一台服务器上解压solr.4.10.3.tgz,将solr.4.10.3.tgz拷贝到/usr/local下,解压缩:
tar -zxvf solr-4.10.3.tgz
压缩后在/usr/local下有 solr-4.10.3目录 。
2.7.2 solrhome
在/home下创建solr作为solrhome 并赋于读写权限
2.7.3 部署solr.war
参考solr单机部署方法。
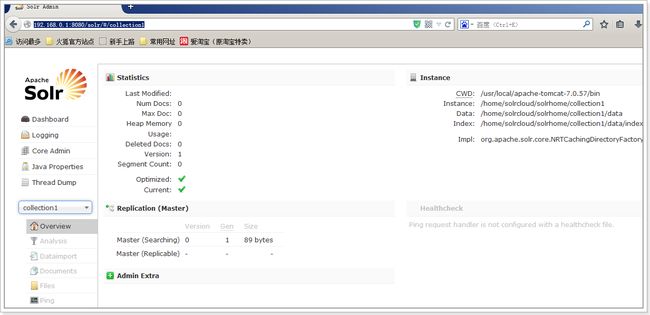
启动tomcat 访问 http://192.168.0.1:8080/solr 如图,至此单机版solr配制完成
2.8 solrCloud部署
2.8.1 启动zookeeper
solrCloud部署依赖zookeeper,需要启动每一台zookeeper服务器。
2.8.2 zookeeper管理配置文件
由于zookeeper统一管理solr的配置文件(主要是schema.xml、solrconfig.xml), solrCloud各各节点使用zookeeper管理的配置文件。
将上边部署的solr单机的conf拷贝到/home/solr下。
执行下边的命令将/home/solr/conf下的配置文件上传到zookeeper:
**sh /solr/solr-4.10.3/example/scripts/cloud-scripts/zkcli.sh -zkhost 192.168.200.149:2181,192.168.200.150:2181,192.168.200.151:2181 -cmd upconfig -confdir /solr/solr-4.10.3/example/solr/collection1/conf -confname myconf -solrhome /solr/solr-4.10.3/example/solr**
登陆zookeeper服务器查询配置文件:
cd /solr/zookeeper/bin/
./zkCli.sh
2.8.3 修改SolrCloud监控端口为8080:
修改每个solr的/solr/solr-4.10.3/example/solr/solr.xml文件。
2.8.4 每一台solr和zookeeper关联
修改每一台solr的tomcat 的 bin目录下catalina.sh文件中加入DzkHost指定zookeeper服务器地址:
JAVA_OPTS="-DzkHost=192.168.0.5:2181,192.168.0.6:2181,192.168.0.7:2181"
2.8.5 启动所有的solr服务
启动每一台solr的tomcat服务。
2.8.6 访问solrcloud
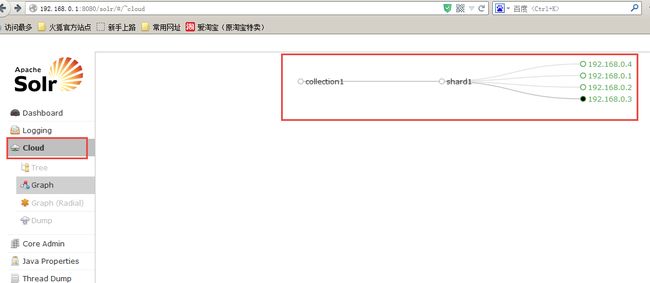
访问任意一台solr,左侧菜单出现Cloud:
2.8.7 SolrCloud集群配置
上图中的collection1集群只有一片,可以通过下边的方法配置新的集群。
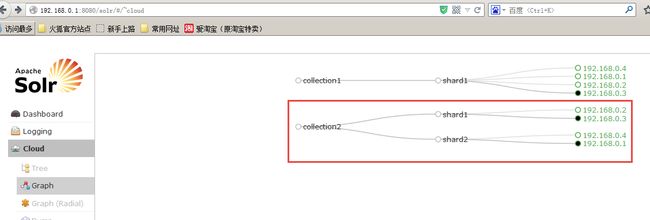
创建新集群collection2,将集群分为两片,每片两个副本。
http://192.168.200.149:8080/solr/admin/collections?action=CREATE&name=collection2&numShards=2&replicationFactor=2
删除集群命令;
http://192.168.200.149:8080/solr/admin/collections?action=DELETE&name=collection1
执行后原来的collection1删除,如下:
更多的命令请参数官方文档:apache-solr-ref-guide-4.10.pdf
另一种配置方法:如下
${solr_home}/collenction1/core.properties

**numShards=2**

**name=collection1**

**shard=shard1**

**coreNodeName=core_node1**

以上参数说明

**numShards=2 //****分片数量**

**name=collection1 //core****名称**

**shard=shard1 //****所属分片**

**coreNodeName=core_node1 //****结点名称**
2.9 SolrCloud测试
创建索引:
测试1:在一台solr上创建索引,从其它solr服务上可以查询到。
测试2:一次创建100个文档甚至更多,通过观察每个solr的core下边都有索引文档,说明索引文档是分片存储。
查询索引:
从任意一台Solr上查询索引,返回一个完整的结果,说明查询请求从不同的分片上获取数据,最终返回集群上所有匹配的结果。
2.10 solrJ访问solrCloud
**public**  **class** SolrCloudTest {

  // zookeeper地址

  **private**  **static** String *zkHostString* = "192.168.101.7:2181,192.168.101.8:2181,192.168.101.9:2181";

  // collection默认名称,比如我的solr服务器上的collection是collection2_shard1_replica1,就是去掉“_shard1_replica1”的名称

  **private**  **static** String *defaultCollection* = "collection2";

  // 客户端连接超时时间

  **private**  **static**  **int**  *zkClientTimeout* = 3000;

  // zookeeper连接超时时间

  **private**  **static**  **int**  *zkConnectTimeout* = 3000;

  // cloudSolrServer实际

  **private** CloudSolrServer cloudSolrServer;

  // 测试方法之前构造 CloudSolrServer

  @Before

  **public**  **void** init() {

  cloudSolrServer = **new** CloudSolrServer(*zkHostString*);

  cloudSolrServer.setDefaultCollection(*defaultCollection*);

  cloudSolrServer.setZkClientTimeout(*zkClientTimeout*);

  cloudSolrServer.setZkConnectTimeout(*zkConnectTimeout*);

  cloudSolrServer.connect();

 }

  // 向solrCloud上创建索引

  @Test

  **public**  **void** testCreateIndexToSolrCloud() **throws** SolrServerException,

 IOException {

 SolrInputDocument document = **new** SolrInputDocument();

 document.addField("id", "100001");

 document.addField("title", "李四");

  cloudSolrServer.add(document);

  cloudSolrServer.commit();

 }

  // 搜索索引

  @Test

  **public**  **void** testSearchIndexFromSolrCloud() **throws** Exception {

 SolrQuery query = **new** SolrQuery();

 query.setQuery("*:*");

  **try** {

 QueryResponse response = cloudSolrServer.query(query);

 SolrDocumentList docs = response.getResults();

 System.*out*.println("文档个数:" + docs.getNumFound());

 System.*out*.println("查询时间:" + response.getQTime());

  **for** (SolrDocument doc : docs) {

 ArrayList title = (ArrayList) doc.getFieldValue("title");

 String id = (String) doc.getFieldValue("id");

 System.*out*.println("id: " + id);

 System.*out*.println("title: " + title);

 System.*out*.println();

 }

 } **catch** (SolrServerException e) {

 e.printStackTrace();

 } **catch** (Exception e) {

 System.*out*.println("Unknowned Exception!!!!");

 e.printStackTrace();

 }

 }

  // 删除索引

  @Test

  **public**  **void** testDeleteIndexFromSolrCloud() **throws** SolrServerException, IOException {

  // 根据id删除

 UpdateResponse response = cloudSolrServer.deleteById("zhangsan");

  // 根据多个id删除

  // cloudSolrServer.deleteById(ids);

  // 自动查询条件删除

  // cloudSolrServer.deleteByQuery("product_keywords:教程");

  // 提交

  cloudSolrServer.commit();

 }

}
2.11 solrJ最新java API
通过SolrJ获取Solr检索结果

  1、通过SolrParams的方式提交查询参数

       SolrClient solr = new HttpSolrClient("http://localhost:8080/solr/core");

 Map map = new HashMap();

 keyword = "".equals(keyword) ? "*" : keyword;

 map.put("q", "search_item:" + keyword);

 map.put("indent", "true");

 map.put("hl", "true");

 map.put("hl.fl", "title, summary");

 map.put("hl.simple.pre", "");

  map.put("hl.simple.post", "");

 map.put("start", "0");

 map.put("rows", "10");

 SolrParams params = new MapSolrParams(map);

 try {

 QueryResponse resp = solr.query(params);

 Map>> highlight = resp.getHighlighting();//高亮集合

 SolrDocumentList docsList = resp.getResults();//文档集合

 int docNumFound = (int) docsList.getNumFound();//文档数

 ArrayList> list = new ArrayList>();

 String key = "";

 Map docMap;

 for (SolrDocument doc : docsList) {

 docMap = new HashMap();

 key = doc.get("id").toString();

 if(key != null && highlight.get(key) != null){

 docMap.put("id", key);

 docMap.put("type", doc.get("type").toString());

 String title = (String) (!"*".equals(keyword) && highlight.get(key).get("title") != null ? highlight.get(key).get("title").get(0) : doc.get("title"));

 docMap.put("title", title);

 String summary = (String) (!"*".equals(keyword) && highlight.get(key).get("summary") != null ? highlight.get(key).get("summary").get(0) : doc.get("summary"));

 docMap.put("summary", summary);

 }

 list.add(docMap);

 }

 solr.close();

 } catch (Exception e) {

 e.printStackTrace();

 }finally{

 if (solr != null) {

 try {

 solr.close();

 } catch (IOException e) {

 e.printStackTrace();

 }

 }

 }

  2、通过SolrQuery提交参数

 SolrClient solr = new HttpSolrClient("http://localhost:8080/solr/core");

 SolrQuery query = new SolrQuery();

  //设置高亮

 query.setQuery("name:datou");

 query.setHighlight(true); // 开启高亮组件或用query.setParam("hl", "true");

 query.addHighlightField("name");// 高亮字段

 query.setHighlightSimplePre("");//标记,高亮关键字前缀

 query.setHighlightSimplePost("");//后缀

// query.setHighlightSnippets(1);//结果分片数,默认为1

// query.setHighlightFragsize(1000);//每个分片的最大长度,默认为100

 System.out.println(query);//用于调试程序

 QueryResponse rsp = solr.query(query);

 NamedList list = (NamedList) rsp.getResponse().get("highlighting");

 System.out.println(list);//用于显示list中的值

  for (int i = 0; i < list.size(); i++){

 System.out.println("id=" + list.getName(i) + "文档中高亮显示的字段:" + list.getVal(i));

 }
2.12 solr javaAPI增删改查
建一个Item Entity
package com.my.entity;

import java.util.Date;

import org.apache.solr.client.solrj.beans.Field;

public class Item {

 @Field

 private long id;

 @Field

 private String subject;

 @Field

 private String content;

 @Field

 private Date last_update_time;

 public long getId() {

 return id;

 }

 public void setId(long id) {

 this.id = id;

 }

 public String getSubject() {

 return subject;

 }

 public void setSubject(String subject) {

 this.subject = subject;

 }

 public String getContent() {

 return content;

 }

 public void setContent(String content) {

 this.content = content;

 }

 public Date getLast_update_time() {

 return last_update_time;

 }

 public void setLast_update_time(Date last_update_time) {

 this.last_update_time = last_update_time;

 }

}
测试代码:
package com.my.solr;
import java.io.IOException;
import java.util.Date;
import java.util.List;
import org.apache.solr.client.solrj.SolrQuery;
import org.apache.solr.client.solrj.SolrQuery.ORDER;
import org.apache.solr.client.solrj.SolrQuery.SortClause;
import org.apache.solr.client.solrj.SolrServerException;
import org.apache.solr.client.solrj.impl.HttpSolrServer;
import org.apache.solr.client.solrj.impl.XMLResponseParser;
import org.apache.solr.client.solrj.response.QueryResponse;
import com.my.entity.Item;
public class TestSolr {
public static void main(String[] args) throws IOException, SolrServerException {
String url = "http://localhost:8899/solr/mycore";
HttpSolrServer core = new HttpSolrServer(url);
core.setMaxRetries(1);
core.setConnectionTimeout(5000);
core.setParser(new XMLResponseParser()); // binary parser is used by default
core.setSoTimeout(1000); // socket read timeout
core.setDefaultMaxConnectionsPerHost(100);
core.setMaxTotalConnections(100);
core.setFollowRedirects(false); // defaults to false
core.setAllowCompression(true);
// ------------------------------------------------------
// remove all data
// ------------------------------------------------------
core.deleteByQuery("*:*");
// ------------------------------------------------------
// add item
// ------------------------------------------------------
Item item = new Item();
item.setId(1);
item.setSubject("solrj test");
item.setContent("this is my solrj test, ha ha.");
item.setLast_update_time(new Date());
core.addBean(item);
// ------------------------------------------------------
// add unicode item
// ------------------------------------------------------
Item item_cn = new Item();
item_cn.setId(2);
item_cn.setSubject("我的测试");
item_cn.setContent("这是一个神奇的网站!");
item.setLast_update_time(new Date());
core.addBean(item_cn);
// commit
core.commit();
// ------------------------------------------------------
// search
// ------------------------------------------------------
SolrQuery query = new SolrQuery();
query.setQuery("*:*");
query.addSort(new SortClause("id", ORDER.desc));
QueryResponse response = core.query(query);
List- items = response.getBeans(Item.class);
for (Item i : items) {
System.out.println("id=" + i.getId() + "\tcontent=" + i.getContent());
}
}
}
