CUDA最近新发布了9.0,搭配cuDNN7重装了以下系统。
硬件环境:win10+Ubuntu16.04.3双系统
软件环境:CUDA9.0+cuDNN7
阅坑无数之后,参见官方文档,以及各种零散资料,一次成功,总结如下。
CUDA9.0下载:https://developer.nvidia.com/cuda-downloads
cuDNN7下载:https://developer.nvidia.com/cudnn
前言
1.关于ubuntu系统,我是在官网下载的release版本后使用U盘安装在win10下的
2.安装之前desible掉了掉脑的source boot
3.安装ubuntu过程中全部勾选,也就是选择download update选项和“安装第三方xxx“那个选项
4.装好ubuntu之后直接安装CUDA9.0,中间没有其他任何操作(没有update)
好了,下面开始装,按照命令一步一步直至结束。
关于nvidia driver!!!
这里我想说下nvidia driver的事情。
这个驱动和ubuntu16.04实在是不太对付,目前网上有几种安装方法:
1.下载安装文件之后使用ubuntu非图形界面安装
2.使用ubuntu系统的更新管理功能安装驱动更新
3.使用PPA源安装
我全都试过,没一个好使!!!!!!!!!!!!!!!!!!!!!(对我而言)
很多循环登录啦,无法进入系统啦。。。
即使进入了,也会出现运行“nvidia-smi“报错的情况!
我用的是如下方法:
因为我看到CUDA的installation document中有介绍会按照nvidia driver,所以选在在安装CUDA的同时安装nvidia driver。
事实也证明这种安装方法,既不会多安东西,也不会缺少东西,十分完美。
所以我没有先安装nvidia driver(驱动)这一步骤,因为包含在CUDA里面了。
一、安装CUDA
1.Verify You Have a CUDA-Capable GPU:
lspci | grep -i nvidia
看官网GPU支持,应该没问题
2.Verify You Have Supported Version of Linux:
uname -m && cat /etc/*release
前面说了16.04,支持
3.Verify the System Has gcc Installed:
gcc --version
这里注意!!!我看到有人在网上说gcc要降版本,我根本没有任何操作,我的版本是“5.4.0“,千万不要作多余操作,以免不必要麻烦!
4.Verify the System has the Correct Kernel Headers and Development Packages Installed:
uname -r
我的版本:4.10.0-38-generic
这里注意!!!官网上说最好执行“sudo apt-get install linux-headers-$(uname -r)“这个命令来安装kernel source,我之前安装的时候直接执行了这个命令,然后在安装nvidia driver的时候死活安不上,报错类似“Unable to load the kernel module 'nvidia.ko'...“。后来我看了很多解决办法,都说缺少kernel source头文件,我安装之后在"/usr/src/"文件夹下多了很多kernel-xxx文件,然而很多都不匹配,只能删掉,然后删掉这种kernel头文件时会损坏系统,所以后来...重装系统。
后来我安装完ubuntu开机之后在"/usr/src/"文件夹下看到已经有四个文件夹,头文件已经装好了,所以不需要执行任何命令!
5.Create a file at/etc/modprobe.d/blacklist-nouveau.confwith the following contents:
blacklist nouveau
options nouveau modeset=0
就是用将上述代码放到该文件中后save
6.Regenerate the kernel initramfs:
sudo update-initramfs -u
执行上述命令应用更改。
7.Reboot into text mode (runlevel 3):
systemctl set-default runlevel3.target
这个命令在再次开机是将运行没有图形界面的系统
8.重启
reboot
注意!!!这里再次开机时将无法进入图形界面,按Ctrl+Alt+F1进入命令行页面。
9.确认nouveau被屏蔽:
lsmod | grep nouveau
无输出则被屏蔽。
好了,接下来可以正式开始安装CUDA和nvidia driver了。
安装:
ssudo sh cuda_9.0.176_384.81_linux.run
注意!!!这里安装是我设置的几个选项:
(1)EULA Acceptance -------y
(2)CUDA Driver installation -------y
(3)openGL -------n
(4)x-server -------y
(5)CUDA Toolkit installation location ---------------默认Enter
(6)CUDA Samples installation and location ---------------默认Enter
全部设置好后等待安装完毕。
10.进入图像界面
systemctl set-default runlevel5.target
设置如上命令,再次重启时进入图形界面
11.重启:
reboot
12.查看显卡:
cat /proc/driver/nvidia/version
我的显示nvidia384等信息
13.Environment Setup
将如下两个文件放到/etc/profile中
export PATH=/usr/local/cuda-9.0/bin${PATH:+:${PATH}}
export LD_LIBRARY_PATH=$LD_LIBRARY_PATH:/usr/local/cuda/lib64
保存。
14.使环境更改生效
source /etc/profile
15.添加动态链接库
将下述代码放到/etc/ld.so.conf中
/usr/local/cuda-9.0/lib64
16.Compiling the Examples
进入到~/NVIDIA_CUDA-9.0_Samples下
make
等待很久。
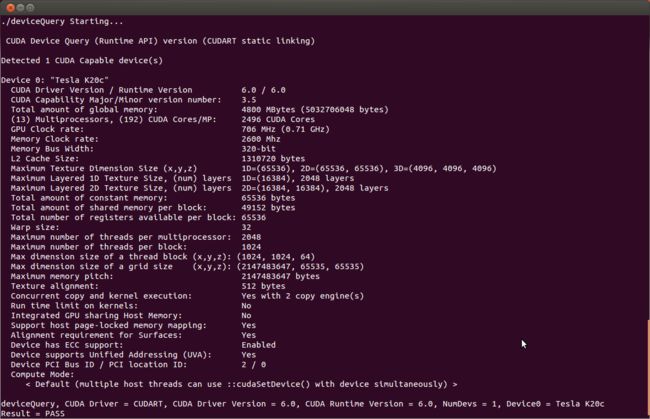
13.检验安装结果
cd 1_Utilities/deviceQuery
./deviceQuery
若出现下列结果,则安装成功
二、cuDNN安装
1.安装
Navigate to “yourdirectory“ containing cuDNN Debian file.
1.Install the runtime library, for example:
sudo dpkg -i libcudnn7_7.0.3.11-1+cuda9.0_amd64.deb
2.Install the developer library, for example:
sudo dpkg -i libcudnn7-dev_7.0.3.11-1+cuda9.0_amd64.deb
3.Install the code samples and the cuDNN Library User Guide, for example:
sudo dpkg -i libcudnn7-doc_7.0.3.11-1+cuda9.0_amd64.deb
2.验证
To verify that cuDNN is installed and is running properly, compile the mnistCUDNN sample located in the/usr/src/cudnn_samples_v7directory in the debian file.
Copy the cuDNN sample to a writable path.
$cp -r /usr/src/cudnn_samples_v7/ $HOME
Go to the writable path.
$ cd $HOME/cudnn_samples_v7/mnistCUDNN
Compile the mnistCUDNN sample.
$make clean && make
Run the mnistCUDNN sample.
$ ./mnistCUDNN
If cuDNN is properly installed and running on your Linux system, you will see a message similar to the following:
Test passed!
说明你安装成功了。
如果没有安装成功,使用另一种压缩包方式再装一遍:
下载文件:cudnn-9.0-linux-x64-v7.tgz
Navigate to yourdirectory containing the cuDNN Tar file.
1.Unzip the cuDNN package.
$ tar -xzvf cudnn-9.0-linux-x64-v7.tgz
2.Copy the following files into the CUDA Toolkit directory.
$ sudo cp cuda/include/cudnn.h /usr/local/cuda/include
$ sudo cp cuda/lib64/libcudnn* /usr/local/cuda/lib64
$ sudo chmod a+r /usr/local/cuda/include/cudnn.h
/usr/local/cuda/lib64/libcudnn*
再验证一遍,成功。
至此,全部安装完毕!
有问题可以留言,大家一起探讨。
转载著名出处。
