1、Voting Classifiers(投票分类器)
假设我们已经训练了一些分类器,创建一个更好的分类器的一种非常简单的方法是聚合每个分类器的预测并预测获得最多选票的类。令人惊讶的是,这种投票分类器通常比集合中的最佳分类器具有更高的准确度。事实上,即使每个分类器都是弱学习者(意味着它只比随机猜测稍微好一些),整体仍然可以成为一个强大的学习者(达到高准确度),只要有足够数量的弱学习者并且他们足够多样化。
以下类比可以帮助揭示这个谜团。假设有一个稍微有偏见的硬币,有51%的机会出现正面, 并有49%的机会出现反面(这对应到模型就是有51%分类正确,49%分类错误)。
接下来我们模拟一个实验,每次投1000次硬币,并由投票法得到结果(即正面多就这一组投掷结果为正面,反之亦然),共投10000次,我们看看有多少组投掷的结果为正面(即有多少次分类正确)。
heads_proba = 0.51
coin_tosses = (np.random.rand(10000, 1000) < heads_proba).astype(np.int32)
pred=(np.sum(coin_tosses,axis=1)>500)
print(sum(pred)/10000)

out:
0.7236
可以看到,得到正面的实验组数占了约72%,这相比单组投掷结果为正面的概率51%提升了不少,如果我们每组投掷10000次,这个数字甚至会变成97%,可见投票分类器是可以达到“三个臭皮匠赛过诸葛亮”的效果的。
然而,只有当所有分类器完全独立时才会出现这种情况,从而产生不相关的错误,但实际训练学习器时显然不是这种情况,因为各个学习器是在相同的数据上训练的。他们可能会犯同样类型的错误,因此错误的类会有很多次拿到多数选票,从而降低整体的准确性。
当预测学习器尽可能彼此独立时,集合方法最有效。如何让各个预测学习器尽可能独立呢?获得不同分类器的一种方法是使用完全不同的算法训练它们。 这增加了他们制造完全不同类型错误的机会,从而提高了整体的准确性。
以下代码在Scikit-Learn中创建并训练投票分类器,这个投票分类器包含三种不同的分类器:
首先加载数据(这里使用make_moon数据集),并划分为训练集和测试集。
from sklearn.model_selection import train_test_split
from sklearn.datasets import make_moons

X,y = make_moons(n_samples=500, noise=0.30, random_state=42)
#未设置test_size,默认值为0.25,即X,y中0.25的数据构成test数据
X_train, X_test, y_train, y_test = train_test_split(X, y, random_state=42)
然后创建各个学习器,包括随机森林、逻辑回归和支持向量分类,创建完成后,使用VotingClassifier将三个学习器进行结合:
from sklearn.ensemble import RandomForestClassifier
from sklearn.linear_model import LogisticRegression
from sklearn.svm import SVC
from sklearn.ensemble import VotingClassifier

log_clf = LogisticRegression(random_state=42)
rnd_clf = RandomForestClassifier(random_state=42)
svm_clf = SVC(random_state=42)

voting_clf = VotingClassifier(
    estimators=[('lr', log_clf), ('rf', rnd_clf), ('svc', svm_clf)],
    voting='hard')
使用我们的投票分类器voting_clf在训练集上进行训练:
voting_clf.fit(X_train,y_train)
比较各个分类器和组合后的投票分类器在测试集上的表现:
from sklearn.metrics import accuracy_score

for clf in (log_clf,rnd_clf,svm_clf,voting_clf):
    clf.fit(X_train,y_train)
    y_pred = clf.predict(X_test)
    print(clf.__class__.__name__,accuracy_score(y_test,y_pred))

out:
LogisticRegression 0.864
RandomForestClassifier 0.872
SVC 0.888
VotingClassifier 0.896
可以看到,投票分类器略微优于所有单独的分类器。
以上方法聚合每个分类器的预测并预测获得最多选票的类。这种多数表决分类器称为硬投票分类器。预测具有最高等级概率的类,对所有单个分类器进行平均。这称为软投票分类器。 依据西瓜书上的说法,软投票分类器的效果通常好于硬投票分类器,即使个体分类器预测的类概率并不是很准确。直觉上这一点是容易理解的,若每个分类器都输出预测类,我们得到的信息只是预测类的概率高于其它类;若每个分类器都输出预测类概率,我们就可以获得这个预测的把握有多大的信息,比如正类概率90%,负类概率10%,和正类概率55%,负类概率45%对于硬投票是体现不出差异的,这部分信息被软投票利用起来,从而有助于提高精度。
下面我们通过设置参数,将上述的硬投票分类器变成软投票分类器,需要做的就是用voting =“soft”替换voting =“hard”,并确保所有分类器都可以估计类概率。默认情况下,SVC类不是估计概率,因此需要将其概率超参数设置为True (这将使SVC类使用交叉验证来估计类概率,减慢训练,并且它将添加predict_proba()方法)。
log_clf = LogisticRegression(random_state=42)
rnd_clf = RandomForestClassifier(random_state=42)
svm_clf = SVC(probability=True,random_state=42)

voting_clf = VotingClassifier(
    estimators=[('lr', log_clf), ('rf', rnd_clf), ('svc', svm_clf)],
    voting='soft')

#训练模型
voting_clf.fit(X_train,y_train)

#计算各个模型的精度
from sklearn.metrics import accuracy_score

for clf in (log_clf, rnd_clf, svm_clf, voting_clf):
    clf.fit(X_train, y_train)
    y_pred = clf.predict(X_test)
    print(clf.__class__.__name__, accuracy_score(y_test, y_pred))

out:
LogisticRegression 0.864
RandomForestClassifier 0.872
SVC 0.888
VotingClassifier 0.912
可以看到,同样的几个个体学习器,通过软投票的方式组合得到的集成分类器要比通过硬投票的方式组合得到的集成分类器精度要高。
2、Bagging
就像刚刚讨论过的,获得各种分类器的一种方法是使用非常不同的训练算法。 另一种方法是对每个预测器使用相同的训练算法,但是在训练集的不同随机子集上训练它们。
这里的重点是随机子集的产生方式,Bagging采用的是自助采样法,即有放回的采样,这种采样方式得到的各个随机子集是相互独立的,因此我们可以认为基于这些随机子集训练出的各个学习器也是尽可能相互独立的。
一般来说,Bagging的最终结果是整体具有相似的偏差,但方差低于在原始训练集上训练的单个预测器。
Scikit-Learn提供了一个简单的BaggingClassifier类,下面我们构建BaggingClassifier来进行Bagging,并将集成后的分类器与单个的学习器进行比较:
from sklearn.tree import DecisionTreeClassifier

tree_clf = DecisionTreeClassifier(random_state=42)

tree_clf.fit(X_train, y_train)
y_pred_tree = tree_clf.predict(X_test)
print(accuracy_score(y_test, y_pred_tree))

out:
0.856
from sklearn.ensemble import BaggingClassifier

bag_clf = BaggingClassifier(
    DecisionTreeClassifier(random_state=42),#  基类预测器
    n_estimators = 500,#基类预测器的个数
    max_samples = 100, #喂给每个基类预测器的样本个数
    bootstrap = True,#是否采取有放回抽样
    n_jobs = -1,#并行的工作数,-1表示使用所有CPU资源
    random_state=42
)

bag_clf.fit(X_train,y_train)
y_pred = bag_clf.predict(X_test)
print(accuracy_score(y_test, y_pred))

out:
0.904
可以看到集成后的分类器精度比单个的分类器要高。
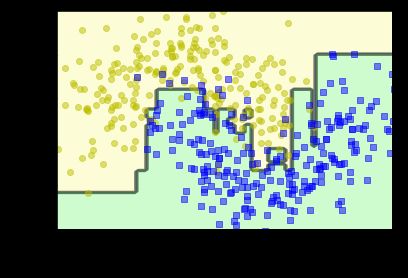
为了理解这种精度的提升来自方差的减小,我们将两者的分界线可视化:
from matplotlib.colors import ListedColormap

def plot_decision_boundary(clf, X, y, axes=[-1.5, 2.5, -1, 1.5], alpha=0.5, contour=True):
    x1s = np.linspace(axes[0], axes[1], 100)
    x2s = np.linspace(axes[2], axes[3], 100)
    x1, x2 = np.meshgrid(x1s, x2s)
    X_new = np.c_[x1.ravel(), x2.ravel()]
    y_pred = clf.predict(X_new).reshape(x1.shape)
    custom_cmap = ListedColormap(['#fafab0','#9898ff','#a0faa0'])
    #alpha表示透明度
    plt.contourf(x1, x2, y_pred, alpha=0.5, cmap=custom_cmap)
    if contour:
        custom_cmap2 = ListedColormap(['#7d7d58','#4c4c7f','#507d50'])
        plt.contour(x1, x2, y_pred, cmap=custom_cmap2, alpha=0.8)
    plt.plot(X[:, 0][y==0], X[:, 1][y==0], "yo", alpha=alpha)
    plt.plot(X[:, 0][y==1], X[:, 1][y==1], "bs", alpha=alpha)
    plt.axis(axes)
    plt.xlabel(r"$x_1$", fontsize=18)
    plt.ylabel(r"$x_2$", fontsize=18, rotation=0)
plt.figure(figsize=(11,4))
plt.subplot(121)
plot_decision_boundary(tree_clf, X, y)
plt.title("Decision Tree", fontsize=14)
plt.subplot(122)
plot_decision_boundary(bag_clf, X, y)
plt.title("Decision Trees with Bagging", fontsize=14)
save_fig("decision_tree_without_and_with_bagging_plot")
plt.show()
如果基类分类器可以估计类概率,则BaggingClassifier自动执行软投票而不是硬投票,决策树分类器就是这种情况。
上图比较单个决策树的决策边界与500棵树的Bagging集成学习器的决策边界,两者都在 moons 数据集上训练。可以看到,集成的预测可能会比单一决策树的预测更好地推广:集成具有和单个决策树差不多的偏差,但方差较小(它使训练集上的错误数大致相同,但决策边界少一点不规则)。
另外,Bagging方法的一个特点就是存在大约37%的未采样训练实例,通常称为out-of-bag (oob),注意,对于所有预测器,它们不是相同的37%。
由于预测器在训练期间从不会看到 oob 实例,因此可以在这些实例上进行评估,无需单独的验证集或交叉验证。可以通过平均每个预测器的 oob 评估来评估集成分类器。
在Scikit-Learn中,可以在创建BaggingClassifier时设置oob_score = True要求在训练后进行自动oob评估。 以下代码演示了这一点。最终的评估分数可通过oob_score_变量获得:
bag_clf = BaggingClassifier(
    DecisionTreeClassifier(random_state=42),#  基类预测器
    n_estimators=500,
    bootstrap = True,
    n_jobs = -1,
    oob_score=True,
    random_state=40
)

bag_clf.fit(X_train,y_train)
bag_clf.oob_score_

out:
0.9013333333333333
3、Random Forest(随机森林)
随机森林算法在种树时引入额外的随机性; 而不是在分割节点时搜索最佳功能,它在随机的特征子集中搜索最佳特征。这导致树木更大的多样性,其为较低的方差交换较高的偏差,通常产生整体更好的模型。
随机森林是决策树的集成,通常通过Bagging训练。 我们使用RandomForestClassifier类,而不是构建BaggingClassifier并将其传递给DecisionTreeClassifier,这样更方便针对Decision Trees 进行优化 (类似地,有一个RandomForestRegressor类用于回归任务)。以下代码使用所有可用的CPU核心训练具有500棵树(每棵树限制为最多16个节点)的随机森林分类器:
from sklearn.ensemble import RandomForestClassifier

rnd_clf = RandomForestClassifier(n_estimators=500, max_leaf_nodes=16, random_state=42)
rnd_clf.fit(X_train,y_train)
y_pred_rf = rnd_clf.predict(X_test)
print(accuracy_score(y_pred_rf,y_test))

out:
0.912
可以看到,模型精度达到了91.2%,这和之前我们使用BaggingClassifier集成500个DecisionTreeClassifier得到的预测精度是相同的。
除了对分类结果进行预测,随机森林还可以提取重要特征,重要特征可能看起来更接近树的根,而不重要的特征通常会更接近叶子(或根本不显示)。因此,可以通过计算特征在森林中所有树木中出现的平均深度来估计特征的重要性。Scikit-Learn会在训练后自动为每个特征计算。 可以使用feature_importances_ 属性访问结果。
from sklearn.datasets import load_iris

iris = load_iris()
rnd_clf = RandomForestClassifier(n_estimators=500, n_jobs=-1, random_state=42)
rnd_clf.fit(iris["data"], iris["target"])
for name, score in zip(iris["feature_names"], rnd_clf.feature_importances_):
    print(name, score)

out:
sepal length (cm) 0.11249225099876374
sepal width (cm) 0.023119288282510326
petal length (cm) 0.44103046436395765
petal width (cm) 0.4233579963547681
可以看到,对于iris数据集的分类,petal_width和petal_length两个特征较为重要,而另外两个特征sepal_width和sepal_length对于分类则不那么重要。
若在MNIST数据集上训练随机森林分类器并绘制每个像素的重要性,将得到如下图像:
from sklearn.datasets import fetch_openml
X, y = fetch_openml('mnist_784', version=1, return_X_y=True)

rnd_clf = RandomForestClassifier(random_state=42)
rnd_clf.fit(X, y)

def plot_digit(data):
    image = data.reshape(28, 28)
    #参数cmap用于设置热图的Colormap
    #interpolation设置插值方式,"nearest"将图片一块块显示颜色
    plt.imshow(image, cmap = matplotlib.cm.hot,
               interpolation="nearest")
    plt.axis("off")

plot_digit(rnd_clf.feature_importances_)

cbar = plt.colorbar(ticks=[rnd_clf.feature_importances_.min(), rnd_clf.feature_importances_.max()])
cbar.ax.set_yticklabels(['Not important', 'Very important'])

save_fig("mnist_feature_importance_plot")
plt.show()
我们可以从热度图中大概看到手写数字分类问题的样本图片中哪些像素是最为重要的。
4、Boosting(提升)
提升(Boosting)指的是可以将几个弱学习者组合成强学习者的集成方法。大多数提升方法的思想就是按顺序去训练分类器,每一个都要尝试修正前面的分类。现如今已经有很多的提升方法了,其中最著名的就是 Adaboost( Adaptive Boosting,适应性提升) 和 Gradient Boosting(梯度提升)。
构建一个 Adaboost 分类器,首先要训练第一个基类分类器(例如一个决策树),然后拿来在训练集上做预测,然后增加错误分类的训练实例的相对权重, 使用更新后的权重训练第二个分类器,并再次对训练集进行预测,更新权重,以此类推。
m = len(X_train)

plt.figure(figsize=(11, 4))
for subplot, learning_rate in ((121, 1), (122, 0.5)):
    sample_weights = np.ones(m)
    plt.subplot(subplot)
    for i in range(5):
        svm_clf = SVC(kernel="rbf", C=0.05, random_state=42)
        svm_clf.fit(X_train, y_train, sample_weight=sample_weights)
        y_pred = svm_clf.predict(X_train)
        sample_weights[y_pred != y_train] *= (1 + learning_rate)
        plot_decision_boundary(svm_clf, X, y, alpha=0.2)
        plt.title("learning_rate = {}".format(learning_rate), fontsize=16)
    if subplot == 121:
        plt.text(-0.7, -0.65, "1", fontsize=14)
        plt.text(-0.6, -0.10, "2", fontsize=14)
        plt.text(-0.5,  0.10, "3", fontsize=14)
        plt.text(-0.4,  0.55, "4", fontsize=14)
        plt.text(-0.3,  0.90, "5", fontsize=14)

save_fig("boosting_plot")
plt.show()
从左图中可以看到,我们的学习器确实在不断更正上一个学习器的分类错误。右边的图表代表了相同的预测器序列,但学习率减半。可以看到,这种顺序学习技术与Gradient Descent有一些相似之处。
下面我们使用sklearn中的类AdaBoostClassifier来训练一个模型并将分类结果可视化:
from sklearn.ensemble import AdaBoostClassifier

ada_clf = AdaBoostClassifier(
    DecisionTreeClassifier(max_depth=1),
    n_estimators=200,
    algorithm="SAMME.R", #SAMME.R使用了对样本集分类的预测概率大小来作为弱学习器权重
    learning_rate=0.5,
    random_state=42)

ada_clf.fit(X_train, y_train)
plot_decision_boundary(ada_clf, X, y)
可以看到AdaBoost方法的分类效果还是很好的。
accuracy_score(ada_clf.predict(X_test),y_test)

out:
0.896
这种顺序学习技术有一个重要缺点:它不能被并行化(或仅部分地),因为每个预测器只能在先前的预测器被训练和评估之后才能被训练。因此它不像Bagging那样可扩展。
接下来我们考虑Gradient Boosting。就像AdaBoost一样,Gradient Boosting通过在一个集合中依次添加学习器来进行工作,每一个都纠正它的前一个学习器的错误。 但是,这种方法不是像AdaBoost那样在每次迭代时调整实例权重,而是尝试使用新预测器拟合先前预测器所产生的残差。
我们演示一个简单的回归示例,使用决策树作为基础预测器(当然,梯度提升也适用于回归任务)。 这称为渐变树增强(Gradient Tree Boosting)。
首先,生成带有随机扰动的二次训练集:
#生成带有随机扰动的二次数据
np.random.seed(42)
X = np.random.rand(100, 1) - 0.5
y = 3*X[:, 0]**2 + 0.05 * np.random.randn(100)
然后训练第一个DecisionTreeRegressor:
from sklearn.tree import DecisionTreeRegressor

tree_reg1 = DecisionTreeRegressor(max_depth= 2)
tree_reg1.fit(X,y)
接下来训练第二个DecisionTreeRegressor来解决第一个预测器遗留的残差:
y2 = y - tree_reg1.predict(X)
tree_reg2 = DecisionTreeRegressor(max_depth = 2)
tree_reg2.fit(X,y2)
类似的,我们训练第三个DecisionTreeRegressor来处理第二个预测器产生的残差:
y3 = y2 - tree_reg2.predict(X)
tree_reg3 = DecisionTreeRegressor(max_depth=2, random_state=42)
tree_reg3.fit(X, y3)
现在我们有一个包含三棵树的集合。它可以简单地通过累加所有树的预测来对新实例进行预测:
X_new = np.array([[0.8]])
y_pred = sum(tree.predict(X_new) for tree in (tree_reg1, tree_reg2, tree_reg3))
y_pred

out:
array([0.75026781])
接下来我们考察各个树的预测和集合中树的总预测结果:
def plot_predictions(regressors, X, y, axes, label=None, style="r-", data_style="b.", data_label=None):
    x1 = np.linspace(axes[0], axes[1], 500)
    y_pred = sum(regressor.predict(x1.reshape(-1, 1)) for regressor in regressors)
    plt.plot(X[:, 0], y, data_style, label=data_label)
    plt.plot(x1, y_pred, style, linewidth=2, label=label)
    if label or data_label:
        plt.legend(loc="upper center", fontsize=16)
    plt.axis(axes)

plt.figure(figsize=(11,11))

plt.subplot(321)
plot_predictions([tree_reg1], X, y, axes=[-0.5, 0.5, -0.1, 0.8], label="$h_1(x_1)$", style="g-", data_label="Training set")
plt.ylabel("$y$", fontsize=16, rotation=0)
plt.title("Residuals and tree predictions", fontsize=16)

plt.subplot(322)
plot_predictions([tree_reg1], X, y, axes=[-0.5, 0.5, -0.1, 0.8], label="$h(x_1) = h_1(x_1)$", data_label="Training set")
plt.ylabel("$y$", fontsize=16, rotation=0)
plt.title("Ensemble predictions", fontsize=16)

plt.subplot(323)
plot_predictions([tree_reg2], X, y2, axes=[-0.5, 0.5, -0.5, 0.5], label="$h_2(x_1)$", style="g-", data_style="k+", data_label="Residuals")
plt.ylabel("$y - h_1(x_1)$", fontsize=16)

plt.subplot(324)
plot_predictions([tree_reg1, tree_reg2], X, y, axes=[-0.5, 0.5, -0.1, 0.8], label="$h(x_1) = h_1(x_1) + h_2(x_1)$")
plt.ylabel("$y$", fontsize=16, rotation=0)

plt.subplot(325)
plot_predictions([tree_reg3], X, y3, axes=[-0.5, 0.5, -0.5, 0.5], label="$h_3(x_1)$", style="g-", data_style="k+")
plt.ylabel("$y - h_1(x_1) - h_2(x_1)$", fontsize=16)
plt.xlabel("$x_1$", fontsize=16)

plt.subplot(326)
plot_predictions([tree_reg1, tree_reg2, tree_reg3], X, y, axes=[-0.5, 0.5, -0.1, 0.8], label="$h(x_1) = h_1(x_1) + h_2(x_1) + h_3(x_1)$")
plt.xlabel("$x_1$", fontsize=16)
plt.ylabel("$y$", fontsize=16, rotation=0)

save_fig("gradient_boosting_plot")
plt.show()
在第一行中,集合只有一棵树,因此它的预测与第一棵树的预测完全相同。
在第二行中,对第一棵树的残差错误训练新树。在右侧,可以看到集合的预测等于前两棵树的预测总和。
类似地,在第三行中,对第二树的残留错误训练第三棵树。可以看到,随着树木被添加到集合中,集合的预测逐渐变得更好。
训练GBRT集合的更简单的方法是使用Scikit-Learn的GradientBoostingRegressor类:
from sklearn.ensemble import GradientBoostingRegressor

gbrt = GradientBoostingRegressor(
    max_depth=2,
    n_estimators=3,
    learning_rate=1.0,
    random_state=42
)

gbrt.fit(X, y)
plt.figure(figsize=(6,4))
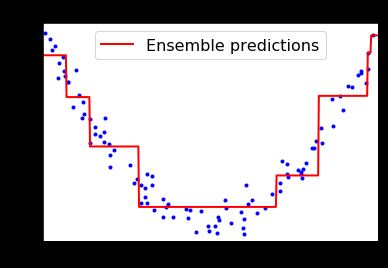
plot_predictions([gbrt], X, y, axes=[-0.5, 0.5, -0.1, 0.8], label="Ensemble predictions")
plt.title("learning_rate={}, n_estimators={}".format(gbrt.learning_rate, gbrt.n_estimators), fontsize=14)
可以看到,最后学习器的拟合效果并不太好,这是因为我们只使用了3棵树进行学习,增加树的数目到100棵效果如何呢?
可以看到,100棵树的集成严重过拟合了。如何选择合适的基学习器的个数显得尤为重要,这里我们可以使用提前停止法(Early stopping)。 实现的一个简单方法是使用staged_predict()方法:它返回一个迭代器,该迭代器覆盖整个训练阶段的集合所做的预测(有一棵树,两棵树等)。
以下代码训练带有120棵树的GBRT集合,然后测量每个训练阶段的验证误差以找到最佳树木数量,最后使用最佳树木数量训练另一个GBRT集合:
import numpy as np
from sklearn.model_selection import train_test_split
from sklearn.metrics import mean_squared_error

X_train, X_val, y_train, y_val = train_test_split(X, y, random_state=49)

gbrt = GradientBoostingRegressor(max_depth=2, n_estimators=120, random_state=42)
gbrt.fit(X_train, y_train)

errors = [mean_squared_error(y_val, y_pred)
          for y_pred in gbrt.staged_predict(X_val)]

bst_n_estimators = np.argmin(errors)

gbrt_best = GradientBoostingRegressor(max_depth=2,n_estimators=bst_n_estimators, random_state=42)
gbrt_best.fit(X_train, y_train)
min_error = np.min(errors)
将结果可视化得到:
plt.figure(figsize=(11, 4))

plt.subplot(121)
plt.plot(errors, "b.-")
plt.plot([bst_n_estimators, bst_n_estimators], [0, min_error], "k--")
plt.plot([0, 120], [min_error, min_error], "k--")
plt.plot(bst_n_estimators, min_error, "ko")
plt.text(bst_n_estimators, min_error*1.2, "Minimum", ha="center", fontsize=14)
plt.axis([0, 120, 0, 0.01])
plt.xlabel("Number of trees")
plt.title("Validation error", fontsize=14)

plt.subplot(122)
plot_predictions([gbrt_best], X, y, axes=[-0.5, 0.5, -0.1, 0.8])
plt.title("Best model (%d trees)" % bst_n_estimators, fontsize=14)

save_fig("early_stopping_gbrt_plot")
plt.show()


