Android为我们提供了非常丰富的界面控件,借助于这些控件,我们可以很方便地进行界面开发。但是,因为功能或者界面效果的需要,我们有时可能要自己定义一些控件。比如,原生的ListView并没有下拉刷新等效果,我们需要在原来的基础上进行扩展满足需要,还有很多其它需要自定义View的情况,下面带来自定义View相关内容的学习总结。
一、概述
二、自定义View原理
三、自定义View示例与解析
四、自定义ViewGroup解析
五、源码链接
一、概述
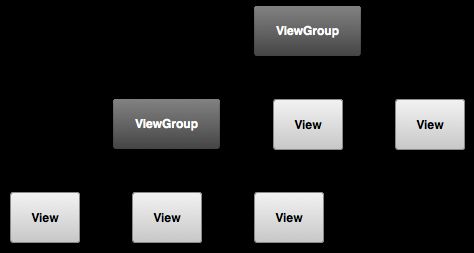
相信很多人对View与ViewGroup已经很熟悉了,但这里还是简单提一下,在我们的应用中,用户界面上的所有元素都是由View与ViewGroup对象构成的。View,视图,是绘制在屏幕上的,用户可以与之交互的对象。ViewGroup,视图组合,是用于包含其它视图以定义界面布局的对象,ViewGroup是继承自View的。我们平常使用的各种普通控件,比如Button,TextView等等都是View的子类,而各种布局都是ViewGroup的子类。
下面这张图很清楚地展示了界面上的View层级关系。
为什么要自定义View?
Android基于View和ViewGroup已经为我们提供了大量精致而且使用方便的组件,但是在有些时候,这些系统的组件不能很好的满足我们的需要,这时就考虑自定义View。如果我们需要一个全新的控件,那么我们可以继承View然后来创建,如果我们只是需要在已有的控件上进行修改,那么我们就可以继承已有的控件类,重写其中的部分方法。
自定义View的基本步骤?
1)新建我们需要的类,继承自View或者View的子类
2)重写其中的方法,比如onMeasure(), onMeasure(),onDraw()等等
3)像使用系统组件一样使用我们自定义的控件
如果需要自定义属性,那么需要在attrs文件里定义。
二、自定义View原理
在自定义View前一般我们需要理解View的工作流程中的三大流程:测量、布局和绘制,分别对应着方法measure(),layout()以及draw()。在这三个的内部还有另外三个比较关键的方法,onMeasure(),onLayout(),onDraw(),通常我们会根据需要重写View或者ViewGroup的这几个方法。
onMeasure() 确定自定义View的尺寸
当我们继承自系统已有控件时比如TextView或者Button等,没有特别需要是不需要重写此方法的。但如果是直接继承自View或者ViewGroup,是需要重写的。原因是TextView等已有控件已经帮我们完成了重写的操作,但是View或者ViewGroup只有一个默认的实现,此实现没有考虑宽高属性设置为wrap_content的情况。
protected void onMeasure(int widthMeasureSpec, int heightMeasureSpec) {
    setMeasuredDimension(getDefaultSize(getSuggestedMinimumWidth(), widthMeasureSpec),
            getDefaultSize(getSuggestedMinimumHeight(), heightMeasureSpec));
}

public static int getDefaultSize(int size, int measureSpec) {
    int result = size;
    int specMode = MeasureSpec.getMode(measureSpec);
    int specSize = MeasureSpec.getSize(measureSpec);

    switch (specMode) {
    case MeasureSpec.UNSPECIFIED:
        result = size;
        break;
    case MeasureSpec.AT_MOST://设置为wrap_content的情况
    case MeasureSpec.EXACTLY:
        result = specSize;
        break;
    }
    return result;
}
类MeasureSpec是一个32位的int值,封装了从父容器传递给子View的布局限制,前2位代表测量模式,后30位代表测量的尺寸大小。它一般有三种测量模式,一种是精确值模式EXACTLY,一种是最大值模式AT_MOST,还有一种是未指定模式UNSPECIFED。其中,当我们设置具体的值比如100dp或者设置成match_parent时,测量模式是EXACTLY,当设置成wrap_content时,是EXACTLY,最后一种UNSPECIFED模式通常用于系统内部,父容器不对View有任何限制,要多大给多大。
onLayout() 确定View的位置
在确定了View的大小后,其次是要确定View的位置,这个动作是在layout()方法里完成的,需要注意的是layout()先确定View自己的位置,然后调用onLayout()来确定子View的位置。因为View中一般不含有子View,所以View的onLayout()方法是空实现,当我们继承自ViewGroup的时候就需要重写了。
onDraw() 真正的View绘制方法
View的绘制是在方法onDraw()里完成的。一般绘制过程是先绘制自己,然后绘制子View。具体绘制需要借助类Canvas和类Paint来完成。
三、自定义View示例与解析
下面展示两个基本的自定义View的例子,通过这些例子可以很清楚地了解用法。
例1 扩展TextView的MyTextView
例2 完全自定义的MyXTextView
例1 扩展TextView的MyTextView。
1、创建自定义View,名称为MyTextView,这里我暂时只是重写了onDraw方法,在系统绘制前添加一些效果。
/**
 * Created by JackalTsc on 2016/7/22.
 */
public class MyTextView extends TextView {

    //画笔
    Paint mPaint1, mPaint2;

    public MyTextView(Context context) {
        this(context, null, 0);
    }

    public MyTextView(Context context, AttributeSet attrs) {
        this(context, attrs, 0);
    }

    public MyTextView(Context context, AttributeSet attrs, int defStyleAttr) {
        super(context, attrs, defStyleAttr);

        //这里对画笔进行初始化
        mPaint1 = new Paint();
        mPaint1.setColor(getResources().getColor(android.R.color.holo_blue_light));
        mPaint1.setStyle(Paint.Style.FILL);

        mPaint2 = new Paint();
        mPaint2.setColor(Color.YELLOW);
        mPaint2.setStyle(Paint.Style.FILL);
    }

    //MyTextView测量
    @Override
    protected void onMeasure(int widthMeasureSpec, int heightMeasureSpec) {
        super.onMeasure(widthMeasureSpec, heightMeasureSpec);
    }

    //绘制
    @Override
    protected void onDraw(Canvas canvas) {

        //绘制文字前我们给TextView添加一些背景效果
        canvas.drawRect(0, 0, getMeasuredWidth(), getMeasuredHeight(), mPaint1);
        canvas.drawRect(10, 10, getMeasuredWidth() - 10, getMeasuredHeight() - 10, mPaint2);
        canvas.save();
        canvas.translate(10, 0);

        //绘制
        super.onDraw(canvas);
        canvas.restore();
    }
}
2、布局文件里使用自定义的View。
3、运行程序可以看到结果如下。
例2 完全自定义的MyXTextView
在例1中,我们只是简单地让自定义的类继承TextView,可以看到,只需要在原来的TextView的基础上重写部分需要的方法进行扩展即可。那么如果我们不是继承TextView而是直接继承View,需要做哪些工作呢?
1、定义属性。我们在values下新建文件attrs.xml,内容如下。
2、构造函数里获得定义的这些属性。下面这段代码是获取我们刚刚定义的attrs文件里的属性。
TypedArray a = context.getTheme().obtainStyledAttributes(attrs, R.styleable.MyStyle, defStyle, 0);

        int n = a.getIndexCount();

        for (int i = 0; i < n; i++) {

            int attr = a.getIndex(i);
            switch (attr) {
                case R.styleable.MyStyle_text:
                    mText = a.getString(attr);
                    break;
                case R.styleable.MyStyle_textColor:
                    // 默认颜色设置为黑色
                    mTextColor = a.getColor(attr, Color.BLACK);
                    break;
                case R.styleable.MyStyle_textSize:
                    // 默认设置为16sp,TypeValue也可以把sp转化为px
                    mTextSize = a.getDimensionPixelSize(attr, (int) TypedValue.applyDimension(
                            TypedValue.COMPLEX_UNIT_SP, 16, getResources().getDisplayMetrics()));
                    break;

            }

        }

        a.recycle();
3、重写onMeasure方法,这一步其实要重点看,前面我们提到View的3种测量模式,因为View类默认的onMeasure()方法只支持EXACTLY模式,所以如果我们想要在使用自定义View的时候可以设置wrap_content,那么必须重写onMeasure方法获取宽高。大家也可以试试,如果不重写onMeasure方法,然后设置宽高为wrap_content,你会看到效果的。
@Override
    protected void onMeasure(int widthMeasureSpec, int heightMeasureSpec) {

        int widthMode = MeasureSpec.getMode(widthMeasureSpec);
        int heightMode = MeasureSpec.getMode(heightMeasureSpec);

        int widthSize = MeasureSpec.getSize(widthMeasureSpec);
        int heightSize = MeasureSpec.getSize(heightMeasureSpec);

        int width;
        int height;

        if (widthMode == MeasureSpec.EXACTLY) {
            width = widthSize;
        } else {
            mPaint.setTextSize(mTextSize);
            mPaint.getTextBounds(mText, 0, mText.length(), mBound);
            float textWidth = mBound.width();
            int desired = (int) (getPaddingLeft() + textWidth + getPaddingRight());
            width = desired;
        }

        if (heightMode == MeasureSpec.EXACTLY) {
            height = heightSize;
        } else {
            mPaint.setTextSize(mTextSize);
            mPaint.getTextBounds(mText, 0, mText.length(), mBound);
            float textHeight = mBound.height();
            int desired = (int) (getPaddingTop() + textHeight + getPaddingBottom());
            height = desired;
        }

        setMeasuredDimension(width, height);
    }
4、重写onDraw()方法。
    @Override
    protected void onDraw(Canvas canvas) {

        mPaint.setColor(Color.YELLOW);
        canvas.drawRect(0, 0, getMeasuredWidth(), getMeasuredHeight(), mPaint);

        mPaint.setColor(mTextColor);
        canvas.drawText(mText, getWidth() / 2 - mBound.width() / 2, getHeight() / 2 + mBound.height() / 2, mPaint);
    }
5、布局文件
四、自定义ViewGroup解析
自定义ViewGroup主要是为了对其子View进行管理,通常需要重写onMeasure()方法对子View进行测量,重写onLayout()方法确定子View的位置等等。由于篇幅关系,这里就不贴代码了,大家可以看Demo里继承自ViewGroup的MyFlowView。
五、源码链接
自定义View简单Demo,https://git.oschina.net/tanshicheng/DemoCustomView.git


