本篇文章主要介绍以几下个知识点:
- ButterKnife 的一些用法
- ButterKnife 插件 —— Zelezny。
1. ButterKnife 简介
ButterKnife 是一个开源的 Android 系统的 View 注入框架,通过注解的方式来绑定 View 的属性或方法,大量减少了类似 findViewById() 以及 setOnClickListener() 等代码,提升开发效率(至于代码可读性好坏因人而异)。
下面就来学习如何使用这个开源框架。ButterKnife 的项目主页上也有详细的使用文档(注,本篇文章一些代码来源于使用文档),地址是:
https://github.com/JakeWharton/butterknife
2. 使用 ButterKnife
首先在项目中添加 ButterKnife 依赖:
dependencies {
  compile 'com.jakewharton:butterknife:8.5.1'
  annotationProcessor 'com.jakewharton:butterknife-compiler:8.5.1'
}
ButterKnife 的基本用法很简单,如下:
public class MainActivity extends AppCompatActivity {

    // 注意:控件的修饰类型不能是:private 或 static
    // 否则会报错误: @BindView fields must not be private or static.
    @BindView(R.id.button)
    Button button;
    @BindView(R.id.imageView)
    ImageView imageView;
    @BindView(R.id.textView)
    TextView textView;

    @Override
    protected void onCreate(Bundle savedInstanceState) {
        super.onCreate(savedInstanceState);
        setContentView(R.layout.activity_main);

        // 绑定activity
        ButterKnife.bind(this);
    }
}
上面几行代码就相当于:
Button button = (Button) findViewById(R.id.button);
ImageView imageView = (ImageView) findViewById(R.id.imageView);
TextView textView = (TextView) findViewById(R.id.textView);
这样就不用写烦人的 findViewById() 了,当然 ButterKnife 的功能远远不止这些,下面介绍一些常用的功能。
2.1 资源绑定
ButterKnife 可以绑定在资源文件上定义好的资源,如字符串、颜色、图片等,如下:
public class MainActivity extends AppCompatActivity {

    @BindString(R.string.title)
    String title;
    @BindColor(R.color.white)
    int white;
    @BindDrawable(R.mipmap.nav_icon)
    Drawable nav_icon;
    @BindDimen(R.dimen.spacer)
    float spacer;
    // ...

    @Override
    protected void onCreate(Bundle savedInstanceState) {
        super.onCreate(savedInstanceState);
        setContentView(R.layout.activity_main);

        // 绑定activity
        ButterKnife.bind(this);

        button.setText(title);
        imageView.setImageDrawable(nav_icon);
        textView.setTextColor(white);
    }
}
2.2 多个控件 id 绑定
多个相同的控件可以一起绑定,比如:
public class MainActivity extends AppCompatActivity {

    @BindViews({ R.id.text01, R.id.text02, R.id.text03 })
    List textList;

    @Override
    protected void onCreate(Bundle savedInstanceState) {
        super.onCreate(savedInstanceState);
        setContentView(R.layout.activity_main);

        // 绑定activity
        ButterKnife.bind(this);

        textList.get( 0 ).setText( "text 01 ");
        textList.get( 1 ).setText( "text 02 ");
        textList.get( 2 ).setText( "text 03 ");

    }
}
2.3 控件监听事件绑定
ButterKnife 绑定监听事件也不复杂,比如点击事件:
@OnClick(R.id.button01)
public void submit(View view) {
  // TODO submit data to server...
}

@OnClick(R.id.button02)
public void sayHi(Button button) {
  button.setText("Hello!");
}

@OnClick(R.id.button03)
public void clickButton() {
  ToastUtils.showShort("点击了按钮3");
}

@OnItemSelected(R.id.list_view)
void onItemSelected(int position) {
  // TODO ...
}
2.4 非 activity 中使用 ButterKnife
在非 activity 中使用 ButterKnife 也很简单,比如:
- Fragment 中
public class MyFragment extends Fragment {

    @BindView(R.id.button1)
    Button button1;
    @BindView(R.id.button2)
    Button button2;

    @Override
    public View onCreateView(LayoutInflater inflater, ViewGroup container, Bundle savedInstanceState) {
        View view = inflater.inflate(R.layout.fancy_fragment, container, false);
        ButterKnife.bind(this, view);

        return view;
    }
}
- 适配器 Adapter 中
public class MyAdapter extends BaseAdapter {

    @Override
    public View getView(int position, View view, ViewGroup parent) {
        ViewHolder holder;
        if (view != null) {
            holder = (ViewHolder) view.getTag();
        } else {
            view = inflater.inflate(R.layout.whatever, parent, false);
            holder = new ViewHolder(view);
            view.setTag(holder);
        }

        holder.name.setText("John Doe");
        // etc...

        return view;
    }

    static class ViewHolder {
        @BindView(R.id.title)
        TextView name;
        @BindView(R.id.job_title)
        TextView jobTitle;

        public ViewHolder(View view) {
            ButterKnife.bind(this, view);
        }
    }
}
2.5 在 view 中使用 ButterKnife
ButterKnife 不但可以在 activity、fragment 等中使用,也可以在对话框中使用,它提供了一个 findById 方法,只要是 view 中都可使用,如下:
View view = LayoutInflater.from(context).inflate(R.layout.thing, null);
TextView firstName = ButterKnife.findById(view, R.id.first_name);
TextView lastName = ButterKnife.findById(view, R.id.last_name);
ImageView photo = ButterKnife.findById(view, R.id.photo);
更多用法可以参考使用文档:
http://jakewharton.github.io/butterknife/
2.6 其他
在实际开发项目时,我们一般会创建个基类,若在基类 BaseActivity 中做了初始化或绑定 ButterKnife,后面继承基类的 activity 中就不用再绑定了,如下:
/**
 * Function:基类
 * Author:kxwon on 2017/2/1 13:17
 * Email:[email protected]
 */

public abstract class BaseActivity extends AppCompatActivity {

    protected Unbinder mBinder;

    @Override
    protected void onCreate(@Nullable Bundle savedInstanceState) {
        super.onCreate(savedInstanceState);
        setContentView(initLayoutId());

        mBinder = ButterKnife.bind(this);

        . . .
    }

    @Override
    protected void onDestroy() {
        // 取消绑定
        mBinder.unbind();
        super.onDestroy();
    }

    . . .

}
3. ButterKnife 插件 —— Zelezny
虽然使用 ButterKnife 库后编码简便了很多,但若还要再偷懒点,可以在 Android Studio 安装 ButterKnife 插件,自动为我们生成需要绑定的控件代码。没错,接下来要安利下插件 —— Zelezny。
安装步骤如下:
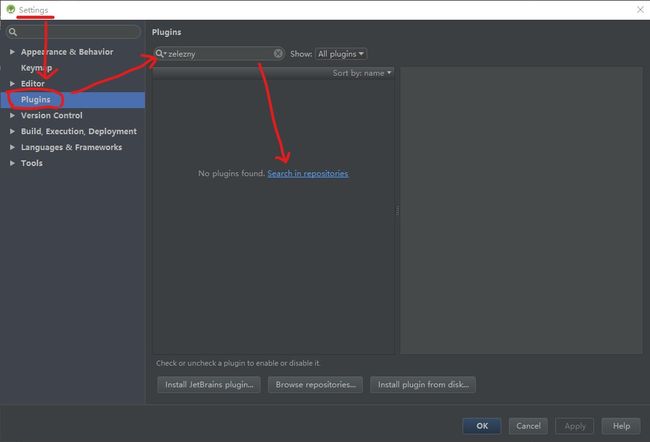
(1)搜索插件:setting→Plugins→搜索
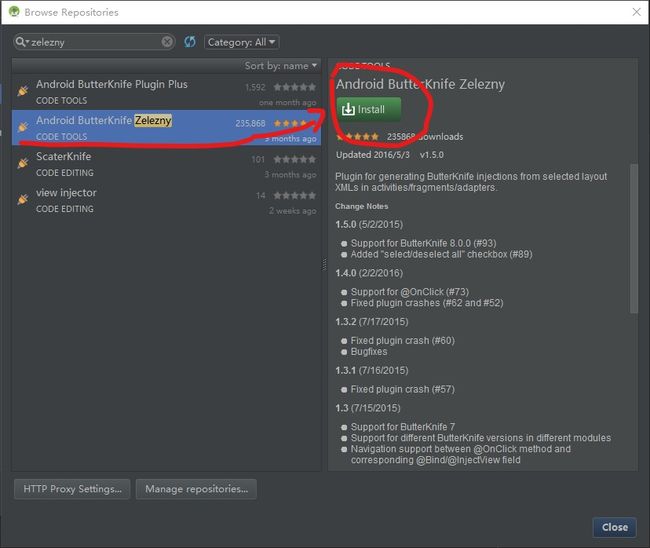
(2)安装插件
(3)安装完后根据提示重启 AS 即可。
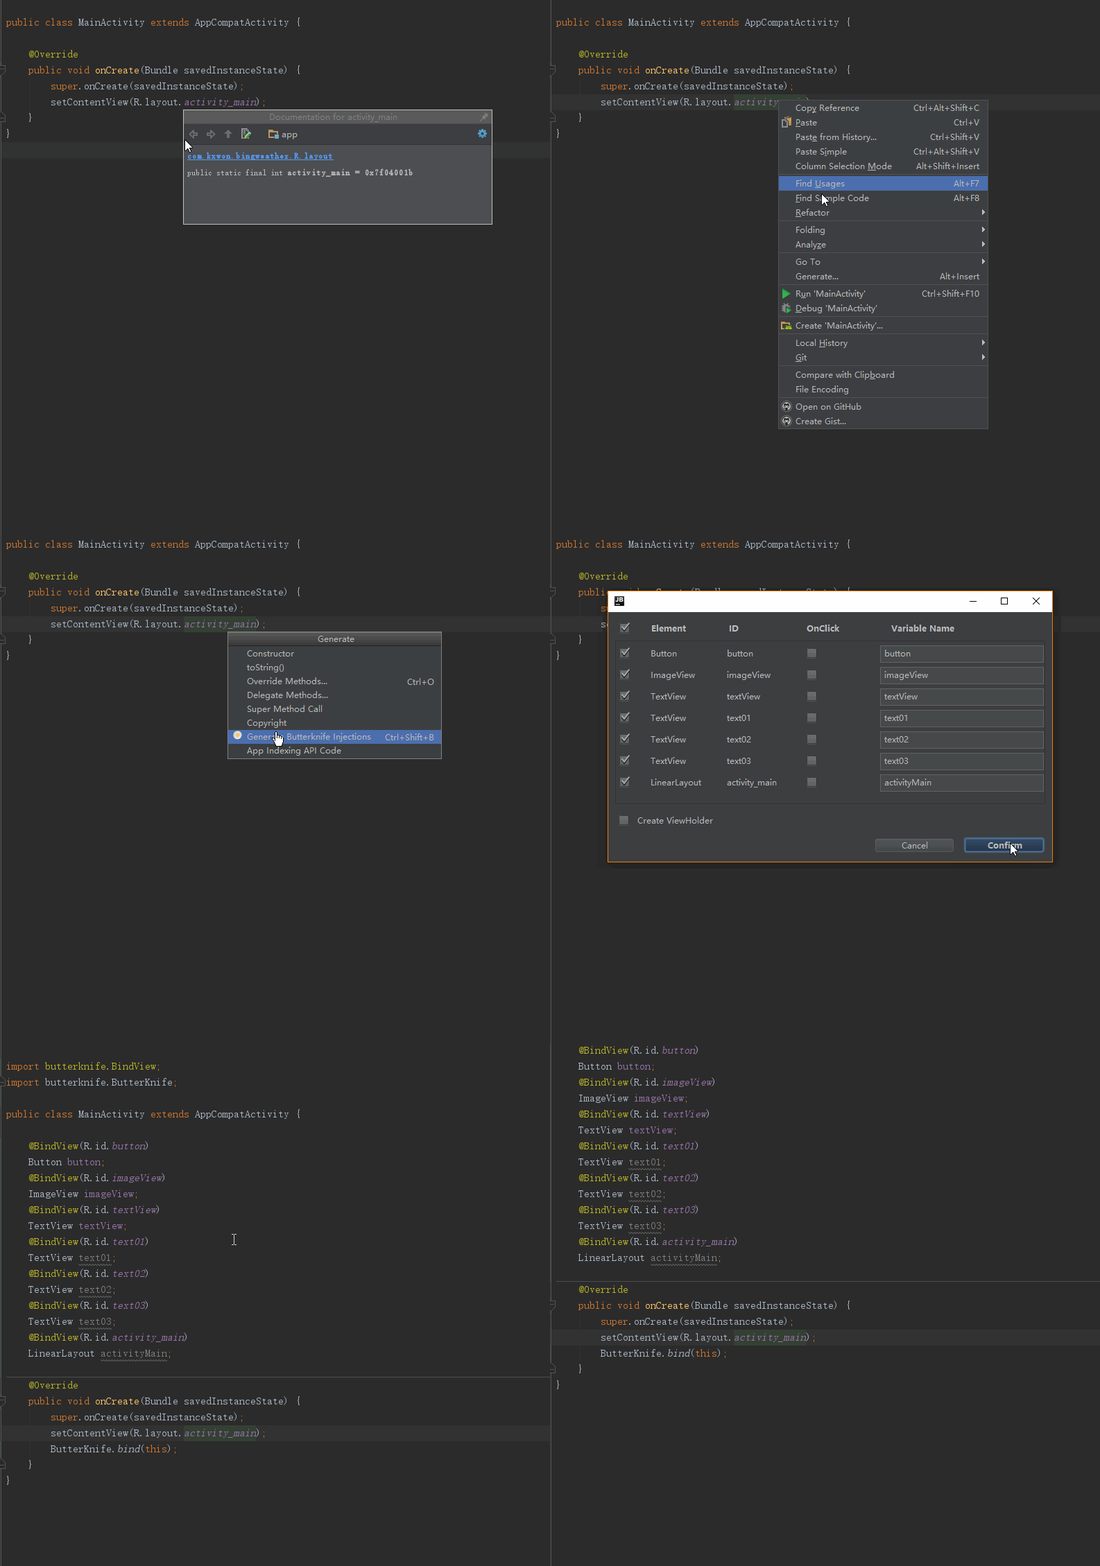
用法很简单:将鼠标(光标)移到布局文件 R.layout.activity_main 上 →右键 Generate →Generate ButterKnife Injections。如下所示:
其中,勾选控件界面上的 CreateViewHolder 勾选框是为 ListView 等的适配器提供的。
这样,编码就方便了很多!
好了,本篇文章就介绍到这。


