前言: 在实际生产或者实验环境下,我们经常会碰到磁盘使用完了,不够用,需要增加硬盘或者直接扩展容量,又或者整个系统全部删除然后进行增加硬盘进行重装系统,但是删掉系统重新进行安装付出的时间或者其他成本都太大了,所以我推荐如果是虚拟化平台直接增加一块硬盘或者扩大容量,本篇文章根据直接扩大硬盘容量
一、 实验环境说明
- 虚拟化平台是VMware workstation 12 pro
- Centos 7.1 最小化安装
- 初始硬盘为 50G
二、开始实验
- 系统信息
[root@Allenwu ~]# lsb_release -a
LSB Version:    :core-4.1-amd64:core-4.1-noarch
Distributor ID: CentOS
Description:    CentOS Linux release 7.1.1503 (Core)
Release:    7.1.1503
Codename:   Core
- 硬盘信息
[root@Allenwu ~]# fdisk -l

Disk /dev/sda: 53.7 GB, 53687091200 bytes, 104857600 sectors
Units = sectors of 1 * 512 = 512 bytes
Sector size (logical/physical): 512 bytes / 512 bytes
I/O size (minimum/optimal): 512 bytes / 512 bytes
Disk label type: dos
Disk identifier: 0x0009c3d0

   Device Boot      Start         End      Blocks   Id  System
/dev/sda1   *        2048     1026047      512000   83  Linux
/dev/sda2         1026048    41943039    20458496   8e  Linux LVM
/dev/sda3        41943040   104857599    31457280   83  Linux

Disk /dev/mapper/centos-root: 49.9 GB, 18756927488 bytes, 36634624 sectors
Units = sectors of 1 * 512 = 512 bytes
Sector size (logical/physical): 512 bytes / 512 bytes
I/O size (minimum/optimal): 512 bytes / 512 bytes


Disk /dev/mapper/centos-swap: 2147 MB, 2147483648 bytes, 4194304 sectors
Units = sectors of 1 * 512 = 512 bytes
Sector size (logical/physical): 512 bytes / 512 bytes
I/O size (minimum/optimal): 512 bytes / 512 bytes
- 进行关机扩大硬盘,然后开机进入系统
shutdown -h now
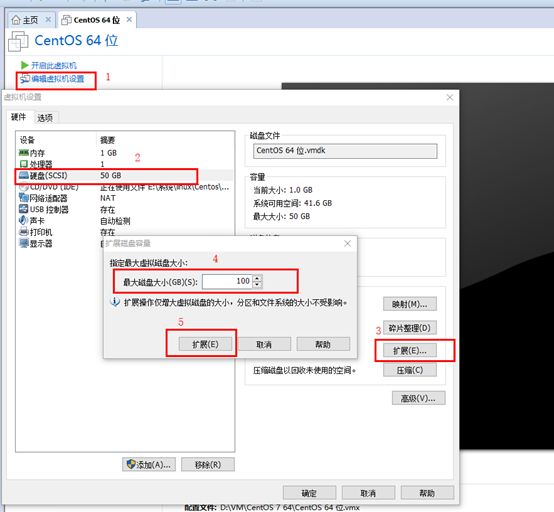
图片.png
- 确认硬盘已经进行扩容,可以看到已经扩容,但还没进行使用
[root@Allenwu ~]# fdisk -l

Disk /dev/sda: 107.4 GB, 107374182400 bytes, 209715200 sectors
Units = sectors of 1 * 512 = 512 bytes
Sector size (logical/physical): 512 bytes / 512 bytes
I/O size (minimum/optimal): 512 bytes / 512 bytes
Disk label type: dos
Disk identifier: 0x0009c3d0

   Device Boot      Start         End      Blocks   Id  System
/dev/sda1   *        2048     1026047      512000   83  Linux
/dev/sda2         1026048    41943039    20458496   8e  Linux LVM
/dev/sda3        41943040   104857599    31457280   83  Linux

Disk /dev/mapper/centos-root: 49.9 GB, 49895440384 bytes, 97452032 sectors
Units = sectors of 1 * 512 = 512 bytes
Sector size (logical/physical): 512 bytes / 512 bytes
I/O size (minimum/optimal): 512 bytes / 512 bytes


Disk /dev/mapper/centos-swap: 2147 MB, 2147483648 bytes, 4194304 sectors
Units = sectors of 1 * 512 = 512 bytes
Sector size (logical/physical): 512 bytes / 512 bytes
I/O size (minimum/optimal): 512 bytes / 512 bytes
- 使用 fdisk 进行分区,创建一个sda4主分区
[root@Allenwu ~]# fdisk /dev/sda
Welcome to fdisk (util-linux 2.23.2).

Changes will remain in memory only, until you decide to write them.
Be careful before using the write command.


Command (m for help): n
Partition type:
   p   primary (3 primary, 0 extended, 1 free)
   e   extended
Select (default e): p
Selected partition 4
First sector (104857600-209715199, default 104857600):
Using default value 104857600
Last sector, +sectors or +size{K,M,G} (104857600-209715199, default 209715199):
Using default value 209715199
Partition 4 of type Linux and of size 50 GiB is set

Command (m for help): t
Partition number (1-4, default 4): 4
Hex code (type L to list all codes): 8e
Changed type of partition 'Linux' to 'Linux LVM'

Command (m for help): w
The partition table has been altered!

Calling ioctl() to re-read partition table.

WARNING: Re-reading the partition table failed with error 16: Device or resource busy.
The kernel still uses the old table. The new table will be used at
the next reboot or after you run partprobe(8) or kpartx(8)
Syncing disks.
- 看到提示需要重启系统,执行下面命令进行重启
shutdown -r now
- 等待启动启动完成,使用
df -Th查看刚刚分区存在 sda4 这个分区,并且可以看出根目录/使用的文件系统是 xfs 文件类型的,所以使用mkfs.xfs命令进行格式化,如果你系统使用的是 ext3或ext4 文件系统,需要根据自己情况进行调整
[root@Allenwu ~]# mkfs.xfs /dev/sda4
meta-data=/dev/sda4            isize=256     agcount=4, agsize=3276800 blks
                =              sectsz=512    attr=2, projid32bit=l
                =              crc=0         finobt=0
data            =              bsize=4096   blocks=13107200, imaxpct=25
                =              sunit=0       swidth=0 blks
naming          =version 2     bsize=4096    ascii-ci=0 ftype=0
log             =internal log     bsize=4096    blocks=6400, version=2
=   sectsz=512         sunit=0 blks, lazy-count=l
realtime =none     extsz=4096   blocks=0, rtextents=0
- 将物理硬盘分区初始化为物理卷,以便被LVM使用,输入指令
[root@Allenwu ~]# pvcreate /dev/sda4
    WARNING: xfs signature detected on /dev/sda4 at offset 0. Wipe it? [y/n]: y
      Wiping xfs signature on /dev/sda4 .
      Physical volume "/dev/sda4" successfully created
- 向卷组中添加物理卷来增加卷组的容量
#先查看一下卷组的名字,VG Name : centos
[root@Allenwu ~]# vgdisplay
  --- Volume group ---
  VG Name               centos
  System ID
  .......

##进行增加容量操作
[root@Allenwu ~]# vgextend centos /dev/sda4
   Volume group "centos" successfully extended
- 再进行查看vg组信息,有一块空间是 Free
[root@Allenwu ~]# vgex
vgexport  vgextend
[root@Allenwu ~]# vgdisplay
  --- Volume group ---
  VG Name               centos
  System ID
  Format                lvm2
  Metadata Areas        3
  Metadata Sequence No  7
  VG Access             read/write
  VG Status             resizable
  MAX LV                0
  Cur LV                2
  Open LV               2
  Max PV                0
  Cur PV                3
  Act PV                3
  VG Size               99.50 GiB
  PE Size               4.00 MiB
  Total PE              25472
  Alloc PE / Size       12408 / 48.47 GiB
  Free  PE / Size       13064 / 51.03 GiB
  VG UUID               cUaGz1-pvaD-Bymp-t7ot-NC87-Eyb6-e4S73r
- 执行扩展命令 lvextend -L+49G /dev/mapper/centos-root /dev/sda4
[root@Allenwu ~]# lvextend -L+49G /dev/mapper/centos-root /dev/sda4
  Size of logical volume centos/root changed from 46.47 GiB (11896 extents) to 95.47 GiB (24440 extents)
  Logical volume root successfully resized
- 做了那么多步骤,使用命令 e2fsck 进行检查一下文件系统
[root@Allenwu ~]# e2fsck -a /dev/mapper/centos-root
- 前面的步骤都弄好无误后,现在需要进行增大硬盘,使用命令 xfs_growfs 命令可以来增大或者收缩未加载的
xfs文件系统大小
[root@Allenwu ~]# xfs_growfs /dev/mapper/centos-root
注意:如果你系统使用文件系统是ext2、ext3、ext4,需要把 xfs_growfs 换成 resize2fs
- 查看现在硬盘大小,发现已经成功增加了硬盘
[root@Allenwu ~]# df -Th
Filesystem              Type      Size  Used Avail Use% Mounted on
/dev/mapper/centos-root xfs        96G  918M   95G   1% /
devtmpfs                devtmpfs  481M     0  481M   0% /dev
tmpfs                   tmpfs     490M     0  490M   0% /dev/shm
tmpfs                   tmpfs     490M  6.6M  484M   2% /run
tmpfs                   tmpfs     490M     0  490M   0% /sys/fs/cgroup
/dev/sda1               xfs       497M  120M  378M  25% /boot
- 以上所有环节弄完以后,代表你已经成功扩大了根分区硬盘容量,你需要检查的是 /etc/fstab 挂载硬盘配置正不正确等问题,如果服务器没在跑业务,建议进行重启确保重启后能够正常进行运行