题外话:由于项目需要集成扫描二维码功能,所以我也特意在网上找了一些资料,具体大家都可以通过Google来获取资料.这里就说一下我的大体思路
1.话不多说,先上效果图(第一次真机录制,可能显示效果不太好,但实际效果会比这个更好).
扫描二维码.gif
2.基本实现
2.1扫描二维码功能是在苹果原生的AVFoundation框架实现的,所以我们需要导入框架:
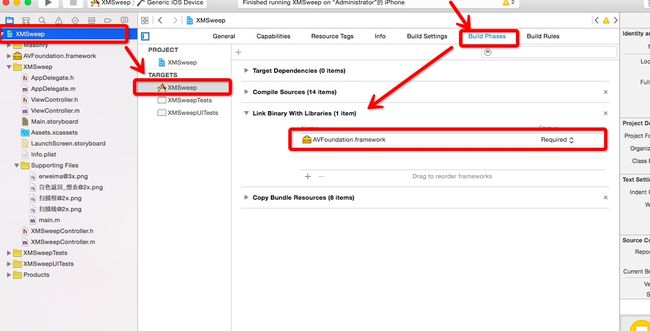
CE7BADCA-2D82-4D88-91A6-630A7E61AEFA.png
2.2因为我们需要开启苹果的相机功能,由于苹果的隐私保护机制,所以需要进行授权设置,所以我们添加以下代码:
- (void)viewDidLoad {
    NSString *mediaType = AVMediaTypeVideo;
    AVAuthorizationStatus authStatus = [AVCaptureDevice authorizationStatusForMediaType:mediaType];
    if (authStatus == AVAuthorizationStatusDenied) {//关闭系统权限
        if (isDevice_IOS8) {
            UIAlertController *alert = [UIAlertController alertControllerWithTitle:@"相机访问受限" message:@"请在IPhone的\"设置->隐私->相机\"选项中,允许\"XMSweep\"访问你的照相机." preferredStyle:UIAlertControllerStyleAlert];
            [alert addAction:[UIAlertAction actionWithTitle:@"好" style:UIAlertActionStyleCancel handler:^(UIAlertAction * _Nonnull action) {
            }]];
            [alert addAction:[UIAlertAction actionWithTitle:@"去设置" style:UIAlertActionStyleDefault handler:^(UIAlertAction * _Nonnull action) {
                if ([self canOpenSystemSettingView]) {
                    [self systemSettingView];
                }
            }]];
            [self presentViewController:alert animated:YES completion:nil];
        }else {
            UIAlertView *alert = [[UIAlertView alloc]initWithTitle:@"相机访问受限" message:@"请在IPhone的\"设置->隐私->相机\"选项中,允许\"XMSweep\"访问你的照相机." delegate:nil cancelButtonTitle:@"好的" otherButtonTitles: nil];
            [alert show];
        }
        return;
    }
}
-(BOOL)canOpenSystemSettingView{
    if (isDevice_IOS8) {
        NSURL *url = [NSURL URLWithString:UIApplicationOpenSettingsURLString];
        if ([[UIApplication sharedApplication]canOpenURL:url]) {
            return YES;
        }else {
            return NO;
        }
    }else{
        return NO;
    }
}
-(void)systemSettingView{
    if (isDevice_IOS8) {
        NSURL *url = [NSURL URLWithString:UIApplicationOpenSettingsURLString];
        if ([[UIApplication sharedApplication]canOpenURL:url]) {
            [[UIApplication sharedApplication]openURL:url];
        }
    }
}
2.2然后我们就可以自己创建一个控制器来跳转扫描二维码功能,同时我们通过Block回调来得到扫描得到的结果.
    XMSweepController *sweepVC = [[XMSweepController alloc]init];
    sweepVC.view.alpha = 0;
    AppDelegate *appdelegate = (AppDelegate *)[UIApplication sharedApplication].delegate;
    [appdelegate.window.rootViewController addChildViewController:sweepVC];
    [appdelegate.window.rootViewController.view addSubview:sweepVC.view];
    [sweepVC setDidRecoiveBlock:^(NSString *result) {
        UIAlertController *alert = [UIAlertController alertControllerWithTitle:@"扫描得到的网址:" message:result preferredStyle:UIAlertControllerStyleAlert];
        [alert addAction:[UIAlertAction actionWithTitle:@"确定" style:UIAlertActionStyleCancel handler:nil]];
        [self presentViewController:alert animated:YES completion:nil];

    }];
    [UIView animateWithDuration:0.3 animations:^{
        sweepVC.view.alpha = 1;
    }];
3.扫描二维码功能代码封装
3.1在.h文件中(因为在扫描二维码的时候是通过系统自带的扫描器,而后面再某一个方法中我们可以获取到扫描结果,所以这里用Block来传值是最好的)
#import
#define IS_VAILABLE_IOS8  ([[[UIDevice currentDevice] systemVersion] intValue] >= 8)

@interface XMSweepController : UIViewController
typedef void (^XMSweepBlock)(NSString *result);
@property(nonatomic,copy)XMSweepBlock didRecoiveBlock;
-(void)setDidRecoiveBlock:(XMSweepBlock)didRecoiveBlock;
@end
3.2在.m文件中(系统扫描二维码的关键代码,这里只管复制黏贴就行了,全都是系统方法,没什么好深究)
#import "XMSweepController.h"
#import
#import "Masonry.h"
@interface XMSweepController()
{
    AVCaptureSession *session; //输入输出的中间桥梁
    int line_tag;
    UIView *highlightView;
}
@end
@implementation XMSweepController
-(void)viewDidLoad
{
    [super viewDidLoad];
    [self instanceDevice];
}
-(void)instanceDevice
{
    [[UIApplication sharedApplication]setStatusBarStyle:UIStatusBarStyleLightContent animated:YES];
    line_tag = 18;

    //获取摄像设备
    AVCaptureDevice *device = [AVCaptureDevice defaultDeviceWithMediaType:AVMediaTypeVideo];
    //创建输入流
    AVCaptureDeviceInput *input = [AVCaptureDeviceInput deviceInputWithDevice:device error:nil];
    //创建输出流
    AVCaptureMetadataOutput *output = [[AVCaptureMetadataOutput alloc]init];
    //设置代理,在主线程刷新
    [output setMetadataObjectsDelegate:self queue:dispatch_get_main_queue()];
    //初始化连接对象
    session = [[AVCaptureSession alloc]init];
    //高质量采集率
    [session setSessionPreset:AVCaptureSessionPresetHigh];
    if (input) {
        [session addInput:input];
    }
    if (output) {
        [session addOutput:output];
        //设置扫码的编码格式
        NSMutableArray *a = [[NSMutableArray alloc]init];
        if ([output.availableMetadataObjectTypes containsObject:AVMetadataObjectTypeQRCode]) {
            [a addObject:AVMetadataObjectTypeQRCode];
        }
        if ([output.availableMetadataObjectTypes containsObject:AVMetadataObjectTypeEAN13Code]) {
            [a addObject:AVMetadataObjectTypeEAN13Code];
        }
        if ([output.availableMetadataObjectTypes containsObject:AVMetadataObjectTypeEAN8Code]) {
            [a addObject:AVMetadataObjectTypeEAN8Code];
        }
        if ([output.availableMetadataObjectTypes containsObject:AVMetadataObjectTypeCode128Code]) {
            [a addObject:AVMetadataObjectTypeCode128Code];
        }
        output.metadataObjectTypes = a;
    }
    AVCaptureVideoPreviewLayer *layer = [AVCaptureVideoPreviewLayer layerWithSession:session];
    layer.videoGravity = AVLayerVideoGravityResizeAspectFill;
    layer.frame = self.view.bounds;
    [self.view.layer insertSublayer:layer atIndex:0];
    //创建扫码页面
    [self creatPickerView];
    //监听扫码状态
    [session addObserver:self forKeyPath:@"running" options:NSKeyValueObservingOptionNew context:nil];
    //开始捕获
    [session startRunning];
}
3.3而这里我们需要构建扫码的界面(这里我们不需要担心控件会被遮挡的,因为系统扫码的时候就会显示整一个摄像头拍摄的图像),抽取一个方法出来,构件图如下
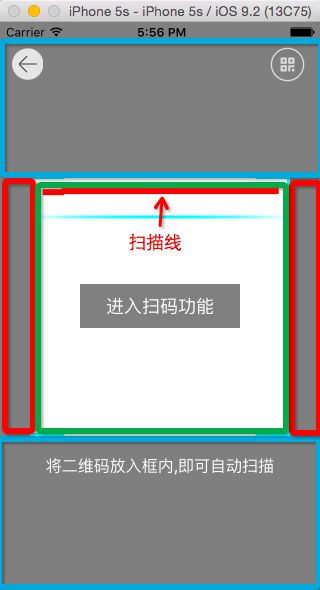
Paste_Image.png
代码如下:
-(void)creatPickerView
{
    //左侧View
    UIImageView *leftView = [[UIImageView alloc]initWithFrame:CGRectMake(0, 0, 30, self.view.frame.size.height)];
    leftView.alpha = 0.5;
    leftView.backgroundColor = [UIColor blackColor];
    [self.view addSubview:leftView];
    //右侧View
    UIImageView *rightView = [[UIImageView alloc]initWithFrame:CGRectMake(self.view.frame.size.width - 30, 0, 30, self.view.frame.size.height)];
    rightView.alpha = 0.5;
    rightView.backgroundColor = [UIColor blackColor];
    [self.view addSubview:rightView];
    //上部View
    UIImageView *topView = [[UIImageView alloc]initWithFrame:CGRectMake(30, 0, self.view.frame.size.width - 60, (self.view.center.y - (self.view.frame.size.width - 60) / 2))];
    topView.alpha = 0.5;
    topView.backgroundColor = [UIColor blackColor];
    [self.view addSubview:topView];
    //底部View
    UIImageView *bottomView = [[UIImageView alloc]initWithFrame:CGRectMake(30, self.view.center.y + (self.view.frame.size.width - 60)/2, self.view.frame.size.width - 60, self.view.frame.size.height - ((self.view.center.y - (self.view.frame.size.width - 60)/2)))];
    bottomView.backgroundColor = [UIColor blackColor];
    bottomView.alpha = 0.5;
    [self.view addSubview:bottomView];
    //扫描框
    UIImageView *centerView = [[UIImageView alloc]initWithFrame:CGRectMake(0, 0, self.view.frame.size.width - 60, self.view.frame.size.width)];
    centerView.center = self.view.center;
    centerView.backgroundColor = [UIColor clearColor];
    centerView.image = [UIImage imageNamed:@"扫描框"];
    centerView.contentMode = UIViewContentModeScaleAspectFit;
    [self.view addSubview:centerView];
    //扫描线
    UIImageView *lineView = [[UIImageView alloc]initWithFrame:CGRectMake(30, CGRectGetMaxY(topView.frame), self.view.frame.size.width - 60, 2)];
    lineView.tag = line_tag;
    lineView.image = [UIImage imageNamed:@"扫描线"];
    lineView.backgroundColor = [UIColor clearColor];
    lineView.contentMode = UIViewContentModeScaleAspectFill;
    [self.view addSubview:lineView];
    //文字
    UILabel *label = [[UILabel alloc]initWithFrame:CGRectMake(30, CGRectGetMinY(bottomView.frame), self.view.frame.size.width - 60, 60)];
    label.textAlignment = NSTextAlignmentCenter;
    label.font = [UIFont systemFontOfSize:16];
    label.textColor = [UIColor whiteColor];
    label.text = @"将二维码放入框内,即可自动扫描";
    label.backgroundColor = [UIColor clearColor];
    [self.view addSubview:label];
    //返回按钮
    UIButton *backBtn = [UIButton buttonWithType:UIButtonTypeCustom];
    backBtn.frame = CGRectMake(-2, 10, 60, 64);
    [backBtn addTarget:self action:@selector(backToView:) forControlEvents:UIControlEventTouchUpInside];
    [backBtn setImage:[UIImage imageNamed:@"白色返回_想去"] forState:UIControlStateNormal];
    [self.view addSubview:backBtn];

    UIImageView *imageV = [[UIImageView alloc]initWithImage:[UIImage imageNamed:@"erweima@3x"]];
    imageV.userInteractionEnabled = YES;
    //    imageV.frame = CGRectMake(280, 10, 35, 35);
    UITapGestureRecognizer *tap = [[UITapGestureRecognizer alloc]initWithTarget:self action:@selector(chooseImage)];
    [imageV addGestureRecognizer:tap];
    [self.view addSubview:imageV];
    [imageV mas_makeConstraints:^(MASConstraintMaker *make) {
        make.top.equalTo(self.view).with.offset(25);
        make.right.equalTo(self.view).with.offset(-15);
        make.size.mas_equalTo(CGSizeMake(35, 35));
    }];
}
3.4然后就是添加动画效果了(扫码的时候扫描线由上到下地移动).我们可以在系统监听扫码状态的代理方法写.
//监听扫码状态,添加扫码动画
-(void)setDidRecoiveBlock:(XMSweepBlock)didRecoiveBlock
{
    _didRecoiveBlock = [didRecoiveBlock copy];
}
-(void)observeValueForKeyPath:(NSString *)keyPath ofObject:(id)object change:(NSDictionary *)change context:(void *)context
{
    if ([object isKindOfClass:[AVCaptureSession class]]) {
        BOOL isRunning = ((AVCaptureSession *)object).isRunning;
        if (isRunning) {
            //添加动画
            [self addAnimation];
        }else{
            //移除动画
            [self removeAnimation];
        }
    }
}
//添加扫码动画
-(void)addAnimation{
    UIView *line = [self.view viewWithTag:line_tag];
    line.hidden = NO;
    CABasicAnimation *animation = [self moveTime:2 fromY:[NSNumber numberWithFloat:0] toY:[NSNumber numberWithFloat:self.view.frame.size.width - 60 -2] rep:OPEN_MAX];
    [line.layer addAnimation:animation forKey:@"lineAnimation"];

}
//移除扫码动画
-(void)removeAnimation{
    UIView *line = [self.view viewWithTag:line_tag];
    [line.layer removeAnimationForKey:@"lineAnimation"];
    line.hidden = YES;
}
-(CABasicAnimation *)moveTime:(float)time fromY:(NSNumber *)fromY toY:(NSNumber *)toY rep:(int)rep
{
    CABasicAnimation *anima = [CABasicAnimation animationWithKeyPath:@"transform.translation.y"];
    [anima setFromValue:fromY];
    [anima setToValue:toY];
    anima.duration = time;
    anima.delegate = self;
    anima.repeatCount = rep;
    //动画结束的时候,保持动画的最后状态
    anima.fillMode = kCAFillModeForwards;
    anima.removedOnCompletion = NO;
    //控制动画的速度
    anima.timingFunction = [CAMediaTimingFunction functionWithName:kCAMediaTimingFunctionEaseInEaseOut];
    return anima;
}
3.5这里我们通过前面定义的Block,设置相关的Block方法(获取到相对应的值),我们在扫码得到结果后,退出当前的控制器,且停止系统捕获信息的方法.
//获取到扫码结果
-(void)captureOutput:(AVCaptureOutput *)captureOutput didOutputMetadataObjects:(NSArray *)metadataObjects fromConnection:(AVCaptureConnection *)connection
{
    if (metadataObjects.count > 0) {
        [session stopRunning];
        AVMetadataMachineReadableCodeObject *metadataObject = [metadataObjects objectAtIndex:0];
        //输出扫描字符串
        NSString *data = metadataObject.stringValue;
        NSLog(@"我想要得到的数据是%@",data);
        if (_didRecoiveBlock) {
            _didRecoiveBlock(data);
            [self removeFromSuperview];
        }
    }
}

//从父视图移除
-(void)removeFromSuperview
{
    [session removeObserver:self forKeyPath:@"running" context:nil];
    [UIView animateWithDuration:0.3 animations:^{
        self.view.alpha = 0;
    } completion:^(BOOL finished) {
        [self.view removeFromSuperview];
        [self removeFromParentViewController];
    }];
    [[UIApplication sharedApplication]setStatusBarStyle:UIStatusBarStyleDefault animated:YES];
}
4.本地二维码扫码功能
4.1其实实现原理很简单,也是从相册选中二维码照片(单张选取和选中),然后通过系统的方法获取扫码的结果,最后也是通过Block来回调.
-(void)chooseImage
{
    UIImagePickerController *picker = [[UIImagePickerController alloc]init];
    picker.sourceType = UIImagePickerControllerSourceTypePhotoLibrary;
    picker.delegate = self;
    picker.allowsEditing = YES;
    [self presentViewController:picker animated:YES completion:nil];
}
//选中单张照片
-(void)imagePickerController:(UIImagePickerController *)picker didFinishPickingMediaWithInfo:(NSDictionary *)info
{
    [picker dismissViewControllerAnimated:YES completion:nil];
    __block UIImage *image = [info objectForKey:UIImagePickerControllerEditedImage];
    if (!image) {
        image = [info objectForKey:UIImagePickerControllerOriginalImage];
    }
    //系统自带的识别方法
    CIDetector *detector = [CIDetector detectorOfType:CIDetectorTypeQRCode context:nil options:@{ CIDetectorAccuracy : CIDetectorAccuracyHigh }];
    CGImageRef ref = (CGImageRef)image.CGImage;
    CIImage *cii = [CIImage imageWithCGImage:ref];
    NSArray *feacture = [detector featuresInImage:cii];
    if (feacture.count >= 1) {
        CIQRCodeFeature *feature = [feacture objectAtIndex:0];
        NSString *scanResult = feature.messageString;
        if (_didRecoiveBlock) {
            self.didRecoiveBlock(scanResult);

            [self selfRemoveFromSuperview];
        } else {
            if (IS_VAILABLE_IOS8) {
                UIAlertController *alert = [UIAlertController alertControllerWithTitle:@"扫码" message:scanResult preferredStyle:UIAlertControllerStyleAlert];
                [alert addAction:[UIAlertAction actionWithTitle:@"好" style:UIAlertActionStyleCancel handler:^(UIAlertAction * _Nonnull action) {
                    [session startRunning];
                }]];
                [self presentViewController:alert animated:YES completion:nil];
            } else {
                UIAlertView *alert = [[UIAlertView alloc] initWithTitle:@"扫码" message:scanResult delegate:self cancelButtonTitle:@"好" otherButtonTitles:nil];
                [alert show];
            }
        }
    }
}

- (void)selfRemoveFromSuperview{
    [session removeObserver:self forKeyPath:@"running" context:nil];
    [UIView animateWithDuration:0.3 delay:0 options:UIViewAnimationOptionCurveEaseInOut animations:^{
        self.view.alpha = 0;
    } completion:^(BOOL finished) {
        [self.view removeFromSuperview];
        [self removeFromParentViewController];
    }];
    [[UIApplication sharedApplication] setStatusBarStyle:UIStatusBarStyleDefault animated:YES];
}
写到这里,基本功能都能实现,具体可以根据自己的需求来修改.
源码下载,如果能对你有用的话,希望能能给个Star!(__) 嘻嘻……