译者语:我没有任何技术背景,翻译这篇文章挺费劲,Google,维基百科左右相伴。感谢我的同事,程序宋少和美术李大师,给予的专业指导。与大家分享好的技术文章,也许翻译中有不合逻辑的地方,也希望各位IT专家提宝贵修改意见,以完善。
Coutre Jour Snot 背后的技术
作者: Nathan Gonzalez
获奖游戏Contre Jour美轮美奂的视觉效果,除了直观给大家来外美好体验,其独特的技术手法也值得关注。正如我一个同事在其博客中写到的,游戏图像的创造是通过OpenGL drawing framework以及利用动态渲染这种较为复杂的方式来替代简单绘制一些元素。游戏中的Snot既是这种制作方法的体现之一。Snots帮助并指引Petit(游戏主人公)完成了它的伟大冒险旅程。现在请跟我们一起来探知如何在HTML5中制作snot。
神奇的物理
要想了解drawing snots如何工作,需要了解其基本结构。Contre Jour使用的是2D物理引擎Box2d。我们将不会在文章中过多的讨论snot的物理特征,但如果你从未使用过物理引擎,那么先简单了解一下会对理解下文有帮助。一名来自Mokus Games的优秀程序员,将多个Box2d body通过接点(接点的种类取决于snot的种类)有顺序地关联起来,设计出snot。每个body好比一个合叶,当受到外力时就会弯曲。因为每个body是彼此关联的,所以当一个body受力时,另外一个也会做出相应反应。对我们来说,每一个当前的body位置都是可以访问的,这很重要。这些控制点将会是服务于接下来要说的绘图技术的基础。
绘制一个Snot
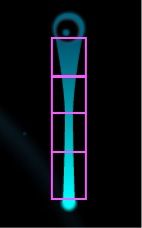
我们已经对snot的原理有了简单了解。接下来我们来讲如何在Box2d中来完成一个snot。如下图所示,snot由两部分组成,需要不同的技术来实现。

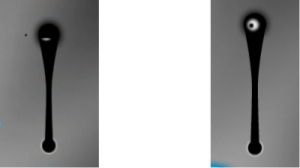
黄色部分是snot的头和尾,完全是图。我们只要确定头尾的Box2d body位置,然后画图。用HTML 5 canvas 来实现会更容易,只需要使用drawImage方法。蓝色方框内是snot的中间部分,制作起来更复杂。如果精确的模仿出bodies动起来的感觉,静止图像(static image)实现起来够呛。取而代之,游戏开发者写了一个公式,计算snot bodies的Bezier曲线的控制点;计算由控制点的中介点组成的数组;把数组给到OpenGL,从而绘制出流畅的曲线,而不是很多个三角。这么一看,这似乎不能用javascript实现。毕竟我们没有OpenGL接口。结论是,用HTML5 Canvas来制作body确实比通过最初的OpenGL容易!我们很容易从最初的程序中得到控制点的计算结果,通过Canvas的quadraticCurveTo功能画出二次曲线,然后根据结果填充路径。代码和结果如下:
// variables: ctx = HTML5 context, color = rgba color string,
// pairs: array of control point pairs, with each element containing a
// first and second point that mirror each other along the body.
ctx.fillStyle = color;
ctx.beginPath();
start = pairs[0].first, control, anchor;
ctx.moveTo(start.x, start.y);
for (var i = 1; i < pairs.length; i += 2) {
control = pairs[i].first;
anchor = pairs[i + 1].first;
ctx.quadraticCurveTo(control.x, control.y, anchor.x, anchor.y);
}
ctx.lineTo(pairs[pairs.length - 1].second.x, points[pairs.length -1].second.y);
for (var i = pairs.length - 2; i > 0; i -= 2) {
control = pairs[i].second;
anchor = pairs[i - 1].second;
ctx.quadraticCurveTo(control.x, control.y, anchor.x, anchor.y);
}
ctx.lineTo(start.x, start.y);
ctx.closePath();
ctx.fill();
绘制渐变Snot
相比最初的应用,在HTML5中绘制一条颜色一致的snot不是难事。为“Night“世界(第二章)绘制snots就不一样了。修改代码让snot有阴影渐变,在最初版本中,简单地给OpenGL一个与曲线点数组一一对应的颜色数组。OpenGL绘制snot顶点时,使用的是存储在数组中的颜色,然后给代码生成的形状上色就好了。不幸的是,在这方面Canvas不能也如此灵活。Canvas能做到的是,用API(Application Programming Interface,应用程序编程接口)生成linear gradients(线性渐变),正如你看到的snot body。这并不像我们之前我们做纯黑色snot那样简单,生成一个渐变并给snot body填色,就能一下子搞定。就像名字说得那样,要逐~渐~变~(译者:字面表述很奇怪)。API需要一个起点和一个终点,然后在两点间生成渐变。所以,如果我们只是简单以snot的头到尾为点生成一个渐变,将不会完全与snot body相吻合,除非这这两点之间是直线。如果这是一个可以伸缩的snot,问题就来了。不过我们可以通过简单的方法,把绘制snot过程分段来解决。代替一下子画出整个snot body路径的方式,我们将控制点分为很多组,大致对应Box2d bodies中每个段,然后单独完成每个段,把这个段的颜色从头到尾用线性映射出来。
虽然不是100%的准确,通过接点关联的bodies之间的行动能确保,每个段在绝大多数情况下都会相对线性(除非一个snot被弯得很扭曲)。即便是“不是100%准确”和“相对线性”,听起来没有十足把握,但是这个技术的实验结果还是非常接近原始效果的。
// The colors parameter is an array of colors that represent
// the color the snot should be at each control point.
var point0, point1, point2, grd, color0, color1;
context.save();
var colorIndex = 0;
// Iterate through all the segments and draw each one individually.
for (var i = 1; i < points.length; i += 2) {
point0 = points[i - 1];
point1 = points[i];
point2 = points[i + 1];
color0 = colors[colorIndex];
color1 = colors[colorIndex + 1];
// In order to hide breaks it helps to draw the segments
// with a slight overlap.
if (i > 1) {
Box2dUtil.b2Vec2Lerp(point0.first, points[i - 2].first, 0.05, point0.first);
Box2dUtil.b2Vec2Lerp(point0.second, points[i - 2].second, 0.05, point0.second);
}
Box2dUtil.getCenter(point0.first, point0.second, DrawUtil.center);
Box2dUtil.getCenter(point2.first, point2.second, DrawUtil.center2);
// Create a gradient that runs from the top to the bottom of the segment
// using the color value array and set the gradient as the fillStyle.
grd = context.createLinearGradient(DrawUtil.center.x, DrawUtil.center.y, DrawUtil.center2.x, DrawUtil.center2.y);
grd.addColorStop(0, color0);
grd.addColorStop(1, color1);
context.fillStyle = grd;
// Fill in the segment.
context.beginPath();
context.moveTo(point0.first.x, point0.first.y);
context.quadraticCurveTo(point1.first.x, point1.first.y, point2.first.x, point2.first.y);
context.lineTo(point2.second.x, point2.second.y);
context.quadraticCurveTo(point1.second.x, point1.second.y,point0.second.x, point0.second.y);
context.lineTo(point0.first.x, point0.first.y);
context.closePath();
context.fill();
colorIndex++;
}
context.restore();

绳子纹理
尽管把OpenGL代码倒进HTML5是一个困难的任务,到目前为止我们还没有出过问题。我们想到的解决方法都相对简而易懂和实现,并与最初的游戏效果基本一致。遗憾的是,总会有不按常理出牌的个体出来给你泼冷水,让你沮丧。我们的那个“个体”就是rope snot。
在iOS版本中,rope body身上的条纹图案是通过single texture(单材质纹理)创造出来:

OpenGL沿着body的长度循环一个图样,通过纹理映射(texture mapping)到snot的形状上。这项技术保证了段之间的纹理无缝连接。
难题来了,如何在HTML5中,既不影响浏览器处理速度,又模仿出texture mapping的结果呢。我们试了很多方法,包括linear gradients, Canvas pattern fills,甚至试图在Canvas中创造真正意义上的纹理映射。但没有一种方法能做出原始版本那样的效果。幸运的是,我们又找到另外一个方法,尽量去靠近纹理映射效果。这算是上面讨论的gradient技术的延伸。首先,将像night snot那样将snot body分段。将这些段都切成两部分。每一部分,我们算一个变换矩阵,以尽可能的符合纹理映射。变换矩阵包括每段的头到尾的角度向量,中心作为纹理的位置,通过计算段的平均长度和宽度和纹理的平均长度和宽度的比例,逐个得出x和y的缩放系数。然后,用cavans clip方法确保任何超出段的纹理不会被画进来。
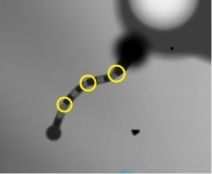
这个方法最大的缺点是rope的每个段之间有非常明显的断点,外层曲线也会缺少一定平滑度。
不管怎么说,在绘制纹理段之前,要确保纹理图样的头和尾保持一致,始终用一种颜色(普通snots的颜色)来绘制整个body,以缩小断点。尽管这能有效遮盖缝隙,但snot的体外有了边儿,当snot扭曲和转动时,这个边儿更明显。不过这个纹理边儿的颜色让snot有了3D效果,也算游戏多了一个“属性”吧。
// backColor is a passed in rgba string that we can use to set the
// context color.
var point0, point1, point2;
// Fill in back with solid color to hide breaks using the method
// described in the solid snot section.
DrawUtil.drawBezier(context, points, backColor);
// Fill the rest of the straight areas with texture.
// This method makes use of a custom Bitmap class to handle drawing
// the texture.
context.save();
for (var i = 1; i < points.length-1; i += 2) {
point0 = points[i - 1];
point1 = points[i];
point2 = points[i + 1];
if (i > 1){
Box2dUtil.b2Vec2Lerp(point0.first, points[i - 2].first, 0.05, point0.first);
Box2dUtil.b2Vec2Lerp(point0.second, points[i - 2].second, 0.05, point0.second);
}
// Draw segment path.
context.beginPath();
context.moveTo(point0.first.x, point0.first.y);
context.quadraticCurveTo(point1.first.x, point1.first.y, point2.first.x, point2.first.y);
context.lineTo(point2.second.x, point2.second.y);
context.quadraticCurveTo(point1.second.x, point1.second.y, point0.second.x, point0.second.y);
context.lineTo(point0.first.x, point0.first.y);
context.closePath();
// Calculate a position, rotation, and scale to map half of the
// texture with the top half of the segment.
context.save();
// Set the texture to draw only the front half.
texture.frame = 0;
Box2dUtil.getCenter(point0.first, point0.second, DrawUtil.center);
Box2dUtil.getCenter(point1.first, point1.second, DrawUtil.center2);
// Calculate the rotation of the texture from the vector between the top and bottom centers of the top half segment.
var direction = Box2dUtil.b2Vec2Subtract(DrawUtil.center2, DrawUtil.center);
var rotation = Box2dUtil.atan2Vec(direction);
// Calculate the y scale by dividing the segment's length by the
// texture's length.
var scaleY = direction.Length() / 16;
// Calculate the x scale by averaging the widths of the top and
// bottom of the segment and then divide that by
// twice the width of the texture (because we are averaging two together).
var point1Width = Box2dUtil.b2Vec2Distance(point1.first, point1.second);
var scaleX =(Box2dUtil.b2Vec2Distance(point0.first, point0.second) + point1Width) / (32 * 2);
// Calculate the center of this half of the segment.
Box2dUtil.getCenter(DrawUtil.center, DrawUtil.center2, DrawUtil.center);
// Clip the context and use a draw method of the Bitmap to draw
// the texture with the calculated values.
context.clip();
texture.drawNoTransform(context, DrawUtil.center.x, DrawUtil.center.y, rotation, scaleX, scaleY);
context.restore();
// Repeat for the bottom part of the segment.
context.save();
texture.frame = 1;
Box2dUtil.getCenter(point2.first, point2.second, DrawUtil.center);
var direction = Box2dUtil.b2Vec2Subtract(DrawUtil.center, DrawUtil.center2);
var rotation = Box2dUtil.atan2Vec(direction);
scaleY = direction.Length() / 16;
scaleX = (point1Width + Box2dUtil.b2Vec2Distance(point2.first, point2.second)) / (32 * 2);
Box2dUtil.getCenter(DrawUtil.center, DrawUtil.center2,DrawUtil.center);
context.clip();
texture.drawNoTransform(context, DrawUtil.center.x, DrawUtil.center.y, rotation, scaleX, scaleY);
context.restore();
}
context.restore();

如你所见,用canvas替代OpenGL用了我们很多想法,但通过积极尝试并结合IE10这样的浏览器的处理能力,我们也能创造出与原始应用差不多的效果,并没有让snot的动感变得糟糕。大胆去尝试HTML5吧,你也可能做出一个基于浏览器的游戏大作。
The Tech Behind a Contre Jour Snot
By: Nathan Gonzalez
While the award winning game Contre Jour is amazing on many fronts, its stunning visuals are probably its most unique asset. As detailed in a colleague’s blog post the game creates its graphics through the OpenGL drawing framework and several elements are dynamically rendered in a more complex manner than by simply drawing images. One of these is the Snot (also known as the Tentacle). They are the most common tools used to help guide Petit through the perils of his epic journey. So sit back and relax as we take a deep dive into how they are constructed as well as how we overcame the pitfalls of translating one into HTML5
The Physics Magic
In order to understand how drawing snots works, it is important to understand the basic structure of one. Please note that Contre Jour uses the 2d physics engine Box2d for its physics. We aren’t going to go over much of the physics aspect of the snot in this blog, but if you’ve never dealt with a physics engine before a quick overview of the documentation may help you understand the next sentence. The talented programmers at Mokus Games designed the snot out of multiple Box2d bodies which are sequentially connected to each other with joints (with the type of joint depending on the type of snot). You can think of each body as being a hinge that flexes when forces are applied to it. Since each body is connected to one another, forces applied to one body will cause the others to react as well. What is most important for us, however, is that the current location of each body is accessible. These control points will serve as the basis of all the upcoming drawing techniques.
Drawing a Snot
Now that we have a very basic understanding of the inner workings of a snot, we can take off our Box2d hats and think about how we are going to draw one. As shown in the picture below, there are two distinct sections of the snot that will require us to draw them using a different technique.
snot sections
The yellow sections contain the top and bottom portions of the snot and are comprised completely of images, so all we have to do is get the respective positions of the top and bottom Box2d bodies and draw the images at the appropriate location. This is easy to do in the HTML5 canvas and only requires the use of the drawImage method. The blue section that denotes the middle of the snot, however, is a bit more complex to draw. In order to precisely mimic the look and feel of the movement of the underlying bodies, a static image just won’t cut it. Instead, the game’s creators developed a formula that calculated the control points for a bezier curve from the snot’s bodies, calculated an array of intermediate points from the control points, and then gave the array to OpenGL to draw the smooth curve out of many triangles. At first glance, this may seem an impossible technique to translate to javascript. After all, we have no access to OpenGL. However, using the power of the HTML5, it is actually easier to implement the drawing of the body in the canvas than it is through native OpenGL! We simply took the control point calculation from the original code and drew quadratic curves through the canvas’s quadraticCurveTo function and filled the resulting path. The code and results are shown below:
// variables: ctx = HTML5 context, color = rgba color string,
// pairs: array of control point pairs, with each element containing a
// first and second point that mirror each other along the body.
ctx.fillStyle = color;
ctx.beginPath();
start = pairs[0].first, control, anchor;
ctx.moveTo(start.x, start.y);
for (var i = 1; i < pairs.length; i += 2) {
control = pairs[i].first;
anchor = pairs[i + 1].first;
ctx.quadraticCurveTo(control.x, control.y, anchor.x, anchor.y);
}
ctx.lineTo(pairs[pairs.length - 1].second.x, points[pairs.length -1].second.y);
for (var i = pairs.length - 2; i > 0; i -= 2) {
control = pairs[i].second;
anchor = pairs[i - 1].second;
ctx.quadraticCurveTo(control.x, control.y, anchor.x, anchor.y);
}
ctx.lineTo(start.x, start.y);
ctx.closePath();
ctx.fill();
iOS snot on left, HTML5 snot on right
Drawing a Gradient Snot
While drawing a solid colored snot in HTML5 isn’t a big challenge compared to the native application, drawing the snots for the “Night” world (chapter 2) is a somewhat thornier issue. To modify the code to shade the snot with a gradient, the original version simply gives OpenGL a color array that it calculates based on the number of calculated curve points. When OpenGL draws the snot vertices, it uses the colors stored in the array to color the resulting shapes appropriately. Unfortunately, this is an area where canvas does not have the same flexibility. What canvas does have, however, is an API for creating linear gradients, which is what the snot body looks like. It isn’t as simple as creating a gradient and filling the snot body in one shot as we did with the solid black snot though. As the name implies, a linear gradient is defined as being, well, linear. The API expects a start point and an end point, which it takes and creates a gradient that goes straight between the two points. So if we simply create a gradient that goes from the snot head to its tail, the gradient will not fit correctly on the snot body unless it is in a straight line between the two points. Since a snot is very elastic, this will not always be the case. Luckily for us, simply segmenting how the snot is drawn solves this problem for us. Instead of drawing a path for the whole snot body at once, we break the control points up into groups that roughly correspond to the segments between the Box2d bodies and draw each segment individually and with a gradient that maps to the top and bottom of said segment.
visual representation of the gradient segments
While not 100% accurate, the behaviour of the bodies connected by joints guarantees us that each segment will be fairly linear most of the time (except when a snot is bent at a hard angle). Though using phrases such as “not 100% accurate” and “fairly linear” are hardly confidence inspiring, the results of this technique are very close to the original.
// The colors parameter is an array of colors that represent
// the color the snot should be at each control point.
var point0, point1, point2, grd, color0, color1;
context.save();
var colorIndex = 0;
// Iterate through all the segments and draw each one individually.
for (var i = 1; i < points.length; i += 2) {
point0 = points[i - 1];
point1 = points[i];
point2 = points[i + 1];
color0 = colors[colorIndex];
color1 = colors[colorIndex + 1];
// In order to hide breaks it helps to draw the segments
// with a slight overlap.
if (i > 1) {
Box2dUtil.b2Vec2Lerp(point0.first, points[i - 2].first, 0.05, point0.first);
Box2dUtil.b2Vec2Lerp(point0.second, points[i - 2].second, 0.05, point0.second);
}
Box2dUtil.getCenter(point0.first, point0.second, DrawUtil.center);
Box2dUtil.getCenter(point2.first, point2.second, DrawUtil.center2);
// Create a gradient that runs from the top to the bottom of the segment
// using the color value array and set the gradient as the fillStyle.
grd = context.createLinearGradient(DrawUtil.center.x, DrawUtil.center.y, DrawUtil.center2.x, DrawUtil.center2.y);
grd.addColorStop(0, color0);
grd.addColorStop(1, color1);
context.fillStyle = grd;
// Fill in the segment.
context.beginPath();
context.moveTo(point0.first.x, point0.first.y);
context.quadraticCurveTo(point1.first.x, point1.first.y, point2.first.x, point2.first.y);
context.lineTo(point2.second.x, point2.second.y);
context.quadraticCurveTo(point1.second.x, point1.second.y,point0.second.x, point0.second.y);
context.lineTo(point0.first.x, point0.first.y);
context.closePath();
context.fill();
colorIndex++;
}
context.restore();
iOS snot on left, HTML5 snot on right
Texturing the Rope
Despite the daunting task of porting all the OpenGL code to HTML5, so far we’ve done all right. The solutions we’ve come up with are fairly easy to understand and implement and stay pretty true to the original game. Sadly, there is always that one unruly individual who likes to rain on everyone’s parade and steal all the cookies. In our case this came to us in the form of the rope snot.
In the iOS game, the striped pattern on the rope body is created by using a single texture:
rope texture
The texture is then mapped to the snot body shape by OpenGL using texture mapping in a repeat pattern along the length of the body. This technique ensures that the texture fits perfectly with no overlap or breaks between sections.
Now the million dollar question is how to emulate the results of texture mapping in HTML5 (which has no concept of true texture coordinates) without slowing the browser to a crawl in the process. We tried several techniques to get this to work, including linear gradients, canvas pattern fills and even experimented with trying to create true texture mapping in the canvas. None of these created an effect that looked at all like the original. Luckily, after all these options were exhausted there was one method left to be tried, a rough approximation of texture mapping. It’s really an extension of the gradient technique from the last section. First, the snot body was segmented in the same fashion as the night snot. These sections were then cut into two halves. For each half, we calculated a transform to apply to the texture that mapped as close as possible to the half size. The center of the half was used as the texture’s position, while the rotation was found through calculating the angle of the vector from the top of the segment to the bottom. The x and y scale values were both individually computed by calculating a proportion of the average length and width of the segment with the length and width of the texture. Then, the canvas clip method was used to ensure that any excess texture outside of the segment wouldn’t be drawn.
The big flaw with this method is that without anything else it produces a noticeable disjoint between the individual segments of the rope and the outer curve loses some of its smoothness.
disjointed texture sections
However, this can be minimized by drawing the entire body in with a solid color (like the normal snots) that matches the start and end of the texture pattern before drawing the texture segments. While it effectively hides the seams, it does create a small border on the outside of the snot that becomes more noticeable when the snot does a lot of twisting and turning. It actually creates a sort of 3D effect because of the color of the texture border, so we can chalk this one up as a “feature” and call it a day.
// backColor is a passed in rgba string that we can use to set the
// context color.
var point0, point1, point2;
// Fill in back with solid color to hide breaks using the method
// described in the solid snot section.
DrawUtil.drawBezier(context, points, backColor);
// Fill the rest of the straight areas with texture.
// This method makes use of a custom Bitmap class to handle drawing
// the texture.
context.save();
for (var i = 1; i < points.length-1; i += 2) {
point0 = points[i - 1];
point1 = points[i];
point2 = points[i + 1];
if (i > 1){
Box2dUtil.b2Vec2Lerp(point0.first, points[i - 2].first, 0.05, point0.first);
Box2dUtil.b2Vec2Lerp(point0.second, points[i - 2].second, 0.05, point0.second);
}
// Draw segment path.
context.beginPath();
context.moveTo(point0.first.x, point0.first.y);
context.quadraticCurveTo(point1.first.x, point1.first.y, point2.first.x, point2.first.y);
context.lineTo(point2.second.x, point2.second.y);
context.quadraticCurveTo(point1.second.x, point1.second.y, point0.second.x, point0.second.y);
context.lineTo(point0.first.x, point0.first.y);
context.closePath();
// Calculate a position, rotation, and scale to map half of the
// texture with the top half of the segment.
context.save();
// Set the texture to draw only the front half.
texture.frame = 0;
Box2dUtil.getCenter(point0.first, point0.second, DrawUtil.center);
Box2dUtil.getCenter(point1.first, point1.second, DrawUtil.center2);
// Calculate the rotation of the texture from the vector between the top and bottom centers of the top half segment.
var direction = Box2dUtil.b2Vec2Subtract(DrawUtil.center2, DrawUtil.center);
var rotation = Box2dUtil.atan2Vec(direction);
// Calculate the y scale by dividing the segment's length by the
// texture's length.
var scaleY = direction.Length() / 16;
// Calculate the x scale by averaging the widths of the top and
// bottom of the segment and then divide that by
// twice the width of the texture (because we are averaging two together).
var point1Width = Box2dUtil.b2Vec2Distance(point1.first, point1.second);
var scaleX =(Box2dUtil.b2Vec2Distance(point0.first, point0.second) + point1Width) / (32 * 2);
// Calculate the center of this half of the segment.
Box2dUtil.getCenter(DrawUtil.center, DrawUtil.center2, DrawUtil.center);
// Clip the context and use a draw method of the Bitmap to draw
// the texture with the calculated values.
context.clip();
texture.drawNoTransform(context, DrawUtil.center.x, DrawUtil.center.y, rotation, scaleX, scaleY);
context.restore();
// Repeat for the bottom part of the segment.
context.save();
texture.frame = 1;
Box2dUtil.getCenter(point2.first, point2.second, DrawUtil.center);
var direction = Box2dUtil.b2Vec2Subtract(DrawUtil.center, DrawUtil.center2);
var rotation = Box2dUtil.atan2Vec(direction);
scaleY = direction.Length() / 16;
scaleX = (point1Width + Box2dUtil.b2Vec2Distance(point2.first, point2.second)) / (32 * 2);
Box2dUtil.getCenter(DrawUtil.center, DrawUtil.center2,DrawUtil.center);
context.clip();
texture.drawNoTransform(context, DrawUtil.center.x, DrawUtil.center.y, rotation, scaleX, scaleY);
context.restore();
}
context.restore();
iOS rope on left, HTML5 rope on right
As you can see, it took some creativity to replace OpenGL drawing with the canvas, but with a little elbow grease and the processing power provided by hardware-accelerated browsers such as IE10 we managed to create a pretty consistent look with the native application that managed not to slow it down to a crawl. So I encourage you to go out and experiment with HTML5 yourself. Maybe you’ll accidentally make the next big browser game.