简介
在iOS持续集成的过程中,签名打包这一部分,就是对原生指令进行了封装, 将常用的参数名简化, 支持全部的自带参数及设置, 同时输出符号表 dSYM 文件, 并且支持直接从相关 repo 直接编译打包.因此熟悉一下xcodebuild还是很有必要的。
在终端输入man xcodebuild,可以看到Description里面有介绍用法。
打包流程
Archive包
xcodebuild archive -workspace 项目名称.xcworkspace
                       -scheme 项目名称
                       -configuration 构建配置
                       -archivePath archive包存储路径
                       CODE_SIGN_IDENTITY=证书
                       PROVISIONING_PROFILE=描述文件UUID
在这里证书,和描述文件的字段,可要可不要,它会根据xcode去匹配
证书对应内容:
在钥匙串找到对应证书把加粗部分的标题复制出来即可
描述文件UUID:
首先到描述文件路径:
/Users/用户名/Library/MobileDevice/Provisioning Profiles
在终端下解密描述文件
security cms -D -i xxxx.mobileprovision
可以找到TeamName,UUID,等对应的value值,注意要 在CODE_SIGN_IDENTITY,PROVISIONING_PROFILE赋值时要加“”号
导出ipa包
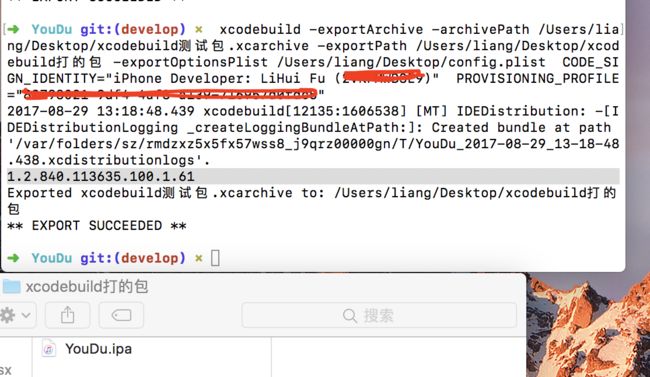
xcodebuild -exportArchive -archivePath archive文件的地址.xcarchive
                          -exportPath 导出的文件夹地址
                          -exportOptionsPlist exprotOptionsPlist.plist
                          CODE_SIGN_IDENTITY=证书
                          PROVISIONING_PROFILE=描述文件UUID
同样的,证书和描述文件的参数可要可不要,exportOptionsPlist是plist文件,我们可以用xcode创建一个,在里面可以配置参数,我的如下:
我的命令:
使用xcodebuild exportOptionsPlist -h 查看plist可写参数
Available keys for -exportOptionsPlist:

    compileBitcode : Bool

        For non-App Store exports, should Xcode re-compile the app from bitcode? Defaults to YES.

    embedOnDemandResourcesAssetPacksInBundle : Bool

        For non-App Store exports, if the app uses On Demand Resources and this is YES, asset packs are embedded in the app bundle so that the app can be tested without a server to host asset packs. Defaults to YES unless onDemandResourcesAssetPacksBaseURL is specified.

    iCloudContainerEnvironment

        For non-App Store exports, if the app is using CloudKit, this configures the "com.apple.developer.icloud-container-environment" entitlement. Available options: Development and Production. Defaults to Development.

    manifest : Dictionary

        For non-App Store exports, users can download your app over the web by opening your distribution manifest file in a web browser. To generate a distribution manifest, the value of this key should be a dictionary with three sub-keys: appURL, displayImageURL, fullSizeImageURL. The additional sub-key assetPackManifestURL is required when using on demand resources.

    method : String

        Describes how Xcode should export the archive. Available options: app-store, package, ad-hoc, enterprise, development, and developer-id. The list of options varies based on the type of archive. Defaults to development.

    onDemandResourcesAssetPacksBaseURL : String

        For non-App Store exports, if the app uses On Demand Resources and embedOnDemandResourcesAssetPacksInBundle isn't YES, this should be a base URL specifying where asset packs are going to be hosted. This configures the app to download asset packs from the specified URL.

    teamID : String

        The Developer Portal team to use for this export. Defaults to the team used to build the archive.

    thinning : String

        For non-App Store exports, should Xcode thin the package for one or more device variants? Available options:  (Xcode produces a non-thinned universal app),  (Xcode produces a universal app and all available thinned variants), or a model identifier for a specific device (e.g. "iPhone7,1"). Defaults to .

    uploadBitcode : Bool

        For App Store exports, should the package include bitcode? Defaults to YES.

    uploadSymbols : Bool

        For App Store exports, should the package include symbols? Defaults to YES.
上传
1.测试包:
可以上传到fir,蒲公英等网站,以fir为例,
首先需要一个注册一个fir账号,从里面可以获取一个apitoken
安装fir(fir命令参考)
 ruby -v  // > 1.9.3
 gem install fir-cli
登录fir
fir login   //此时会让你输入apitoken
fir me  //获取账号信息
发布应用到fir
fir publish ipa包全路径
发布成功后,终端会输出一个路径,这个就是应用发布后的路径,复制访问即可.
2.正式包
altool:Application Loader的命令行工具用来验证并上传你的应用程序二进制文件到App Store
altool工具路径:
/Applications/Xcode.app/Contents/Applications/Application\ Loader.app/Contents/Frameworks/ITunesSoftwareService.framework/Versions/A/Support/altool
设置别名
在~/.bash_profile 中设置别名
alias altool='/Applications/Xcode.app/Contents/Applications/Application\ Loader.app/Contents/Frameworks/ITunesSoftwareService.framework/Versions/A/Support/altool'

设置别名后在终端
输入 source ~/.bash_profile
再输入 altool  就会有它的一些用法提示,否则就是设置别名失败了
altool用法
验证 ipa
altool --validate-app -f file -u username [-p password] [--output- format xml]
上传 ipa
altool --upload-app -f file -u username [-p password] [--output- format xml]
具体参数:
--validate-app
您要验证的应用程序。
--upload-app
您要上传的应用程序。
-f file
您正在验证或上传的应用程序的路径和文件名。
-u username
您的用户名。
-p password
您的用户密码。
--output-format [xml | normal]
您要 Application Loader 以结构化的 XML 格式还是非结构化的文本格式返回输出信息。Application Loader 默认以文本格式返回输出信息。
我的验证命令如下:
altool -validate-app -f 路径.ipa -u 用户名 -p 密码 -t ios
不出意外就可以得到一个成功的验证结果,我用的是以前上架过的包,得到的验证是已经存在这个包的错误提示


