Xcode->Homebrew->RVM->Ruby->CocoaPods
上面是安装顺序,所以要想安装CocoaPods,必须先确认你的电脑是否安装了Ruby环境。打开终端输入ruby -v即可查看是否安装Ruby环境。
ruby -v
ruby 2.3.1p112 (2016-04-26 revision 54768) [x86_64-darwin15]
如果安装了Ruby环境请直接移步后面CocoaPods安装,没有的话我们继续。
Xcode
Xcode就不说了。
Homebrew
linux系统有软件包依赖问题,好在Red hat有yum、Ubuntu有apt-get。而Mac OS却没有类似的,所以就有了第三方支持:Homebrew,简称brew,是Mac OSX上的软件包管理工具,能在Mac中方便的安装软件或者卸载软件。
Homebrew的安装很简单,只需要去官网将下图中用红色圈住的脚本复制到终端回车就行,当然也可以复制下面的脚本使用,你开心就好。
/usr/bin/ruby -e "$(curl -fsSL https://raw.githubusercontent.com/Homebrew/install/master/install)"
Homebrew使用
就举例常用的吧(从hen没hao用yong过),更多使用方法自己去官网挖掘吧!
搜索软件:brew search 软件名,如brew search wget
安装软件:brew install 软件名,如brew install wget
卸载软件:brew remove 软件名,如brew remove wget
RVM
RVM(Ruby Version Manager)是一个命令行工具,可以提供一个便捷的多版本Ruby环境的管理和切换。安装命令"curl -L get.rvm.io | bash -s stable"。RVM使用过程中所有命令都是在用户权限下操作,所以任何命令最好都不要用sudo、gem。
RVM安装
curl -L get.rvm.io | bash -s stable

% Total    % Received % Xferd  Average Speed   Time    Time     Time  Current Dload  Upload   Total   Spent    Left  Speed
100   184  100   184    0     0    218      0 --:--:-- --:--:-- --:--:--   218
100 22865  100 22865    0     0   8327      0  0:00:02  0:00:02 --:--:-- 20004
Downloading https://github.com/rvm/rvm/archive/1.27.0.tar.gz
Downloading https://github.com/rvm/rvm/releases/download/1.27.0/1.27.0.tar.gz.asc
Found PGP signature at: 'https://github.com/rvm/rvm/releases/download/1.27.0/1.27.0.tar.gz.asc',
but no GPG software exists to validate it, skipping.

Installing RVM to /Users/Fantasy/.rvm/
Adding rvm PATH line to /Users/Fantasy/.profile /Users/Fantasy/.mkshrc /Users/Fantasy/.bashrc /Users/Fantasy/.zshrc.
Adding rvm loading line to /Users/Fantasy/.profile /Users/Fantasy/.bash_profile /Users/Fantasy/.zlogin.
Installation of RVM in /Users/Fantasy/.rvm/ is almost complete:

* To start using RVM you need to run `source /Users/Fantasy/.rvm/scripts/rvm`
in all your open shell windows, in rare cases you need to reopen all shell windows.

# Fantasy,
#
#   Thank you for using RVM!
#   We sincerely hope that RVM helps to make your life easier and more enjoyable!!!
#
# ~Wayne, Michal & team.

In case of problems: https://rvm.io/help and https://twitter.com/rvm_io
载入RVM
source ~/.rvm/scripts/rvm
检查安装是否正确
rvm -v
rvm 1.27.0 (latest) by Wayne E. Seguin , Michal Papis  [https://rvm.io/]
列出已知的Ruby版本
rvm list known
获取更多的RVM知识请点击RVM实用指南
Ruby
Ruby是开源的面向对象程序设计的服务器端脚本语言。想挖掘更多关于Ruby信息请移步Ruby China、Ruby。
Ruby安装
如果使用RVM的Ruby安装源的话会比较慢,可以修改到Ruby China的Ruby镜像服务器提高安装速度。
echo "ruby_url=https://cache.ruby-china.org/pub/ruby" > ~/.rvm/user/db
rvm list known列表里面的都可以用来安装,这里安装最新的稳定版本2.3.1。
rvm install 2.3.1
切换到Ruby版本。
rvm use 2.3.1
设置默认版本,这样以后新打开的终端默认的Ruby就是这个版本。
rvm use 2.3.1 --default
检查当前使用的Ruby版本
ruby -v
ruby 2.3.1p112 (2016-04-26 revision 54768) [x86_64-darwin15]
查询已安装的Ruby
rvm list
卸载一个已安装版本
rvm remove 2.2.0
获取管理员权限更新系统的Ruby
sudo gem update --system
CocpaPods
CocoaPods是一个负责管理iOS项目中第三方开源库的工具。开发iOS项目不可避免地要使用第三方开源库,CocoaPods的出现使得开发人员节省了设置和更新第三方开源库的时间。
CocoaPods安装
Ruby的默认源使用的是cocoapods.org,国内访问这个网址有时候会有问(bei)题(qiang),解决方案是将其替换成Ruby China镜像。
查看Ruby的默认源。
gem sources -l
移除Ruby默认源并使用Ruby China镜像
gem sources --add https://gems.ruby-china.org/ --remove https://rubygems.org/
使用gem sources -l查看是否替换成功
*** CURRENT SOURCES ***

https://gems.ruby-china.org/
安装CocoaPods
sudo gem install cocoapods
****备注****:OS X EL Capitan 后安装改为
sudo gem install -n /usr/local/bin cocoapods
在安装进程结束的时候,执行命令:
pod setup
CocoaPods升级
升级很简单,再次执行安装命令即可。
sudo gem install cocoapods
****注意:****如果安装的时候使用了sudo,升级的时候一样需要使用该关键字,不然升级完了以后会出现路径不匹配问题。
CocoaPods使用
1.新建一个项目,名字Test_CocoaPods
2.终端cd到项目总目录
cd /Users/Fantasy/Desktop/Test_CocoaPods
3.建立Podfile(配置文件)
vim Podfile
4.键盘输入 ****i**** 进入编辑模式,输入:
platform :ios, '7.0'
pod 'SDWebImage', '~>3.8'
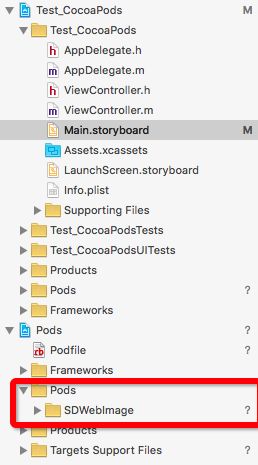
然后按Esc,并且输入:号进入vim命令模式,然后在:后边输入wq进行保存并退出,执行pod install
如果报错[!] The dependency `SDWebImage (~> 3.8)` is not used in any concrete target.则输入:
platform :ios, '7.0'
target 'Test_CocoaPods' do
pod 'SDWebImage', '~>3.8'
end
****注意:****target 后面的Test_CocoaPods为工程名。
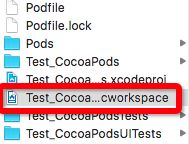
5.打开项目
点击Test_CocoaPods.xcworkspace,而不是点击Test_CocoaPods.xodeproj
6.接下来测试一下
6.1在
ViewController中导入
#import "UIImageView+WebCache.h"
6.2创建一个
UIImageView的对象并调用
sd_setImageWithURL:(NSURL *)url
[test_ImageView sd_setImageWithURL:url];
6.3运行结果
总结
- 用 CocoaPods进行管理,修改第三方源码极不方便;
- CocoaPods可以节省设置和更新第三方开源库的时间;
- 理解安装顺序(Xcode->Homebrew->RVM->Ruby->CocoaPods)对于安装CocoaPods有帮助。
想挖掘更多关于CocoaPods的信息请移步CocoaPods wiki
联系作者:·DH_Fantasy 新浪微博·DH_Fantasy
版权声明:自由转载-非商用-非衍生-保持署名(CC BY-NC-ND 3.0)


