一,研究背景:
起点Android客户端670版本有个需求,就是游戏下载在通知栏显示。为了把其功能实现的优雅,特此对此知识进行一番深入的研究,希望达到的目的是实现多样化的通知,应付各种先关需求变化。
二,结构图:
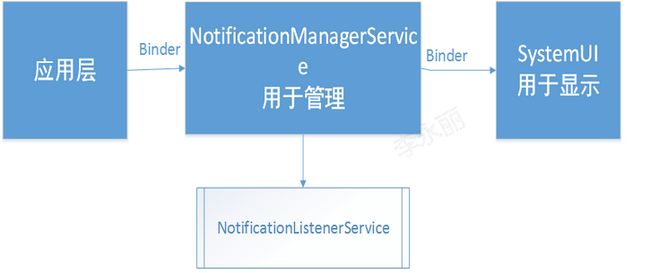
Notification大家都不陌生,其实用起来也很简单,有关工作原理如下:
通过以上简单的结构图不难看出,这个Notification的生命周期其实是一个sevice的生命周期,全权有NotificationManagerSerice来进行管理。
下面会详细分析到源码。
三,运用介绍:
关于如何运用,我简单的概括如下几个步骤:
Step1:获取NotificationManager对象
/** 获取Notification管理器。*/
mNotificationManager= (NotificationManager) getSystemService(NOTIFICATION_SERVICE);
Step2: 创建Notification对象
(有两种方式,一种直接new一个notificaiton对象,一种是创建一个builder中间对象,最后动过Bulder.build()方法达到目的,这个我觉得是看个人用法习惯)
builder=newNotification.Builder(this);
Step3:关联intent对象
/*** 给Notification设置Intent,单击Notification会发出这个Intent。*/
builder.setContentIntent(mPendingIntent);
这个intent我们一般会设置成PendingIntent,指的是当触发单个通知的时候发生的操作。提到PendingIntent就简单说一下他和intent的区别吧,pendingintent顾名思义不会立即被当前的activity所执行,他算是intent的一个包装,保留了当前app的上下文,也就是说不依赖于当前的activity,即便是当前的activty消失了,外界的app也会通过保留的上下文来执行pendingintent,通常使用他的场景就是闹钟和通知了。
Step4:执行notify
/** 发送Notification提醒。*/
mNotificationManager.notify(0,builder.build());
以上四个步骤四最简单不过的操作了,如果想更复杂点,可以自定义自己的RemoteView等。
接下来我主要讲notificaiton的新特性和notificaiton的源码机制:
A.新特性:
5.0提出了MediaStyle这一设置,就是你经常看到锁屏状态也能收到某些app的通知界面,这些通知会直接展现在手机界面上。MediaStyle实现了这一功能,可以将你通过Notification.Builder.addAction()添加的动作按钮,紧凑的呈现出来。 通过设置setSession可以配 置notification控制指定的MediaSession。通 过.setVisibility(Notification.VISIBILITY_PUBLIC)以使其出现在锁屏界面上。
如何实现,其实很简单:
private voidshow() {
MediaSession mediaSession =newMediaSession(this,"My Special Notification!");
builder.setVisibility(Notification.VISIBILITY_PUBLIC);// 设置能看的权限,这个代表锁屏状态下也能看
builder.setSmallIcon(R.drawable.about_icon);
builder.setContentTitle("My Notification!");
builder.setContentText("Test-test-test");
mIntent=newIntent(this,QDTestActivity.class);
PendingIntent p1 = PendingIntent.getActivity(this,0,mIntent,0);
builder.addAction(R.drawable.about_icon,"Move",p1);// 可以设置不同的pendingintent
builder.addAction(R.drawable.about_icon,"Pause",p1);
builder.addAction(R.drawable.about_icon,"Stop",p1);
builder.setStyle(newNotification.MediaStyle().setMediaSession(mediaSession.getSessionToken()));
mNotificationManager.notify(0,builder.build());
}
备注:5.0一下的机型是不支持的,否则会报以下的错误:
Process: com.qidian.liyongli.mynotificationtest, PID: 22064
java.lang.NoClassDefFoundError: android.media.session.MediaSession
B.Notificaiton机制:
我们知道应用程序如果要在通知栏弹一个消息,看起来只有几行代码,实际上有两个比较大的框架在里面。一个是通过 PendingIntent的静态函数getActivity()获取一个PendingIntent对象;一个是获取 NotificationManagerService的服务代理对象调用notify()来post一个消息出去。
通过PendingIntent的静态函数getActivity()获取一个PendingIntent对象,这个里面其实做了几件隐蔽的事情:
其一是调用 了AMS的getIntentSender()函数,在AMS中创建了一个PendingIntentRecord记录块并保存在 mIntentSenderRecords中;
其二是:PendingIntentRecord继承 IIntentSender.Stub,getIntentSender()函数返回了PendingIntentRecord的binder引 用,binder引用保存在PendingIntent.mTarget变量中;
其三是上层应用的创建的Intent保存在 PendingIntentRecord中供后续触发。
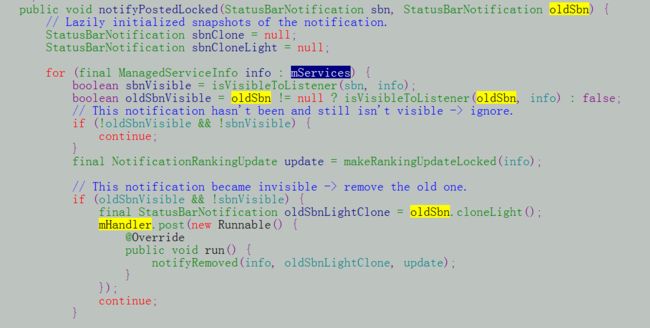
Notification的发送也很简单,首先将消息发送到系统层,NotificationManagerService会为之创建一个 NotificationRecord,保存在mNotificationList、mNotificationsByKey.put中,然后把 ManagedServices.services中所有对象取出来(第一部分中为通知栏的INotificationListenerWrapper的 binder引用创建了一个ManagedServiceInfo),然后调用onNotificationPosted()将通知发送给通知栏。
接下来就直接走进源码吧,捡关键的说,直接从notify方法入手:
public voidnotify(intid,Notification notification)
{
notify(null,id,notification);// 调用notificaiton的地方
}
public voidnotify(String tag, intid,Notification notification) {
int[] idOut =new int[1];
INotificationManager service = getService();// 拿到真正的service INotificationManager是一个通信接口,是一个aidl文件
String pkg = mContext.getPackageName();
if(notification.sound!=null) {
notification.sound= notification.sound.getCanonicalUri();
if(StrictMode.vmFileUriExposureEnabled()) {
notification.sound.checkFileUriExposed("Notification.sound");
}
}
if(localLOGV) Log.v(TAG,pkg +": notify("+ id +", "+ notification +")");
Notification stripped = notification.clone();
Builder.stripForDelivery(stripped);
try{
service.enqueueNotificationWithTag(pkg,mContext.getOpPackageName(),tag,id,
stripped,idOut,UserHandle.myUserId());// 实际上是先对notificaiton进行一个系统保存
if(id != idOut[0]) {
Log.w(TAG,"notify: id corrupted: sent "+ id +", got back "+ idOut[0]);
}
}catch(RemoteException e) {}
由于源码太多,下面我就根据逻辑流程捡重点的说。
首先你消息如何保存。
答:NotificaitonRecord,用它创建一个arraylist,所有的消息都暂存于此。但是创建一个这个对象时先判断消息的有效性,特别提出的是数量不能超过50个。
消息如何发送。
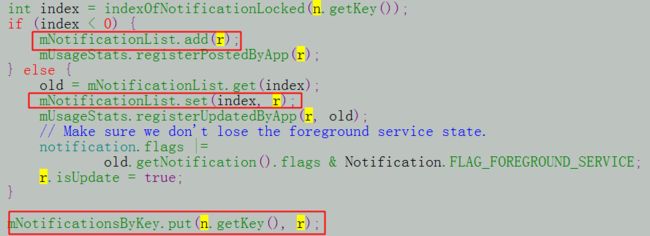
答:通过int index = indexOfNotificationLocked(n.getKey());获取是否已经发送过此notification,如果是新发送的notification就走新增流程mNotificationList.add(r);
如果有发送过,就获取old = mNotificationList.get(index);,后面走更新流程 mNotificationList.set(index, r); mUsageStats.registerPostedByApp(r)和mUsageStats.registerUpdatedByApp(r, old);都是更新stats.numPostedByApp++
如:
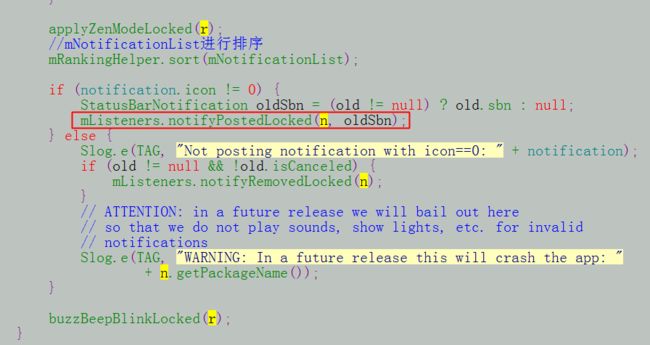
如果notification的icon不为空,调用mListeners.notifyPostedLocked(n, oldSbn);如果notification的icon为空,并且存在旧的NotificationRecord并且没被canceled,就调用mListeners.notifyRemovedLocked(n);取消这个notification
有一个新的notification,以异步方式通知所有listeners
消息是如何添加的。
答:addNotification(sbn, rankingMap);
inflateViewsForHeadsUp 构建HeadsUp
mHeadsUpNotificationView.showNotification 显示HeadsUp
3.createNotificationViews创建NotificationViews
4.tick(notification, true); 显示tiker
5.该方法主要构造Notification Icons以及expanded View
addNotificationViews(shadeEntry, ranking);
重新计算滑动窗口的位置和标题。
setAreThereNotifications();
刷新一下ExpandedView的位置updateExpandedViewPos(EXPANDED_LEAVE_ALONE);
四:遇到的问题:
1.使用Bulder结合RemoteView的时候,不起作用。
原因:没有使用setSamllIcon(5.0以下版本)
解决方案:添加如下代码
builder.setSmallIcon(R.drawable.aa);
2. Notification.Bulder不可用。
原因:不兼容API11以下的版本。
解决方案:改变sdk的版本或者在AndroidManifest.xml写入:
android:minSdkVersion="11"/>
if(Build.VERSION.SDK_INT>= Build.VERSION_CODES.HONEYCOMB) {
builder=newNotification.Builder(this);
}
3. 如何使手机通知栏的高度适应不来自定义的样式
原因:4.0以上版本才能支持
解决方案:
notification.bigContentView = remoteView;
4. 有的时候发现添加的pendingintent不起作用。
原因:
manager.notify(COUNT++,notification);
当有只有一个notificaiton实例时,Count只能唯一,这里不能加加。
解决方案:改成一个常量值,这是唯一标识。
五,总结:
总之关于notificaiton还有很多其他的小知识,比如如何实现信号灯,震动等。这次的源码分析也是走的主干逻辑,有关更多的知识欢迎补充,改正和吐槽。


