1.前言
频繁的findViewById是一件挺烦人的事,IOC注解框架应运而生,Android中IOC框架就是注入控件和布局或者说是设置点击监听。
现在主流的有ButterKnife、xUtils、afinal等,IOC注解框架刚出来的时候,粗略看过源码后我是摒弃使用的,因为里面有反射、循环遍历寻找控件等操作,但是慢慢的接收了这种快捷方式,发现对实际性能影响并不大,不是在特别强迫症的情况下完全可行,特别是ButterKnife的出现,ButterKnife没有利用全反射,而是在同包下动态编译生成代码,性能几乎和自己findViewById性能是一样的!
2.源码分析
下面我们来实际分析xUtils和ButterKnife的源码:
2.1 xUtils 使用
xUtils源码地址:https://github.com/wyouflf/xUtils3
xUtils 包含了orm, http(s), image, view注解,下面我们重点讲解View注解(IOC注入):
public class MainActivity extends AppCompatActivity {

    @ViewInject(R.id.test_tv)
    private TextView test_tv;

    @ViewInject(R.id.test_btn)
    private Button test_btn;

    @Override
    protected void onCreate(Bundle savedInstanceState) {
        super.onCreate(savedInstanceState);
        setContentView(R.layout.activity_main);
        x.view().inject(this);
        test_tv.setText("测试文本");
        test_btn.setText("测试按钮");
    }

    /**
     * 1. 方法必须私有限定,
     * 2. 方法参数形式必须和type对应的Listener接口一致.
     * 3. 注解参数value支持数组: value={id1, id2, id3}
     * 4. 其它参数说明见{@link org.xutils.view.annotation.Event}类的说明.
     **/
    @Event(value = R.id.test_btn,
            type = View.OnClickListener.class/*可选参数, 默认是View.OnClickListener.class*/)
    private void iconIvClick(View view) {
        test_tv.setText("点击了按钮,修改测试文本");
        Toast.makeText(this, "点击了按钮,修改测试文本", Toast.LENGTH_LONG).show();
    }
}
注解省去了findViewById和setOnClickListener等简单操作。
2.2 xUtils源码分析
我们挑一些关键的源码分析,先分析x.view().inject(this);这句代码做了什么:
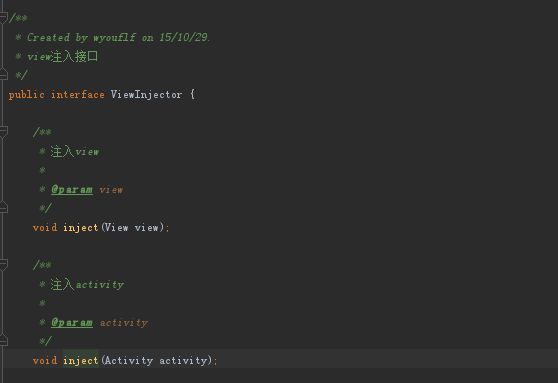
点击进入查看是一个接口ViewInjector,看不到实现代码,我就Ctrl+鼠标左键查看实现类:

找到实现类ViewInjectorImpl中inject(Activity activity)方法代码:
 @Override
    public void inject(Activity activity) {
        //获取Activity的ContentView的注解
        Class handlerType = activity.getClass();
        try {
            // 找到ContentView这个注解,在activity类上面获取
            ContentView contentView = findContentView(handlerType);
            if (contentView != null) {
                int viewId = contentView.value();
                if (viewId > 0) {
                    // 如果有注解获取layoutId的值,利用反射调用activity的setContentView方法注入视图
                    Method setContentViewMethod = handlerType.getMethod("setContentView", int.class);
                    setContentViewMethod.invoke(activity, viewId);
                }
            }
        } catch (Throwable ex) {
            LogUtil.e(ex.getMessage(), ex);
        }
        // 处理 findViewById和setOnclickListener的注解
        injectObject(activity, handlerType, new ViewFinder(activity));
    }
根据源码可知,先判断是否有ContentView这个注解,在activity类上面获取,有则setContentView(R.layout.xxxx),然后再处理 findViewById和setOnclickListener的注解(injectObject方法):
@SuppressWarnings("ConstantConditions")
    private static void injectObject(Object handler, Class handlerType, ViewFinder finder) {

        if (handlerType == null || IGNORED.contains(handlerType)) {
            return;
        }

        // 从父类到子类递归
        injectObject(handler, handlerType.getSuperclass(), finder);

        // inject view
        Field[] fields = handlerType.getDeclaredFields();
        if (fields != null && fields.length > 0) {
            for (Field field : fields) {

                Class fieldType = field.getType();
                if (
                /* 不注入静态字段 */     Modifier.isStatic(field.getModifiers()) ||
                /* 不注入final字段 */    Modifier.isFinal(field.getModifiers()) ||
                /* 不注入基本类型字段 */  fieldType.isPrimitive() ||
                /* 不注入数组类型字段 */  fieldType.isArray()) {
                    continue;
                }

                ViewInject viewInject = field.getAnnotation(ViewInject.class);
                if (viewInject != null) {
                    try {
                        View view = finder.findViewById(viewInject.value(), viewInject.parentId());
                        if (view != null) {
                            field.setAccessible(true);
                            field.set(handler, view);
                        } else {
                            throw new RuntimeException("Invalid @ViewInject for "
                                    + handlerType.getSimpleName() + "." + field.getName());
                        }
                    } catch (Throwable ex) {
                        LogUtil.e(ex.getMessage(), ex);
                    }
                }
            }
        } // end inject view

        // inject event
        Method[] methods = handlerType.getDeclaredMethods();
        if (methods != null && methods.length > 0) {
            for (Method method : methods) {

                if (Modifier.isStatic(method.getModifiers())
                        || !Modifier.isPrivate(method.getModifiers())) {
                    continue;
                }

                //检查当前方法是否是event注解的方法
                Event event = method.getAnnotation(Event.class);
                if (event != null) {
                    try {
                        // id参数
                        int[] values = event.value();
                        int[] parentIds = event.parentId();
                        int parentIdsLen = parentIds == null ? 0 : parentIds.length;
                        //循环所有id,生成ViewInfo并添加代理反射
                        for (int i = 0; i < values.length; i++) {
                            int value = values[i];
                            if (value > 0) {
                                ViewInfo info = new ViewInfo();
                                info.value = value;
                                info.parentId = parentIdsLen > i ? parentIds[i] : 0;
                                method.setAccessible(true);
                                // EventListenerManager 动态代理执行相应的方法
                                EventListenerManager.addEventMethod(finder, info, event, handler, method);
                            }
                        }
                    } catch (Throwable ex) {
                        LogUtil.e(ex.getMessage(), ex);
                    }
                }
            }
        } // end inject event

    }
源码中利用类的反射循环获取属性的注解值然后通过findViewById之后,动态的注入到控件属性里面;事件注入也是类似首先findViewById然后利用动态代理去反射执行方法,动态代理代码如下:
    public static void addEventMethod(
            //根据页面或view holder生成的ViewFinder
            ViewFinder finder,
            //根据当前注解ID生成的ViewInfo
            ViewInfo info,
            //注解对象
            Event event,
            //页面或view holder对象
            Object handler,
            //当前注解方法
            Method method) {
        try {
            View view = finder.findViewByInfo(info);

            if (view != null) {
                // 注解中定义的接口,比如Event注解默认的接口为View.OnClickListener
                Class listenerType = event.type();
                // 默认为空,注解接口对应的Set方法,比如setOnClickListener方法
                String listenerSetter = event.setter();
                if (TextUtils.isEmpty(listenerSetter)) {
                    listenerSetter = "set" + listenerType.getSimpleName();
                }


                String methodName = event.method();

                boolean addNewMethod = false;
                /*
                    根据View的ID和当前的接口类型获取已经缓存的接口实例对象,
                    比如根据View.id和View.OnClickListener.class两个键获取这个View的OnClickListener对象
                 */
                Object listener = listenerCache.get(info, listenerType);
                DynamicHandler dynamicHandler = null;
                /*
                    如果接口实例对象不为空
                    获取接口对象对应的动态代理对象
                    如果动态代理对象的handler和当前handler相同
                    则为动态代理对象添加代理方法
                 */
                if (listener != null) {
                    dynamicHandler = (DynamicHandler) Proxy.getInvocationHandler(listener);
                    addNewMethod = handler.equals(dynamicHandler.getHandler());
                    if (addNewMethod) {
                        dynamicHandler.addMethod(methodName, method);
                    }
                }

                // 如果还没有注册此代理
                if (!addNewMethod) {

                    dynamicHandler = new DynamicHandler(handler);

                    dynamicHandler.addMethod(methodName, method);

                    // 生成的代理对象实例,比如View.OnClickListener的实例对象
                    listener = Proxy.newProxyInstance(
                            listenerType.getClassLoader(),
                            new Class[]{listenerType},
                            dynamicHandler);

                    listenerCache.put(info, listenerType, listener);
                }

                Method setEventListenerMethod = view.getClass().getMethod(listenerSetter, listenerType);
                setEventListenerMethod.invoke(view, listener);
            }
        } catch (Throwable ex) {
            LogUtil.e(ex.getMessage(), ex);
        }
    }
在实例化DynamicHandler的时候穿递的是Activity/Fragment。然后调用EventListenerManager.addEventMethod(finder, info, event, handler, method);法的时候,将method(当前注解方法)传递进去了。完整类名有,方法名字有。动态代理的实现如下:
public static class DynamicHandler implements InvocationHandler {
// 存放代理对象,比如Fragment或view holder
private WeakReference2.3 ButterKnife的使用
ButterKnife源码https://github.com/JakeWharton/butterknife
相比起xutils来,ButterKnife更受欢迎,第一在性能方面xutils完全是利用的反射,butterknife是轻量级的反射使用的注解都是编译时注解,而且它还提供了一个Android Studio的插件不需要我们去写任何的代码,作者JakeWharton很出名的写过很多大型的第三方框架。
ButterKnife的代码自动生成的Android Studio插件: android-butterknife-zelezny
后期我会模仿这个插件编写一个自己的IOC注解框架的AndroidStudio插件。
public class MainActivity extends AppCompatActivity {

    @BindView(R.id.test_tv)
    TextView test_tv;

    @BindView(R.id.test_btn)
    Button test_btn;

    @Override
    protected void onCreate(Bundle savedInstanceState) {
        super.onCreate(savedInstanceState);
        setContentView(R.layout.activity_main);
        ButterKnife.bind(this);
        test_tv.setText("测试文本");
        test_btn.setText("测试按钮");
    }

    @OnClick({R.id.test_tv, R.id.test_btn})
    public void onViewClicked(View view) {
        switch (view.getId()) {
            case R.id.test_tv:
                break;
            case R.id.test_btn:
                test_tv.setText("点击了按钮,修改测试文本");
                Toast.makeText(this, "点击了按钮,修改测试文本", Toast.LENGTH_LONG).show();
                break;
        }
    }
}
上面是ButterKnifeZelezny这个插件自动生成的代码,只需要自己实现业务逻辑代码就够了,基本 @BindView、@OnClick等注解自动生成非常好用的插件。
2.4 ButterKnife源码分析
源码入口从ButterKnife.bind(this)这里查起:
  /**
   * BindView annotated fields and methods in the specified {@link Activity}. The current content
   * view is used as the view root.
   *
   * @param target Target activity for view binding.
   */
  @NonNull @UiThread
  public static Unbinder bind(@NonNull Activity target) {
    View sourceView = target.getWindow().getDecorView();
    return createBinding(target, sourceView);
  }
bind(activity)最后调用了createBinding(target, sourceView),其实bind(view)和bind(dialog)等方法都会调用createBinding(target, sourceView),源码如下:
/**
   * BindView annotated fields and methods in the specified {@link View}. The view and its children
   * are used as the view root.
   *
   * @param target Target view for view binding.
   */
  @NonNull @UiThread
  public static Unbinder bind(@NonNull View target) {
    return createBinding(target, target);
  }

  /**
   * BindView annotated fields and methods in the specified {@link Dialog}. The current content
   * view is used as the view root.
   *
   * @param target Target dialog for view binding.
   */
  @NonNull @UiThread
  public static Unbinder bind(@NonNull Dialog target) {
    View sourceView = target.getWindow().getDecorView();
    return createBinding(target, sourceView);
  }

  /**
   * BindView annotated fields and methods in the specified {@code target} using the {@code source}
   * {@link Activity} as the view root.
   *
   * @param target Target class for view binding.
   * @param source Activity on which IDs will be looked up.
   */
  @NonNull @UiThread
  public static Unbinder bind(@NonNull Object target, @NonNull Activity source) {
    View sourceView = source.getWindow().getDecorView();
    return createBinding(target, sourceView);
  }

  /**
   * BindView annotated fields and methods in the specified {@code target} using the {@code source}
   * {@link View} as the view root.
   *
   * @param target Target class for view binding.
   * @param source View root on which IDs will be looked up.
   */
  @NonNull @UiThread
  public static Unbinder bind(@NonNull Object target, @NonNull View source) {
    return createBinding(target, source);
  }

  /**
   * BindView annotated fields and methods in the specified {@code target} using the {@code source}
   * {@link Dialog} as the view root.
   *
   * @param target Target class for view binding.
   * @param source Dialog on which IDs will be looked up.
   */
  @NonNull @UiThread
  public static Unbinder bind(@NonNull Object target, @NonNull Dialog source) {
    View sourceView = source.getWindow().getDecorView();
    return createBinding(target, sourceView);
  }
就是最终会用目标对象target和绑定的View进行处理,下面分析createBinding(target, sourceView)的源码:
private static Unbinder createBinding(@NonNull Object target, @NonNull View source) {
    Class targetClass = target.getClass();
    if (debug) Log.d(TAG, "Looking up binding for " + targetClass.getName());
    Constructor constructor = findBindingConstructorForClass(targetClass);

    if (constructor == null) {
      return Unbinder.EMPTY;
    }

    //noinspection TryWithIdenticalCatches Resolves to API 19+ only type.
    try {
      return constructor.newInstance(target, source);
    } catch (IllegalAccessException e) {
      throw new RuntimeException("Unable to invoke " + constructor, e);
    } catch (InstantiationException e) {
      throw new RuntimeException("Unable to invoke " + constructor, e);
    } catch (InvocationTargetException e) {
      Throwable cause = e.getCause();
      if (cause instanceof RuntimeException) {
        throw (RuntimeException) cause;
      }
      if (cause instanceof Error) {
        throw (Error) cause;
      }
      throw new RuntimeException("Unable to create binding instance.", cause);
    }
  }
源码中通过findBindingConstructorForClass(targetClass)获取构造方法,然后调用constructor.newInstance(target, source)通过反射调用构造方法,下面先分析findBindingConstructorForClass(targetClass):
  @Nullable @CheckResult @UiThread
  private static Constructor findBindingConstructorForClass(Class cls) {
    //1.先从BINDINGS这个Map中获取缓存的Constructor
    Constructor bindingCtor = BINDINGS.get(cls);
    //2.如果有缓存那么就直接返回Constructor
    if (bindingCtor != null) {
      if (debug) Log.d(TAG, "HIT: Cached in binding map.");
      return bindingCtor;
    }
    //3.反射获取目标类对象,判断是否是android和java包下的框架类,框架类终止查询构造方法操作,返回空不再进行处理
    String clsName = cls.getName();
    if (clsName.startsWith("android.") || clsName.startsWith("java.")) {
      if (debug) Log.d(TAG, "MISS: Reached framework class. Abandoning search.");
      return null;
    }
    try {
      //4.通过反射加载(clsName + "_ViewBinding")名字的类
      Class bindingClass = cls.getClassLoader().loadClass(clsName + "_ViewBinding");
      //noinspection unchecked
      //bindingClass 中查询参数为(cls, View.class)的构造函数,cls为最初的目标类
      bindingCtor = (Constructor) bindingClass.getConstructor(cls, View.class);
      if (debug) Log.d(TAG, "HIT: Loaded binding class and constructor.");
    } catch (ClassNotFoundException e) {
      if (debug) Log.d(TAG, "Not found. Trying superclass " + cls.getSuperclass().getName());
      //报错后查询cls的父类,看是否在父类中有实现这个构造方法
      bindingCtor = findBindingConstructorForClass(cls.getSuperclass());
    } catch (NoSuchMethodException e) {
      throw new RuntimeException("Unable to find binding constructor for " + clsName, e);
    }
    //将反射查询出的结果缓存在BINDINGS中
    BINDINGS.put(cls, bindingCtor);
    return bindingCtor;
  }
根据源码分析得知(源码中我加了注释) Class bindingClass = cls.getClassLoader().loadClass(clsName + "_ViewBinding")也就是target类名+_ViewBinding,然后bindingClass.getConstructor(cls, View.class)获取这个类对应参数的构造方法,按照源码执行顺序最后要执行的也是这个方法。
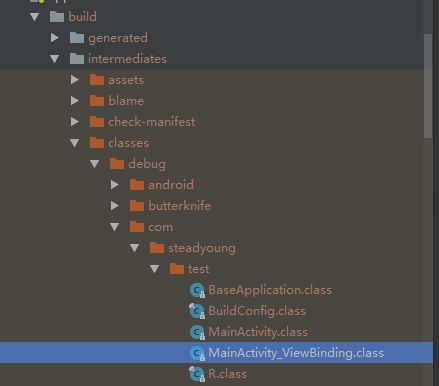
我的target类是MainActivity,那么实现类是MainActivity_ViewBinding这个类,不过这个类是在编译运行时才会生成的,Ctrl+N 搜索类如下图

如果搜不到我们可以在项目目录..\app\build中找到,编译后在目录..\app\build\intermediates\classes\debug\你的包名(com\xxx\xxx)
那么下面查看MainActivity_ViewBinding的代码:
public class MainActivity_ViewBinding implements Unbinder {
    private MainActivity target;
    private View view2131165311;
    private View view2131165310;

    @UiThread
    public MainActivity_ViewBinding(MainActivity target) {
        this(target, target.getWindow().getDecorView());
    }

    @UiThread
    public MainActivity_ViewBinding(final MainActivity target, View source) {
        this.target = target;
        View view = Utils.findRequiredView(source, 2131165311, "field 'test_tv' and method 'onViewClicked'");
        target.test_tv = (TextView)Utils.castView(view, 2131165311, "field 'test_tv'", TextView.class);
        this.view2131165311 = view;
        view.setOnClickListener(new DebouncingOnClickListener() {
            public void doClick(View p0) {
                target.onViewClicked(p0);
            }
        });
        view = Utils.findRequiredView(source, 2131165310, "field 'test_btn' and method 'onViewClicked'");
        target.test_btn = (Button)Utils.castView(view, 2131165310, "field 'test_btn'", Button.class);
        this.view2131165310 = view;
        view.setOnClickListener(new DebouncingOnClickListener() {
            public void doClick(View p0) {
                target.onViewClicked(p0);
            }
        });
    }

    @CallSuper
    public void unbind() {
        MainActivity target = this.target;
        if (target == null) {
            throw new IllegalStateException("Bindings already cleared.");
        } else {
            this.target = null;
            target.test_tv = null;
            target.test_btn = null;
            this.view2131165311.setOnClickListener((OnClickListener)null);
            this.view2131165311 = null;
            this.view2131165310.setOnClickListener((OnClickListener)null);
            this.view2131165310 = null;
        }
    }
}
看到源码MainActivity_ViewBinding(final MainActivity target, View source)构造方法中实现了findViewById和setOnClickListener,源码中Utils.findRequiredView其实就是实现了findViewById,代码如下:
  public static View findRequiredView(View source, @IdRes int id, String who) {
    View view = source.findViewById(id);
    if (view != null) {
      return view;
    }
    String name = getResourceEntryName(source, id);
    throw new IllegalStateException("Required view '"
        + name
        + "' with ID "
        + id
        + " for "
        + who
        + " was not found. If this view is optional add '@Nullable' (fields) or '@Optional'"
        + " (methods) annotation.");
  }
那么我们注解的操作在此都实现了,所以bind(activity)等绑定的方法最后都会调用到这个构造方法来实现注解绑定UI操作!
那么MainActivity_ViewBinding这个类怎么生成的呢?
这些操作都在butterknife-compiler中,终于知道为什么ButterKnife中要添加两个框架了
dependencies {
  implementation 'com.jakewharton:butterknife:8.8.1'
  annotationProcessor 'com.jakewharton:butterknife-compiler:8.8.1'
}
因为butterknife-compiler编译运行时动态生成代码的过程比较复杂,我将另出一篇文章来分析:ButterKnife编译时生成代码原理:butterknife-compiler源码分析
看到MainActivity_ViewBinding的代码,我要选第三方注解框架就是ButterKnife了,插件动态生成对应class文件去直接实现注解的操作,而且Android Studio又有插件自动生成注解代码,不用自己手动写代码,非常便利!
3 总结
在源码的分析中我们扩展了只是,深入理解了反射、动态代理、编译时代码生成等,虽然直接引用第三方好用的框架可以事半功倍,但是有时间一定要去分析源码,学习大神的编码方式,学习大神的思维逻辑,并仿照编写自己的框架,后面文章我也将自己编写IOC注解框架!
自己简易打造的IOC注解框架:SteadyoungIOC