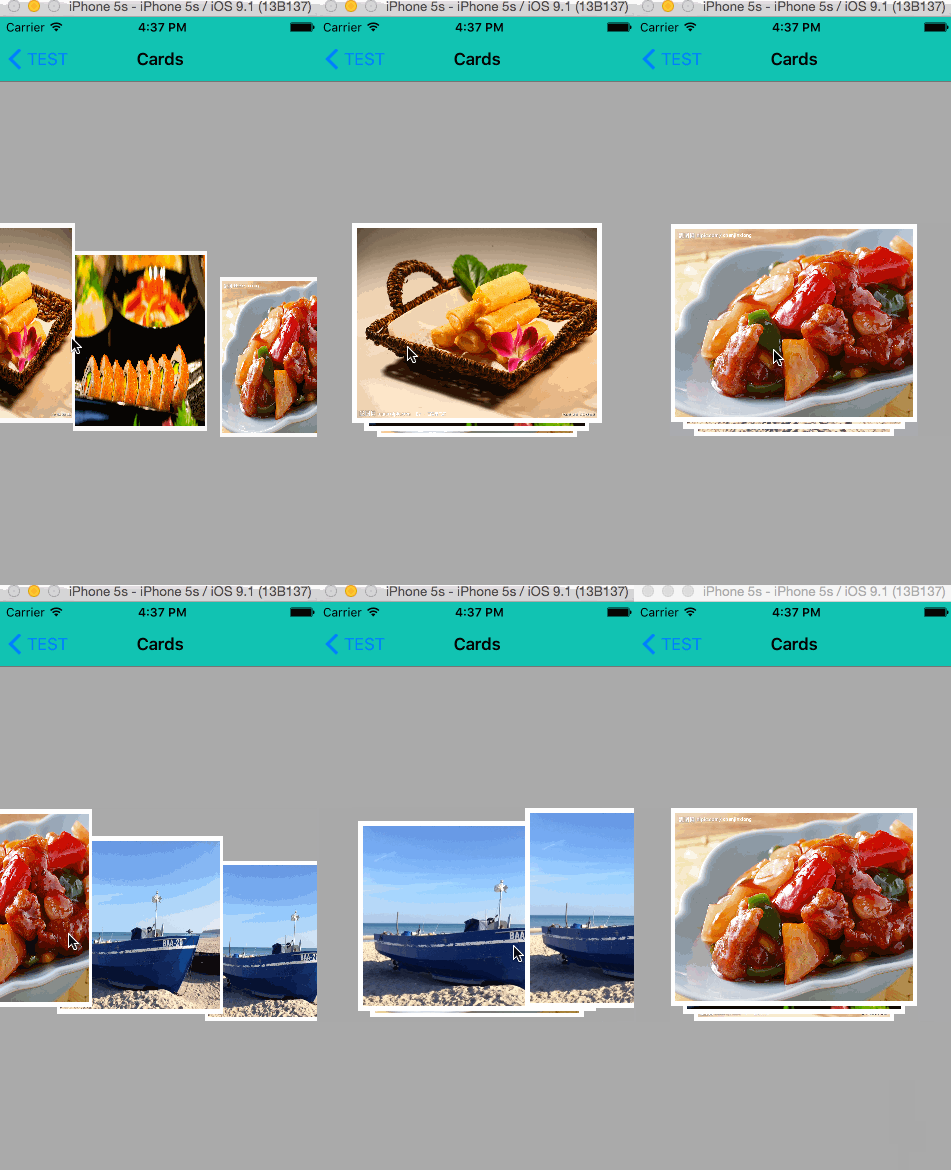
还是先看效果图。
这个动态效果我没有用ios 原生的Animation,而是用popAnimation,当然在用之前得用pods把pop下载到你的工程文件中,这个步骤网上有很多资料,按照那里面说的安装就可以了。
我的这个动画是直接封装成一个View的。在controller中只需要一句代码就可以了。
CGRect cardViewFrame = self.view.bounds;
        _cardView = [[DynamicCardsView alloc] initWithFrame:cardViewFrame
                                  subImageArray:self.imageArr allImageArr:self.allImageArr];
至于这里面的imageArr是你要在这个View上显示的图片(太多的图片可能太拥挤了)而allImageArr是所有的图片。
下面就看看封装的那个View中是怎么写的。
准备工作:
利用接口中传过来的imageArray ,在View中初始化两类imageArray,
- (instancetype)initWithFrame:(CGRect)frame
                subImageArray:(NSArray *)subArr
                  allImageArr:(NSArray *)allArr {

    self = [super initWithFrame:frame];
    if (self) {
        self.subImageArray = subArr;
        self.allImageArray = allArr;

        self.subImageCount = subArr.count;
        [self getCustomCards];
        [self makeCards3D];
    }
    return self;
}
拿到图片后,就有利用这些图片去初始化我们的卡片CustomCard并且把这些卡片对象放进一个数组中。
- (void)getCustomCards {

    NSMutableArray *cardsImg = [NSMutableArray array];
    [self.subImageArray enumerateObjectsUsingBlock:^(id  _Nonnull obj, NSUInteger idx, BOOL * _Nonnull stop) {
        CustomCard *card = [[CustomCard alloc] initWithFrame:CGRectMake(0, 0, 250, 200) image:[UIImage imageNamed:obj]];
        card.tag = 100 + idx;
        [self addSubview:card];
        card.center = self.center;
        [cardsImg addObject:card];
    }];
    self.cardsImg = [cardsImg copy];
}
这儿我做了第二次封装,就是对这个卡片的形状(白色边框,或者里面的布局)当然它也是一个View的子类
- (id)initWithFrame:(CGRect)frame image:(UIImage *)image {

    self = [super initWithFrame:frame];
    if (self) {
        self.backgroundColor = [UIColor whiteColor];
        _image = image;
        [self setup];
        [self addSubview:self.cardImageView];
    }
    return self;
}

- (void)setup {

    self.cardImageView = [UIImageView new];
    self.cardImageView.left = 5;
    self.cardImageView.top = 5;
    self.cardImageView.width = self.width - 5*2;
    self.cardImageView.height = self.height - 5*2;
    self.cardImageView.image = self.image;
    self.cardImageView.contentMode = UIViewContentModeScaleToFill;
}
当然你也可以在这里给每个card添加手势。不过我是在外面一层添加的。
- (void)makeCards3D {

    [self.cardsImg enumerateObjectsUsingBlock:^(CustomCard *obj, NSUInteger idx, BOOL * _Nonnull stop) {
        CGFloat cardScale = 0.1*idx + 0.8;
        obj.transform = CGAffineTransformScale(obj.transform, cardScale, cardScale);

        CGFloat cardTranslate = 0;
        if (idx == 0) {
            cardTranslate = 70;
        }else {
            cardTranslate = (self.cardsImg.count - idx) * 22;
        }
        if (idx == self.cardsImg.count - 1) {
            [self addGesOnTopCardView:obj];
        }
        obj.transform = CGAffineTransformTranslate(obj.transform, 0, cardTranslate);
    }];
}
这个方法是在View上显示三张图片由大到小,并且只在最外面的那个图片上添加手势。(这样就点击其他图片时无响应)。
然后就是给最上面那张图片添加手势。
- (void)addGesOnTopCardView:(CustomCard *)cardView {

    UIPanGestureRecognizer *panGes = [[UIPanGestureRecognizer alloc] initWithTarget:self
                                                                             action:@selector(cardViewDidPan:)];
    [cardView addGestureRecognizer:panGes];

    UITapGestureRecognizer *tapGes = [[UITapGestureRecognizer alloc] initWithTarget:self
                                                                             action:@selector(cardViewDidTap:)];
    [cardView addGestureRecognizer:tapGes];
}
这里我是添加两个手势,一个是滑动手势,一个是点击手势。
接着就是一大波的代码了。
- (void)cardViewDidPan:(UIPanGestureRecognizer *)panGes {

    CGPoint location = [panGes locationInView:panGes.view];
    CGPoint velocity = [panGes velocityInView:panGes.view];
    CGPoint translate = [panGes translationInView:panGes.view];
    if (panGes.state == UIGestureRecognizerStateBegan) {
        self.initialLocation = location.x;
    }

    if (translate.x < 0 && panGes.view.centerX == self.centerX) {
        [self springAnimationToVale:CGPointMake(0, self.centerY)
                           withView:panGes.view velocity:velocity];
        [self bottomCardsViewSpreadAnimationwithVelocity:velocity];
        self.isSpreadCards = YES;

    }else if (translate.x >= 0) {
        if (panGes.view.centerX == 0) {
            [self.cardsImg enumerateObjectsUsingBlock:^(CustomCard *obj, NSUInteger idx, BOOL * _Nonnull stop) {
                [self eachCardViewDidRotate:obj rotate:0];
            }];
            if (self.isTapCardView) {
                [self makeCards3D];
                self.isTapCardView = NO;
            }
            [self springAnimationToVale:CGPointMake(self.centerX, self.centerY)
                               withView:panGes.view velocity:velocity];
            [self bottomCardsViewShrinkAnimationwithVelocity:velocity];
            self.isSpreadCards = NO;
        }else if (panGes.view.centerX == self.centerX) {
            [self dismissTopCardView:CGPointMake(self.width + panGes.view.width/2.0,
                                                 self.centerY)
                            withView:panGes.view];
            [self bottomCardsViewRecoverScaleWithVelocity:velocity complete:^(BOOL finished){
            }];
        }
    }
}
可以看到这里面有三种情况:
1.是直接向左滑动时,三种卡片各自的运动轨迹,也就会展开的。(self.isSpreadCards = YES,这个时候说明可以点击图片了。)
2.在图片展开的情况下往右滑动,这个时候卡片会呈叠起状态。并且卡片不能被点击。
3.直接向右滑动时,最外面一个图片会消失而在图片在底部会增加一张图片。
上面那个方法只是将卡片的滑动和点击进行逻辑判断。
接着就是运用pop中的animation。
- (void)springAnimationToVale:(CGPoint)point withView:(UIView *)view velocity:(CGPoint)velocity{

    POPSpringAnimation *swipeAni = [POPSpringAnimation animationWithPropertyNamed:kPOPLayerPositionX];
    swipeAni.velocity = [NSValue valueWithCGPoint:velocity];
    swipeAni.toValue = [NSValue valueWithCGPoint:point];
    [view.layer pop_addAnimation:swipeAni forKey:@"swipeAnimtion"];
}
这个方法中主要运用pop的弹簧动画,在x轴上移动也就是在展开过程中每张图片的animation
- (void)bottomCardsViewSpreadAnimationwithVelocity:(CGPoint)velocity{

    [self.cardsImg enumerateObjectsUsingBlock:^(CustomCard *obj, NSUInteger idx, BOOL * _Nonnull stop) {
        if (idx == 1) {
            [self springAnimationToVale:CGPointMake(self.centerX - 20,self.centerY)
                               withView:obj velocity:velocity];
        }else if (idx == 0) {
            [self springAnimationToVale:CGPointMake(self.width - 40,self.centerY)
                               withView:obj velocity:velocity];
        }
    }];
}
这个方法中是第二张和第三张图片将会移动的animation。
这样上面的第一种滑动就实现了。
接着就是在展开的情况下点击了,或者是向右滑动。
- (void)cardViewDidTap:(UITapGestureRecognizer *)tapGes {

    if (!self.isSpreadCards) {
        return;
    }
    self.isTapCardView = YES;
    [self.cardsImg enumerateObjectsUsingBlock:^(CustomCard *obj, NSUInteger idx, BOOL * _Nonnull stop) {
        [self eachCardViewDidRotate:obj rotate:-M_PI_4];
    }];

}
向右滑动
- (void)bottomCardsViewShrinkAnimationwithVelocity:(CGPoint)velocity{

    [self.cardsImg enumerateObjectsUsingBlock:^(CustomCard *obj, NSUInteger idx, BOOL * _Nonnull stop) {
        if (idx == 1) {
            [self springAnimationToVale:CGPointMake(self.centerX,
                                                    self.centerY)
                               withView:obj velocity:velocity];
        }else if (idx == 0) {
            [self springAnimationToVale:CGPointMake(self.centerX,
                                                    self.centerY)
                               withView:obj velocity:velocity];
        }
    }];
}
这里会设置卡片是在点击状态下。(因为展开后的卡片接下来的操作可能会向→滑,也可能点击)所以得有旗子进行标识。
- (void)eachCardViewDidRotate:(CustomCard *)cardView rotate:(CGFloat)angleValue{

    POPSpringAnimation *rotateAni = [POPSpringAnimation animationWithPropertyNamed:kPOPLayerRotationY];
    [cardView.layer setAnchorPoint:CGPointMake(0.5, 0.5)];
    rotateAni.springBounciness = 18.0f;
    rotateAni.dynamicsMass = 2.0f;
    rotateAni.dynamicsTension = 200;
    rotateAni.toValue = @(angleValue);
    [cardView.layer pop_addAnimation:rotateAni forKey:@"rotationAnimation"];
}
这个方法会将每个卡片在y轴进行角度翻转
最后就是第三种情况了。
- (void)dismissTopCardView:(CGPoint)point withView:(UIView *)view {

    [UIView animateWithDuration:0.3 delay:0 usingSpringWithDamping:0.8
          initialSpringVelocity:10 options:0 animations:^{
              view.center = point;
          } completion:^(BOOL finished) {
              [view removeFromSuperview];
              [self adjustImageArr];
              [self addCardViewOnBottomest];
          }];
}
首先让最上面的那张图片滑动消失。同时就得调整图片数组中的数据了。
接着让本来第二张,第三张图片的scale变成第一张和第二张的scale
- (void)bottomCardsViewRecoverScaleWithVelocity:(CGPoint)velocity complete:(void (^)(BOOL finished))completion {

    [self.cardsImg enumerateObjectsUsingBlock:^(CustomCard *obj, NSUInteger idx, BOOL * _Nonnull stop) {
        if (idx == 1) {
            [self recoverScaleWithScale:1.0/0.9 translate:-20 cardView:obj];
        }else if (idx == 0) {
            [self recoverScaleWithScale:1.0/0.9 translate:-20 cardView:obj];
        }
    }];
}

- (void)recoverScaleWithScale:(CGFloat)scale translate:(CGFloat)translate cardView:(UIView *)view {

    [UIView animateWithDuration:0.3 delay:0 usingSpringWithDamping:0.8
          initialSpringVelocity:10 options:0 animations:^{
              view.transform = CGAffineTransformTranslate(view.transform, 0, translate);
              view.transform = CGAffineTransformScale(view.transform, scale, scale);
          } completion:nil];

}
调整图片数组
- (void)adjustImageArr {

    id addObj = [self.allImageArray objectAtIndex:self.subImageCount];
    self.subImageCount = self.subImageCount + 1;
    if (self.subImageCount == self.allImageArray.count) {
        self.subImageCount = 0;
    }
    NSMutableArray *adjustArr = [self.subImageArray mutableCopy];
    [adjustArr lastObject];
    [adjustArr insertObject:addObj atIndex:0];
    self.subImageArray = [adjustArr mutableCopy];
}
也就是把所有图片数组中要显示的图片添加到子图片数组中并且在0的位置上插入。
接着要做的就是把新插入的图片初始化成一个card的对象。
并且生成新的card数组对象.
- (void)addCardViewOnBottomest {

    NSMutableArray *adjustCards = [self.cardsImg mutableCopy];
    [adjustCards removeLastObject];
    [self.subImageArray enumerateObjectsUsingBlock:^(id  _Nonnull obj, NSUInteger idx, BOOL * _Nonnull stop) {
        if (idx == 0) {
            CustomCard *bottomCard = [adjustCards firstObject];
            CustomCard *card = [[CustomCard alloc] initWithFrame:CGRectMake(0, 0, 250, 200) image:[UIImage imageNamed:obj]];
            [UIView animateWithDuration:0.2 delay:0 usingSpringWithDamping:0.8
                  initialSpringVelocity:10 options:0 animations:^{
                      card.center = self.center;
                      [self recoverScaleWithScale:0.8 translate:55 cardView:card];
                  } completion:^(BOOL finished) {
                      [self insertSubview:card belowSubview:bottomCard];
                  }];
            [adjustCards insertObject:card atIndex:0];
        }else if (idx == self.subImageArray.count - 1) {
            CustomCard *topCard = [adjustCards lastObject];
            [self addGesOnTopCardView:topCard];
        }
        self.cardsImg = [adjustCards copy];
    }];
}
这样就可以周而复始的滑动了。
这个工程代码我会放到我的github上。因为工程代码中还有一些动画,地址我会放在最后一篇动画中。


