环境描述:
阅读本文前,假定您已经能够启动单节点EOSIO node,如果还不能正确操作,请参考官方WIKI:https://developers.eos.io/eosio-nodeos/docs/autobuild-script
操作系统:MAC OS 10.13.X,EOSIO版本号:V1.1.3
自定义合约开发与测试,在单节点操作,流程更简单,效果相同,因此以下操作流程都是在没有部署eosio.system合约的环境中进行。
操作步骤:
1.启动EOS环境,创建两组key
启动NODE:
nodeos --data-dir tmpdata -e -p eosio --plugin eosio::wallet_api_plugin --plugin eosio::chain_api_plugin--plugin eosio::history_api_plugin --max-transaction-time=1000(避免超时设置1000)
创建KEY:
cleos create key
2.使用创建的public_key,创建eosio.token用户,创建部署合约账户cactus,转账账户from:
create account eosio eosio.token EOS6JowfuTT7CZe4ResHqNvEWAnuYjCT68gw97KxsHY99sUk2t1j8 EOS6JowfuTT7CZe4ResHqNvEWAnuYjCT68gw97KxsHY99sUk2t1j8
create account eosio cactus EOS6JowfuTT7CZe4ResHqNvEWAnuYjCT68gw97KxsHY99sUk2t1j8 EOS6JowfuTT7CZe4ResHqNvEWAnuYjCT68gw97KxsHY99sUk2t1j8
create account eosio from EOS6JowfuTT7CZe4ResHqNvEWAnuYjCT68gw97KxsHY99sUk2t1j8 EOS6JowfuTT7CZe4ResHqNvEWAnuYjCT68gw97KxsHY99sUk2t1j8
2.1解锁钱包:
cleos wallet unlock --password PW5JCM32pkoqwfNwfMnLih8Gh5s5edbQyys6vP3Ci9NxL2x6EKecq
2.2导入私钥:
导入用户private_key:
cleos wallet import --private-key 5JC3dp6z2imXiAnq4M4JAQXetRntU23QLoFNZJxwBB1yxPVsSW3
导入eosio的private_key:
cleos wallet import --private-key 5KQwrPbwdL6PhXujxW37FSSQZ1JiwsST4cqQzDeyXtP79zkvFD3
3.发布eosio.token合约到eosio.token
3.1cd到eosio目录/build/programs/cleos
cleos set contract eosio.token ../../contracts/eosio.token
3.2创建代币:
cleos push action eosio.token create '["eosio","1000000000.0000 SYS",0,0,0]' -p eosio.token
3.3发行代币
cleos push action eosio.token issue '["eosio","1000000000.0000 SYS","issue"]' -p eosio
至此,基础工作完毕,可以先把node节点停掉,开始编写自定义转账合约。
4.创建自定义转账合约cactus.token.cpp
打开源码目录contracts,新建目录cactus.token,创建源码文件cactus.token.cpp,此合约使用了inline_action的方式调用eosio.token合约的transfer函数,inline action具体来说就是一个智能合约的代码调用另外一个智能合约的函数。action(xx).send(),具体参数的含义是:Action(permssion_level, other_contract_account_name, method, args)
action(permission_level{from, N(active)},
             N(eosio.token), N(transfer),
             std::make_tuple(from, to,quantity,std::string("cactus transfer"))).send();
此处,合约调用eosio.token transfer方法从from的账户转账,因此必须获得用户from的active权限,否则不能操作,具体授权在8处详述。
注意:目录名称与主文件名称相同,部署合约时使用目录名进行部署
namespace cactus {
    class msig : public eosio::contract {
    public:
        using contract::contract;
        msig(account_name self)
                : eosio::contract(self), mtranses(_self, _self), wits(_self, _self),cts(_self, _self) {}
        //@abi action
        void transfer(account_name from, account_name to, asset quantity) {
            auto quant_after_fee = quantity;
            eosio_assert(is_account(from), "to account does not exist");
            eosio_assert(quantity.is_valid(), "invalid quantity");
            eosio_assert(quantity.amount > 0, "must withdraw positive quantity");
            require_auth(from);
            action(
                    permission_level{from, N(active)},
                    N(eosio.token), N(transfer),
                    std::make_tuple(from, _self, quantity, std::string("cactus transfer"))
            ).send();
            cts.emplace(_self, [&](auto &a) {
                a.id = cts.available_primary_key();
                a.from = from;
                a.to = to;
                a.amount = quantity.amount;
            });
        }
5.根据cactus.token.cpp生成cactus.token.wast及cactus.token.wasm,cactus.token.abi文件
cd 到eosio主目录/contracts/cactus.token/
生成cactus.token.wast、cactus.token.wasm文件,虚拟机加载使用
eosiocpp -o cactus.token.wast cactus.token.cpp
生成cactus.token.abi文件
eosiocpp -g cactus.token.abi cactus.token.cpp
执行此命令将文件夹cactus.token copy到build/contracts/
cp -R ../cactus.token ../../build/contracts/
6.重新启动node节点:
nodeos --data-dir tmpdata -e -p eosio --plugin eosio::wallet_api_plugin --plugin eosio::chain_api_plugin--plugin eosio::history_api_plugin --max-transaction-time=1000(避免超时设置1000)
7.部署合约
部署自定义合约到账户cactus,此时终端cd eosio主目录/build/contracts :
cleos set contract cactus cactus.token
可以看到输出内容如下图所示
8.授权
8.1 eosio.code内部权限
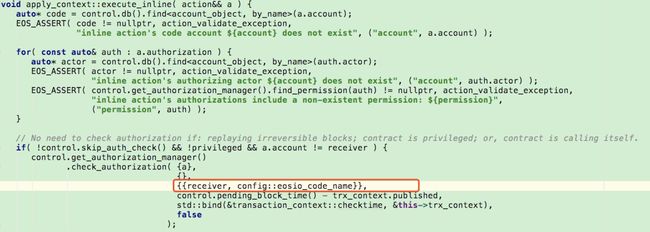
dawn4.0后新增的内部特殊权限eosio.code,用来加强inline action的安全性,当cactus.token智能合约代码通过action.send调用eosio.token智能合约时,cactus.token代码是拿不到任何私钥的,也就没法为声明的权限签名,即没办法证明该智能合约具备action声明的权限from@active。此时系统代码做安全性保障,因而系统提出了一个虚拟权限eosio.code。具体逻辑执行时,权限检验逻辑(controller.authorization_manager) ,cactus.transfer已经具备[email protected]权限。然后authorization_manager只需检验from@active是否授权给[email protected]即可。通过这种虚拟的权限证明解决了合约调用合约的权限检测问题。
如图标红处,校验合约部署账户的eosio.code权限,以避免inline action调用时出现安全问题。
8.2合约账户授权
智能合约cactus.token要调用eosio.token合约中transfer,将from的代币转出,必须得到from的授权,但是合约执行又需要使用合约部署账户的eosio.code权限才能操作,因此必须把from@active权限赋予[email protected]才能执行;
cleos set account permission from active '{"threshold" : 1, "keys" : [{"key":"EOS5CoAP5TqEzvzVjdhCfDrhffZ7JdpN7dnxgEqjAoVd2n4vRa5Zb","weight":1}], "accounts" : [{"permission":{"actor":"cactus","permission":"eosio.code"},"weight":1}]}' owner -p from@owner
执行结果:
8.3查看A的权限信息:
cleos get account from
执行结果如图所示
9.使用合约进行转账
cleos push action cactus transfer '["from","cactus","10.0000 SYS"]' -p from
操作结果:
至此,自定义合约转账的编码和授权操作结束。


