前言
众所周知,推送和 IM 在 Android 应用中很常见,但真正自己去实现的比较少,我们大多会去选择第三方提供的成熟方案,如极光推送、云信等,因为移动网络具有不确定性,因此自己实现一套稳定的方案会耗费很多精力,这对于小公司来说是得不偿失的。
推送和 IM 我们平时用的很多,但真正了解原理的不多,真正动手实现过的不多。推送和 IM 本质上都是长连接,无非是业务方向不同,因此我们以下统称为长连接。今天我们一起来揭开长连接的神秘面纱。
netty 是何物
虽然很多人都对 netty 比较熟悉了,但是可能还是有不了解的同学,因此我们先简单介绍下 netty。
Netty是由 JBOSS 开发的一个 Java 开源框架
Netty is an asynchronous event-driven network application framework for rapid development of maintainable high performance protocol servers & clients.
Netty是一个异步事件驱动的网络应用程序框架,用于快速开发可维护的高性能协议服务器和客户端。
这段简介摘自 netty 官网,是对 netty 的高度概括。已经帮你们翻译好了 ^ _ ^
Netty is a NIO client server framework which enables quick and easy development of network applications such as protocol servers and clients. It greatly simplifies and streamlines network programming such as TCP and UDP socket server.
'Quick and easy' doesn't mean that a resulting application will suffer from a maintainability or a performance issue. Netty has been designed carefully with the experiences earned from the implementation of a lot of protocols such as FTP, SMTP, HTTP, and various binary and text-based legacy protocols. As a result, Netty has succeeded to find a way to achieve ease of development, performance, stability, and flexibility without a compromise.Netty是一个NIO客户端服务器框架,可以快速简单地开发协议服务器和客户端等网络应用程序。 它极大地简化和简化了TCP和UDP套接字服务器等网络编程。
“快速而简单”并不意味着由此产生的应用程序将受到可维护性或性能问题的困扰。 Netty的设计经验非常丰富,包括FTP,SMTP,HTTP以及各种基于二进制和文本的传统协议。 因此,Netty已经成功地找到了一个方法来实现轻松的开发,性能,稳定性和灵活性,而不用妥协。
一复制就停不下来了 =。= 主要是觉得官网介绍的很准确。
这里提到了 事件驱动,可能大家觉得有点陌生,事件驱动其实很简单,比如你点了下鼠标,软件执行相应的操作,这就是一个事件驱动模型,再举一个例子,Android 中的 Message Looper Handler 也是事件驱动,通过 Handler 发送一个消息,这个消息就相当于一个事件,Looper 取出事件,再由 Handler 处理。
这些特性就使得 netty 很适合用于高并发的长连接。
今天,我们就一起使用 netty 实现一个 Android IM,包括客户端和服务端。
构思
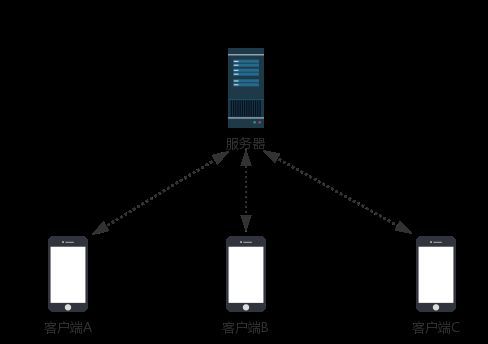
作为一个 IM 应用,我们需要识别用户,客户端建立长连接后需要汇报自己的信息,服务器验证通过后将其缓存起来,表明该用户在线。
客户端是一个一个的个体,服务器作为中转,比如,A 给 B 发送消息,A 先把消息发送到服务器,并告诉服务器这条消息要发给谁,然后服务器把消息发送给 B。
服务器在收到消息后可以对消息进行存储,如果 B 不在线,就等 B 上线后再将消息发送过去。
实战
新建一个项目
- 编写客户端代码
添加 netty 依赖
implementation 'io.netty:netty-all:4.1.9.Final'
netty 已经出了 5.x 的测试版,为了稳定,我们使用最新稳定版。
- 和服务器建立连接
// 修改为自己的主机和端口
private static final String HOST = "10.240.78.82";
private static final int PORT = 8300;

private SocketChannel socketChannel;

NioEventLoopGroup group = new NioEventLoopGroup();
new Bootstrap()
    .channel(NioSocketChannel.class)
    .group(group)
    .option(ChannelOption.TCP_NODELAY, true) // 不延迟,直接发送
    .option(ChannelOption.SO_KEEPALIVE, true) // 保持长连接状态
    .handler(new ChannelInitializer() {
        @Override
        protected void initChannel(SocketChannel socketChannel) throws Exception {
            ChannelPipeline pipeline = socketChannel.pipeline();
            pipeline.addLast(new IdleStateHandler(0, 30, 0));
            pipeline.addLast(new ObjectEncoder());
            pipeline.addLast(new ObjectDecoder(ClassResolvers.cacheDisabled(null)));
            pipeline.addLast(new ChannelHandle());
        }
    })
    .connect(new InetSocketAddress(HOST, PORT))
    .addListener((ChannelFutureListener) future -> {
        if (future.isSuccess()) {
            // 连接成功
            socketChannel = (SocketChannel) future.channel();
        } else {
            Log.e(TAG, "connect failed");
            // 这里一定要关闭,不然一直重试会引发OOM
            future.channel().close();
            group.shutdownGracefully();
        }
    });
- 身份认证
LoginInfo loginInfo = new LoginInfo();
loginInfo.setAccount(account);
loginInfo.setToken(token);
CMessage loginMsg = new CMessage();
loginMsg.setFrom(account);
loginMsg.setType(MsgType.LOGIN);
loginMsg.setContent(loginInfo.toJson());
socketChannel.writeAndFlush(loginMsg.toJson())
        .addListener((ChannelFutureListener) future -> {
            if (future.isSuccess()) {
                // 发送成功,等待服务器响应
            } else {
                // 发送成功
                close(); // 关闭连接,节约资源
            }
        });
- 处理服务器发来的消息
private class ChannelHandle extends SimpleChannelInboundHandler {
    @Override
    public void channelInactive(ChannelHandlerContext ctx) throws Exception {
        super.channelInactive(ctx);
        // 连接失效
        PushService.this.close();
    }

    @Override
    public void userEventTriggered(ChannelHandlerContext ctx, Object evt) throws Exception {
        super.userEventTriggered(ctx, evt);
        if (evt instanceof IdleStateEvent) {
            IdleStateEvent e = (IdleStateEvent) evt;
            if (e.state() == IdleState.WRITER_IDLE) {
                // 空闲了,发个心跳吧
                CMessage message = new CMessage();
                message.setFrom(myInfo.getAccount());
                message.setType(MsgType.PING);
                ctx.writeAndFlush(message.toJson());
            }
        }
    }

    @Override
    protected void channelRead0(ChannelHandlerContext ctx, String msg) throws Exception {
        Gson gson = new Gson();
        CMessage message = gson.fromJson(msg, CMessage.class);
        if (message.getType() == MsgType.LOGIN) {
            // 服务器返回登录结果
        } else if (message.getType() == MsgType.PING) {
            Log.d(TAG, "receive ping from server");
            // 收到服务器回应的心跳
        } else if (message.getType() == MsgType.TEXT) {
            Log.d(TAG, "receive text message " + message.getContent());
            // 收到消息
        }

        ReferenceCountUtil.release(msg);
    }
}
这些代码要长期在后台执行,因此我们放在 Service 中。
- 编写服务器代码
新建一个 Android Library 模块作为服务端,添加同样的依赖
- 启动 netty 服务并绑定端口
new ServerBootstrap()
    .group(new NioEventLoopGroup(), new NioEventLoopGroup())
    .channel(NioServerSocketChannel.class)
    .option(ChannelOption.SO_BACKLOG, 128)
    .option(ChannelOption.TCP_NODELAY, true) // 不延迟,直接发送
    .childOption(ChannelOption.SO_KEEPALIVE, true) // 保持长连接状态
    .childHandler(new ChannelInitializer() {
        @Override
        protected void initChannel(SocketChannel socketChannel) {
            ChannelPipeline pipeline = socketChannel.pipeline();
            pipeline.addLast(new ObjectEncoder());
            pipeline.addLast(new ObjectDecoder(ClassResolvers.cacheDisabled(null)));
            pipeline.addLast(new NettyServerHandler());
        }
    })
    .bind(port)
    .addListener((ChannelFutureListener) future -> {
        if (future.isSuccess()) {
            System.out.println("netty server start");
        } else {
            System.out.println("netty server start failed");
        }
    });
- 处理客户端发来的消息
public class NettyServerHandler extends SimpleChannelInboundHandler {
    @Override
    public void channelInactive(ChannelHandlerContext ctx) {
        // Channel失效,从Map中移除
        NettyChannelMap.remove(ctx.channel());
    }

    @Override
    protected void channelRead0(ChannelHandlerContext ctx, String msg) {
        Gson gson = new Gson();
        CMessage message = gson.fromJson(msg, CMessage.class);
        if (message.getType() == MsgType.PING) {
            System.out.println("received ping from " + message.getFrom());
            // 收到 Ping,回应一下
            Channel channel = NettyChannelMap.get(message.getFrom());
            if (channel != null) {
                channel.writeAndFlush(message.toJson());
            }
        } else if (message.getType() == MsgType.LOGIN) {
            // 用户登录
            LoginInfo loginInfo = gson.fromJson(message.getContent(), LoginInfo.class);
            if (UserManager.get().verify(loginInfo)) {
                loginInfo.setCode(200);
                loginInfo.setMsg("success");
                message.setContent(loginInfo.toJson());
                ctx.channel().writeAndFlush(message.toJson());
                NettyChannelMap.add(loginInfo.getAccount(), ctx.channel());
                System.out.println(loginInfo.getAccount() + " login");
            } else {
                loginInfo.setCode(400);
                loginInfo.setMsg("用户名或密码错误");
                message.setContent(loginInfo.toJson());
                ctx.channel().writeAndFlush(message.toJson());
            }
        } else if (message.getType() == MsgType.TEXT) {
            // 发送消息
            Channel channel = NettyChannelMap.get(message.getTo());
            if (channel != null) {
                channel.isWritable();
                channel.writeAndFlush(message.toJson()).addListener((ChannelFutureListener) future -> {
                    if (!future.isSuccess()) {
                        System.out.println("send msg to " + message.getTo() + " failed");
                    }
                });
            }
        }
        ReferenceCountUtil.release(msg);
    }
}
已登录的用户缓存在 NettyChannelMap 中。
这里可以加入离线消息缓存逻辑,如果消息发送失败,需要缓存起来,等待用户上线后再发送。
如果服务端在本机运行,需要和客户端在同一个局域网,如果是在公网运行则不需要。
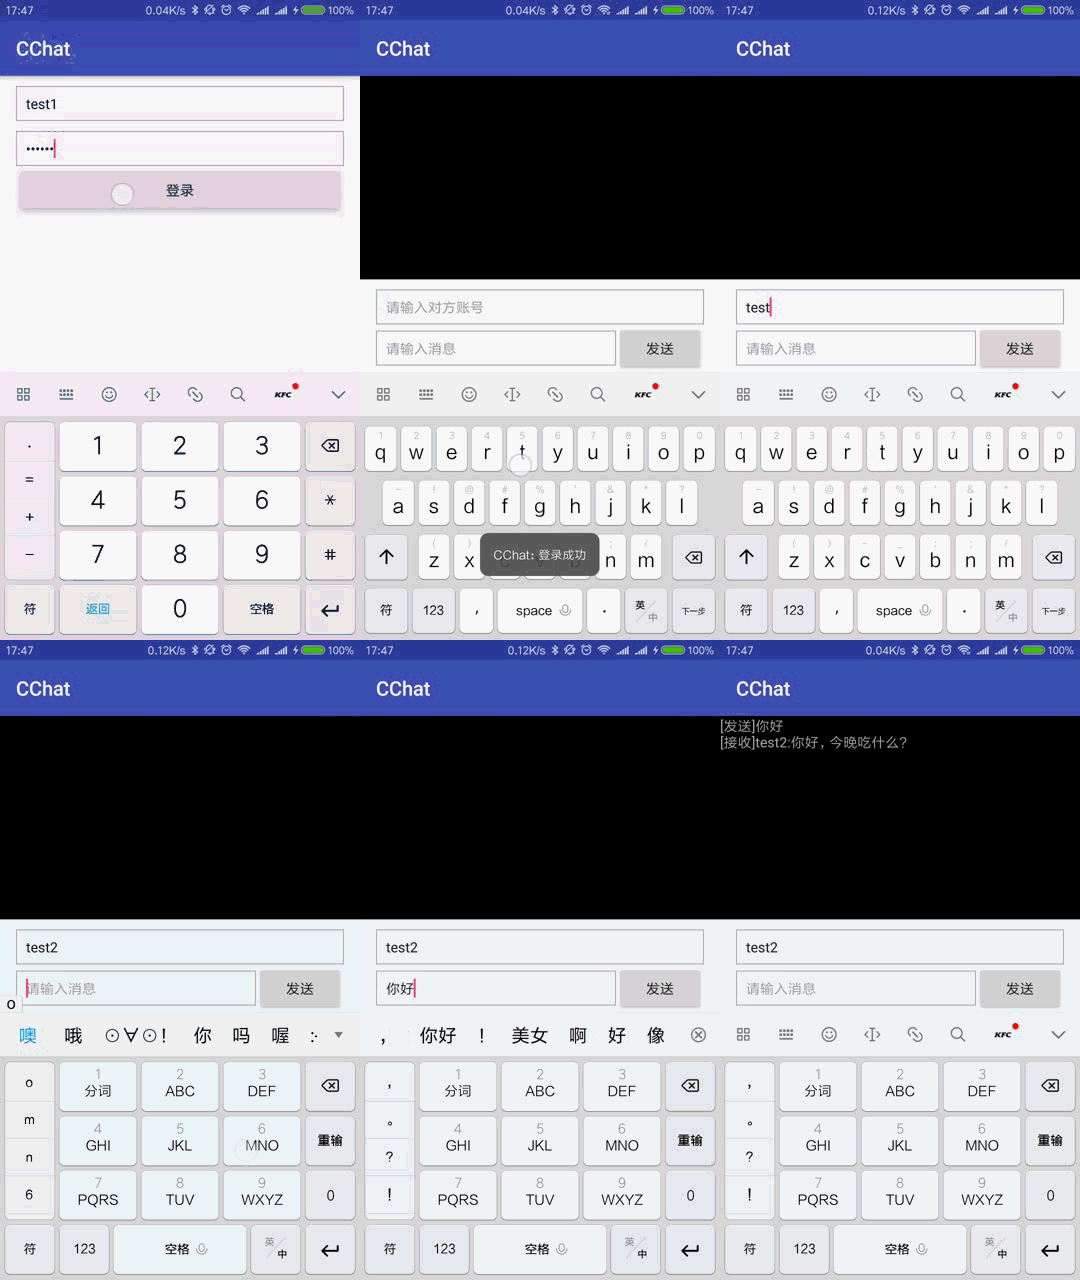
运行效果
源码
只看上面的代码可能还是有点懵逼,建议大家跑一下源码,会对 netty 有一个更清晰的认识。
https://github.com/wangchenyan/cchat
总结
今天我们一起认识了 netty,并使用 netty 实现了一个简单的 IM 应用。这里我们仅仅实现了 IM 核心功能,其他比如保活机制、断线重连不在本文讨论范围之内。
我们今天实现的长连接和第三方长连接服务商提供的长连接服务其实并无太大差异,无非是后者具有成熟的保活、短线重连机制。
读完本文,是否觉得长连接其实也没那么神秘?
但是不要骄傲,我们今天学习的只是最简单的用法,这只是皮毛,要想完全了解其中的原理还是要花费很多功夫的。


