一、Autolayout (xib 、storyboard方式)
1.适配
什么是适配?
适应、兼容各种不同的情况
移动开发中,适配的常见种类
系统适配
针对不同版本的操作系统进行适配
2.屏幕适配
针对不同大小的屏幕尺寸进行适配
iPhone的尺寸
3.5inch、4.0inch、4.7inch、5.5inch
iPad的尺寸
7.9inch、9.7inch
屏幕方向
竖屏    横屏
3.设备分辨率

4.什么是Autolayout
Autolayout是一种“自动布局”技术,专门用来布局UI界面的
Autolayout自iOS 6开始引入,由于Xcode 4的不给力,当时并没有得到很大推广
自iOS 7(Xcode 5)开始,Autolayout的开发效率得到很大的提升
苹果官方也推荐开发者尽量使用Autolayout来布局UI界面
Autolayout能很轻松地解决屏幕适配的问题
5.简介
Autoresizing
在Autolayout之前,有Autoresizing可以作屏幕适配,但局限性较大,有些任务根本无法完成
相比之下,Autolayout的功能比Autoresizing强大很多

Autolayout的2个核心概念
参照
约束
6.Autolayout常用面板
6.1-约束处理

6.2-相对

6.3-对齐

二、代码实现Autolayout
代码实现Autolayout的步骤
利用NSLayoutConstraint类创建具体的约束对象
添加约束对象到相应的view上
- (void)addConstraint:(NSLayoutConstraint *)constraint;
- (void)addConstraints:(NSArray *)constraints;

代码实现Autolayout的注意点
要先禁止autoresizing功能,设置view的下面属性为NO
view.translatesAutoresizingMaskIntoConstraints = NO;
添加约束之前,一定要保证相关控件都已经在各自的父控件上
不用再给view设置frame
NSLayoutConstraint
一个NSLayoutConstraint对象就代表一个约束

创建约束对象的常用方法
/**
view1 :要约束的控件
attr1 :约束的类型(做怎样的约束)
relation :与参照控件之间的关系
view2 :参照的控件
attr2 :约束的类型(做怎样的约束)
multiplier :乘数
c :常量
*/
+(id)constraintWithItem:(id)view1 attribute:(NSLayoutAttribute)attr1 relatedBy:(NSLayoutRelation)relation toItem:(id)view2 attribute:(NSLayoutAttribute)attr2 multiplier:(CGFloat)multiplier constant:(CGFloat)c;
自动布局的核心计算公式
obj1.property1 =(obj2.property2 * multiplier)+ constant value
//  ViewController.m
//  01-代码实现Autolayout
//  Copyright © 2017年 徐sir. All rights reserved.

#import "ViewController.h"

@interface ViewController ()

@end

@implementation ViewController

- (void)viewDidLoad {
    [super viewDidLoad];

    UIView *blueView = [[UIView alloc] init];
    blueView.backgroundColor = [UIColor blueColor];
    //不要将AutoresizingMask转为Autolayout
    blueView.translatesAutoresizingMaskIntoConstraints = NO;
    //注意点,先添加到父控件
    [self.view addSubview:blueView];

    UIView *redView = [[UIView alloc] init];
    redView.backgroundColor = [UIColor redColor];
    //不要将AutoresizingMask转为Autolayout
    redView.translatesAutoresizingMaskIntoConstraints = NO;
    //注意点,先添加到父控件
    [self.view addSubview:redView];

    /********************************* 蓝色 ***********************************/

    //高度约束:300
    NSLayoutConstraint *heightConstraint = [NSLayoutConstraint constraintWithItem:blueView attribute:NSLayoutAttributeHeight relatedBy:NSLayoutRelationEqual toItem:nil attribute:NSLayoutAttributeNotAnAttribute multiplier:0.0 constant:40];
    [blueView addConstraint:heightConstraint];

    //添加右边约束:距离右边有10的间距
    NSLayoutConstraint *rightConstraint = [NSLayoutConstraint constraintWithItem:blueView attribute:NSLayoutAttributeRight relatedBy:NSLayoutRelationEqual toItem:self.view attribute:NSLayoutAttributeRight multiplier:1.0 constant:-10];
    [self.view addConstraint:rightConstraint];

    //添加左边约束:距离右边有10的间距
    NSLayoutConstraint *leftConstraint = [NSLayoutConstraint constraintWithItem:blueView attribute:NSLayoutAttributeLeft relatedBy:NSLayoutRelationEqual toItem:self.view attribute:NSLayoutAttributeLeft multiplier:1.0 constant:10];
    [self.view addConstraint:leftConstraint];

    //添加顶部约束:距离顶部有10的间距
    NSLayoutConstraint *topConstraint = [NSLayoutConstraint constraintWithItem:blueView attribute:NSLayoutAttributeTop  relatedBy:NSLayoutRelationEqual toItem:self.view attribute:NSLayoutAttributeTop multiplier:1.0 constant:20];
    [self.view addConstraint:topConstraint];

    /********************************* 红色 ***********************************/

    //添加与蓝色等高
    NSLayoutConstraint *heightConstraint2 = [NSLayoutConstraint constraintWithItem:redView attribute:NSLayoutAttributeHeight relatedBy:NSLayoutRelationEqual toItem:blueView attribute:NSLayoutAttributeHeight multiplier:1.0 constant:0.0];
    [self.view addConstraint:heightConstraint2];

    //添加左边的约束,redview的左边等于blueView中心点的X
    NSLayoutConstraint *leftConstraint2 = [NSLayoutConstraint constraintWithItem:redView attribute:NSLayoutAttributeLeft relatedBy:NSLayoutRelationEqual toItem:self.view attribute:NSLayoutAttributeCenterX multiplier:1.0 constant:0];
    [self.view addConstraint:leftConstraint2];

    //添加顶部约束:距离有10的间距
    NSLayoutConstraint *topConstraint2 = [NSLayoutConstraint constraintWithItem:redView attribute:NSLayoutAttributeTop  relatedBy:NSLayoutRelationEqual toItem:blueView attribute:NSLayoutAttributeBottom multiplier:1.0 constant:20];
    [self.view addConstraint:topConstraint2];

    //添加右边约束:距离右边有10的间距
    NSLayoutConstraint *rightConstraint2 = [NSLayoutConstraint constraintWithItem:redView attribute:NSLayoutAttributeRight relatedBy:NSLayoutRelationEqual toItem:blueView attribute:NSLayoutAttributeRight multiplier:1.0 constant:0];
    [self.view addConstraint:rightConstraint2];
}

/**
 * 宽度,高度为父控件高度的一半,中心点与父控件的一样
 */
- (void)test2{

    UIView *blueView = [[UIView alloc] init];
    blueView.backgroundColor = [UIColor blueColor];
    //不要将AutoresizingMask转为Autolayout
    blueView.translatesAutoresizingMaskIntoConstraints = NO;
    //注意点,先添加到父控件
    [self.view addSubview:blueView];

    //宽度约束:父控件的一半
    NSLayoutConstraint *widthConstraint = [NSLayoutConstraint constraintWithItem:blueView attribute:NSLayoutAttributeWidth relatedBy:NSLayoutRelationEqual toItem:self.view attribute:NSLayoutAttributeWidth multiplier:0.5 constant:0.0];
    [self.view  addConstraint:widthConstraint];

    //高度约束:父控件的一半
    NSLayoutConstraint *heightConstraint = [NSLayoutConstraint constraintWithItem:blueView attribute:NSLayoutAttributeHeight relatedBy:NSLayoutRelationEqual toItem:self.view attribute:NSLayoutAttributeHeight multiplier:0.5 constant:0.0];
    [self.view  addConstraint:heightConstraint];

    //水平居中
    NSLayoutConstraint *centerXConstraint = [NSLayoutConstraint constraintWithItem:blueView attribute:NSLayoutAttributeCenterX relatedBy:NSLayoutRelationEqual toItem:self.view attribute:NSLayoutAttributeCenterX multiplier:1.0 constant:0.0];
    [self.view  addConstraint:centerXConstraint];

    //垂直居中
    NSLayoutConstraint *centerYConstraint = [NSLayoutConstraint constraintWithItem:blueView attribute:NSLayoutAttributeCenterY relatedBy:NSLayoutRelationEqual toItem:self.view attribute:NSLayoutAttributeCenterY multiplier:1.0 constant:0.0];
    [self.view  addConstraint:centerYConstraint];
}

/**
 * 宽度,高度为100,粘着父控件右上角
 */
- (void)test1{

    UIView *blueView = [[UIView alloc] init];
    blueView.backgroundColor = [UIColor blueColor];
    //不要将AutoresizingMask转为Autolayout
    blueView.translatesAutoresizingMaskIntoConstraints = NO;
    //注意点,先添加到父控件
    [self.view addSubview:blueView];

    //宽度约束:300
    NSLayoutConstraint *widthConstraint = [NSLayoutConstraint constraintWithItem:blueView attribute:NSLayoutAttributeWidth relatedBy:NSLayoutRelationEqual toItem:nil attribute:NSLayoutAttributeNotAnAttribute multiplier:0.0 constant:100];
    [blueView addConstraint:widthConstraint];

    //高度约束:300
    NSLayoutConstraint *heightConstraint = [NSLayoutConstraint constraintWithItem:blueView attribute:NSLayoutAttributeHeight relatedBy:NSLayoutRelationEqual toItem:nil attribute:NSLayoutAttributeNotAnAttribute multiplier:0.0 constant:100];
    [blueView addConstraint:heightConstraint];

    //添加右边约束:距离右边有10的间距
    NSLayoutConstraint *rightConstraint = [NSLayoutConstraint constraintWithItem:blueView attribute:NSLayoutAttributeRight relatedBy:NSLayoutRelationEqual toItem:self.view attribute:NSLayoutAttributeRight multiplier:1.0 constant:-10];
    [self.view addConstraint:rightConstraint];

    NSLayoutConstraint *topConstraint = [NSLayoutConstraint constraintWithItem:blueView attribute:NSLayoutAttributeTop  relatedBy:NSLayoutRelationEqual toItem:self.view attribute:NSLayoutAttributeTop multiplier:1.0 constant:10];
    [self.view addConstraint:topConstraint];

}
@end
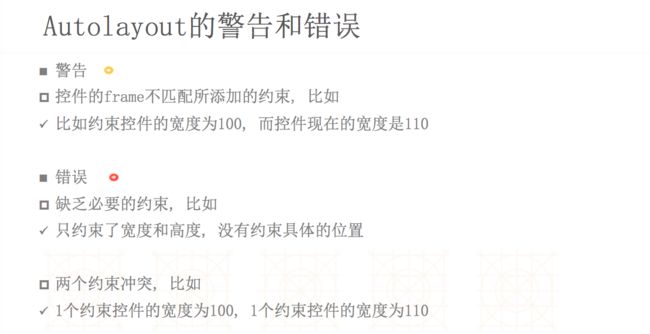
添加约束的规则
规则(1)
在创建约束之后,需要将其添加到作用的view上
在添加时要注意目标view需要遵循以下规则:
1>#对于两个同层级view之间的约束关系,添加到它们的父view上

规则(2)
2>#对于两个不同层级view之间的约束关系,添加到他们最近的共同父view上

规则(3)
3>#对于有层次关系的两个view之间的约束关系,添加到层次较高的父view上

三、VFL语言实现自动布局
1.什么是VFL语言
VFL全称是Visual Format Language,翻译过来是“可视化格式语言”
VFL是苹果公司为了简化Autolayout的编码而推出的抽象语言

2.VFL示例
H:[cancelButton(72)]-12-[acceptButton(50)]
canelButton宽72,acceptButton宽50,它们之间间距12

H:[wideView(>=60@700)]
wideView宽度大于等于60point,该约束条件优先级为700(优先级最大值为1000,优先级越高的约束越先被满足)

V:[redBox][yellowBox(==redBox)]
竖直方向上,先有一个redBox,其下方紧接一个高度等于redBox高度的yellowBox

H:|-10-[Find]-[FindNext]-[FindField(>=20)]-|
水平方向上,Find距离父view左边缘默认间隔宽度,之后是FindNext距离Find间隔默认宽度;再之后是宽度不小于20的FindField,它和FindNext以及父view右边缘的间距都是默认宽度。(竖线“|” 表示superview的边缘)
3.VFL的使用
使用VFL来创建约束数组
+ (NSArray *)constraintsWithVisualFormat:(NSString *)format options:(NSLayoutFormatOptions)opts metrics:(NSDictionary *)metrics views:(NSDictionary *)views;
/**
format :VFL语句
opts :约束类型
metrics :VFL语句中用到的具体数值
views :VFL语句中用到的控件
*/
创建一个字典(内部包含VFL语句中用到的控件)的快捷宏定义
NSDictionaryOfVariableBindings(...)
//  ViewController.m
//  02-代码实现Autolayout-VFL
//  Copyright © 2017年 徐sir. All rights reserved.
//

#import "ViewController.h"

@interface ViewController ()

@end

@implementation ViewController

- (void)viewDidLoad {
    [super viewDidLoad];

    UIButton *loginBtn = [[UIButton alloc] init];
    loginBtn.backgroundColor = [UIColor orangeColor];
    [loginBtn setTitle:@"登  录" forState:UIControlStateNormal];
    [loginBtn setTitleColor:[UIColor whiteColor] forState:UIControlStateNormal] ;
    //不要将AutoresizingMask转为Autolayout
    loginBtn.translatesAutoresizingMaskIntoConstraints = NO;
    //注意点,先添加到父控件
    [self.view addSubview:loginBtn];

    UIButton *registerBtn = [[UIButton alloc] init];
    registerBtn.backgroundColor = [UIColor brownColor];
    [registerBtn setTitle:@"注  册" forState:UIControlStateNormal];
    [registerBtn setTitleColor:[UIColor whiteColor] forState:UIControlStateNormal] ;
    //不要将AutoresizingMask转为Autolayout
    registerBtn.translatesAutoresizingMaskIntoConstraints = NO;
    //注意点,先添加到父控件
    [self.view addSubview:registerBtn];

    //添加水平方向的约束
    NSNumber *margin = @20;
    NSString *vfl = @"H:|-margin-[registerBtn]-margin-[loginBtn(==registerBtn)]-margin-|";
    NSDictionary *views = NSDictionaryOfVariableBindings(registerBtn,loginBtn);
    NSDictionary *metrics = NSDictionaryOfVariableBindings(margin);
    NSArray *constraints = [NSLayoutConstraint constraintsWithVisualFormat:vfl options: kNilOptions metrics:metrics views:views];
    [self.view addConstraints:constraints];

    //添加竖直方向的间距
    NSNumber *height = @44;
    NSString *vfl1 = @"V:[registerBtn(height)]-margin-|";
    NSDictionary *metrics1 = NSDictionaryOfVariableBindings(margin,height);
    NSArray *constraints1 = [NSLayoutConstraint constraintsWithVisualFormat:vfl1 options: kNilOptions metrics:metrics1 views:views];
    [self.view addConstraints:constraints1];

    //添加红色剩余的余约束
   NSLayoutConstraint *redConstraint = [NSLayoutConstraint constraintWithItem:loginBtn attribute:NSLayoutAttributeTop relatedBy:NSLayoutRelationEqual toItem:registerBtn attribute:NSLayoutAttributeTop multiplier:1.0 constant:0];
    [self.view addConstraint:redConstraint];

    NSLayoutConstraint *redConstraint1 = [NSLayoutConstraint constraintWithItem:loginBtn attribute:NSLayoutAttributeBottom relatedBy:NSLayoutRelationEqual toItem:registerBtn attribute:NSLayoutAttributeBottom multiplier:1.0 constant:0];
    [self.view addConstraint:redConstraint1];

}


-(void)test2{

    UIView *redView = [[UIView alloc] init];
    redView.backgroundColor = [UIColor redColor];
    //不要将AutoresizingMask转为Autolayout
    redView.translatesAutoresizingMaskIntoConstraints = NO;
    //注意点,先添加到父控件
    [self.view addSubview:redView];

    UIView *blueView = [[UIView alloc] init];
    blueView.backgroundColor = [UIColor blueColor];
    //不要将AutoresizingMask转为Autolayout
    blueView.translatesAutoresizingMaskIntoConstraints = NO;
    //注意点,先添加到父控件
    [self.view addSubview:blueView];

    //添加水平方向的约束
    NSNumber *margin = @20;
    NSString *vfl = @"H:|-margin-[blueView]-margin-|";

    NSDictionary *views = NSDictionaryOfVariableBindings(blueView);
    NSDictionary *metrics = NSDictionaryOfVariableBindings(margin);
    NSArray *constraints = [NSLayoutConstraint constraintsWithVisualFormat:vfl options: kNilOptions metrics:metrics views:views];
    [self.view addConstraints:constraints];

    //添加竖直方向的间距
    NSNumber *height = @44;
    NSString *vfl1 = @"V:|-margin-[blueView(height)]";
    NSDictionary *metrics1 = NSDictionaryOfVariableBindings(margin,height);
    NSArray *constraints1 = [NSLayoutConstraint constraintsWithVisualFormat:vfl1 options: kNilOptions metrics:metrics1 views:views];
    [self.view addConstraints:constraints1];


}
-(void)test1{

    UIView *blueView = [[UIView alloc] init];
    blueView.backgroundColor = [UIColor blueColor];
    //不要将AutoresizingMask转为Autolayout
    blueView.translatesAutoresizingMaskIntoConstraints = NO;
    //注意点,先添加到父控件
    [self.view addSubview:blueView];

    //添加水平方向的约束
    NSString *vfl = @"H:|-20-[abc]-20-|";
    NSDictionary *views = @{@"abc":blueView};
    NSArray *constraints = [NSLayoutConstraint constraintsWithVisualFormat:vfl options: kNilOptions metrics:nil views:views];
    [self.view addConstraints:constraints];

    //添加竖直方向的间距
    NSString *vfl1 = @"V:|-20-[abc(44)]";
    NSDictionary *views1 = @{@"abc":blueView};
    NSArray *constraints1 = [NSLayoutConstraint constraintsWithVisualFormat:vfl1 options: kNilOptions metrics:nil views:views1];
    [self.view addConstraints:constraints1];

}

@end
Visual Format Language
Visual Format Syntax
[button]-[textField]
Width Constraint
[button(>=50)]
Connection to Superview
|-50-[purpleBox]-50-|
Vertical Layout
V:[topField]-10-[bottomField]
![V:[topField]-10-[bottomField].png](http://img.e-com-net.com/image/info10/56d7410e200c4460b4096fa9d9a363ae.jpg)
Flush Views
[maroonView][blueView]
Priority
[button(100@20)]
Equal Widths
[button1(==button2)]
Multiple Predicates
[flexibleButton(>=70,<=100)]
![[flexibleButton(>=70,<=100)].png](http://img.e-com-net.com/image/info10/49ef2c5f79ff4abda85eeb0cd34099be.jpg)
A Complete Line of Layout
|-[find]-[findNext]-[findField(>=20)]-|
The notation prefers good visualization over completeness of expressibility. Most of the constraints that are useful in real user interfaces can be expressed using visual format syntax, but there are a few that cannot. One useful constraint that cannot be expressed is a fixed aspect ratio (for example, imageView.width = 2 * imageView.height
). To create such a constraint, you must use
constraintWithItem:attribute:relatedBy:toItem:attribute:multiplier:constant:
NOTE
For the objectOfPredicate
production, viewName
is acceptable only if the subject of the predicate is the width or height of a view. That is, you can use [view1(==view2)]
to specify that view1
and view2
have the same width.
If you make a syntactic mistake, an exception is thrown with a diagnostic message. For example:
Expected ':' after 'V' to specify vertical arrangement
V|[backgroundBox]|
^
A predicate on a view's thickness must end with ')' and the view must end with ']'
|[whiteBox1][blackBox4(blackWidth][redBox]|
^
Unable to find view with name blackBox
|[whiteBox2][blackBox]
^
Unknown relation. Must be ==, >=, or <=
V:|[blackBox4(>30)]|
^
四、Masonry 框架的使用
1.目前最流行的Autolayout第三方框架
用优雅的代码方式编写Autolayout
省去了苹果官方恶心的Autolayout代码
大大提高了开发效率

框架地址:
https://github.com/SnapKit/Masonry
2.mas_equalTo和equalTo

默认情况下
mas_equalTo有自动包装功能,比如自动将20包装为@20
equalTo没有自动包装功能

如果添加了下面的宏,那么mas_equalTo和equalTo就没有区别
#define MAS_SHORTHAND_GLOBALS
// 注意:这个宏一定要添加到#import "Masonry.h"前面
3.mas_width和width

默认情况下
width是make对象的一个属性,用来添加宽度约束用的,表示对宽度进行约束
mas_width是一个属性值,用来当做equalTo的参数,表示某个控件的宽度属性

如果添加了下面的宏,mas_width也可以写成width
#define MAS_SHORTHAND
mas_height、mas_centerX以此类推
4.可有可无的用法
以下方法都仅仅是为了提高可读性,可有可无
- (MASConstraint *)with {
    return self;
}
- (MASConstraint *)and {
    return self;
}
说明:
/**
 mas_equalTo:这个方法会对参数进行包装
 equalTo:这个方法不会对参数进行包装
 mas_equalTo的功能强于 > equalTo
 */
/**
 约束的类型:
 1.尺寸:width\height\size
 2.边界:left\leading\right\trailing\top\bottom
 3.中心点:center\centerX\centerY
 4.边界:edges
 */

/**
 // 这个方法会将以前的所有约束删掉,添加新的约束
 [blueView mas_remakeConstraints:^(MASConstraintMaker *make) {

 }];

 // 这个方法将会覆盖以前的某些特定的约束
 [blueView mas_updateConstraints:^(MASConstraintMaker *make) {

 }];
 */
//
// ViewController.m
// 03-Masonry使用
// Copyright © 2017年 徐sir. All rights reserved.
#import "ViewController.h"
//define this constant if you want to use Masonry without the 'mas_' prefix
#define MAS_SHORTHAND
//define this constant if you want to enable auto-boxing for default synta
#define MAS_SHORTHAND_GLOBALS
#import "Masonry.h"
@interface ViewController ()
@end
@implementation ViewController
- (void)viewDidLoad {
[super viewDidLoad];
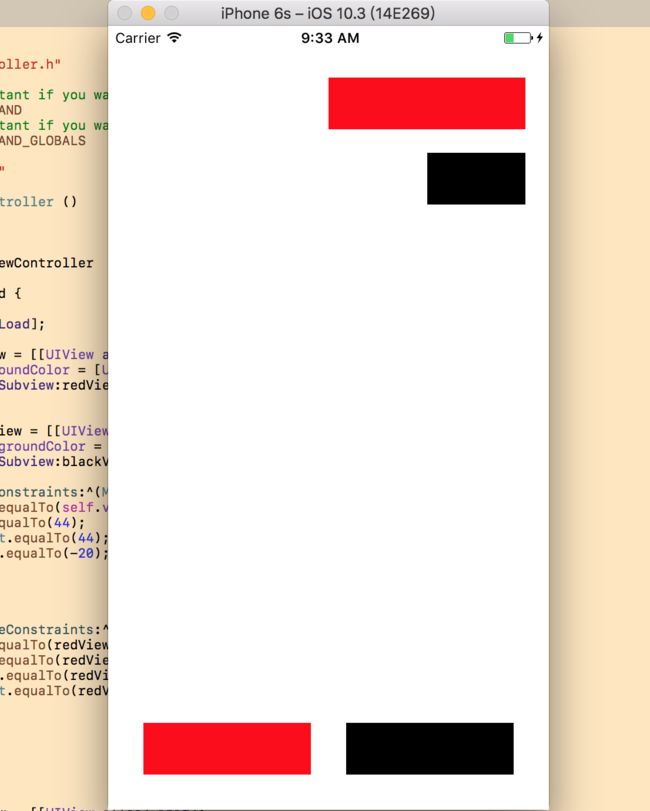
UIView *redView = [[UIView alloc] init];
redView.backgroundColor = [UIColor redColor];
[self.view addSubview:redView];
UIView *blackView = [[UIView alloc] init];
blackView.backgroundColor = [UIColor blackColor];
[self.view addSubview:blackView];
[redView makeConstraints:^(MASConstraintMaker *make){
make.left.equalTo(self.view.centerX);
make.top.equalTo(44);
make.height.equalTo(44);
make.right.equalTo(-20);
}];
[blackView makeConstraints:^(MASConstraintMaker *make) {
make.top.equalTo(redView.bottom).offset(20);
make.left.equalTo(redView.centerX);
make.right.equalTo(redView);
make.height.equalTo(redView);
}];
[self test3];
}
- (void)test3{
UIView *redView = [[UIView alloc] init];
redView.backgroundColor = [UIColor redColor];
[self.view addSubview:redView];
UIView *blackView = [[UIView alloc] init];
blackView.backgroundColor = [UIColor blackColor];
[self.view addSubview:blackView];
[redView makeConstraints:^(MASConstraintMaker *make) {
make.left.equalTo(self.view.mas_left).offset(30);
make.bottom.equalTo(self.view.mas_bottom).offset(-30);
make.right.equalTo(blackView.mas_left).offset(-30);
make.width.equalTo(blackView.mas_width);
make.height.equalTo(@44);
}];
[blackView makeConstraints:^(MASConstraintMaker *make) {
make.right.equalTo(self.view.mas_right).offset(-30);
make.top.equalTo(redView.mas_top);
make.bottom.equalTo(redView.mas_bottom);
}];
}
//2.尺寸:width\height\size
- (void)t2{
UIView *redView = [[UIView alloc] init];
redView.backgroundColor = [UIColor redColor];
[self.view addSubview:redView];
//简写4
// [redView mas_makeConstraints:^(MASConstraintMaker *make) {
//
// make.size.mas_equalTo(CGSizeMake(100, 100));
// make.center.mas_equalTo(self.view);
//
// }];
//简写3
// [redView mas_makeConstraints:^(MASConstraintMaker *make) {
//
// make.width.height.mas_equalTo(100);
// make.center.mas_equalTo(self.view);
//
// }];
//简写2
//mas_equalTo:会自动包装传入的参数为对象类型
// [redView mas_makeConstraints:^(MASConstraintMaker *make) {
//
// make.width.mas_equalTo(100);
// make.height.mas_equalTo(@100);
// make.centerX.mas_equalTo(self.view.mas_centerX);
// make.centerY.mas_equalTo(self.view.mas_centerY);
//
// }];
//简写1
// [redView mas_makeConstraints:^(MASConstraintMaker *make) {
// make.width.equalTo(@100);
// make.height.equalTo(@100);
// make.centerX.equalTo(self.view);
// make.centerY.equalTo(self.view);
// }];
// [redView mas_makeConstraints:^(MASConstraintMaker *make) {
//
// make.width.equalTo(@100);
//
// make.height.equalTo(@100);
// make.centerX.equalTo(self.view.mas_centerX);
//
// make.centerY.equalTo(self.view.mas_centerY);
// }];
}
//1.边界:left\leading\right\trailing\top\bottom\edges
- (void)edges{
UIView *redView = [[UIView alloc] init];
redView.backgroundColor = [UIColor redColor];
[self.view addSubview:redView];
[redView mas_makeConstraints:^(MASConstraintMaker *make) {
make.edges.equalTo(self.view).insets(UIEdgeInsetsMake(20, 20, 20, 20));
}];
// 简写3
// [redView mas_makeConstraints:^(MASConstraintMaker *make) {
// make.top.left.offset(20);
// make.right.bottom.offset(-20);
// }];
// 简写2
// [redView mas_makeConstraints:^(MASConstraintMaker *make) {
// make.top.offset(20);
// make.left.offset(20);
// make.right.offset(-20);
// make.bottom.offset(-20);
// }];
// 简写1
// [redView mas_makeConstraints:^(MASConstraintMaker *make) {
//
// make.top.equalTo(self.view).offset(20);
//
// make.left.equalTo(self.view).offset(20);
//
// make.right.equalTo(self.view).offset(-20);
//
// make.bottom.equalTo(self.view).offset(-20);
// }];
// [redView mas_makeConstraints:^(MASConstraintMaker *make) {
//
// make.top.equalTo(self.view.mas_top).offset(20);
//
// make.left.equalTo(self.view.mas_left).offset(20);
//
// make.right.equalTo(self.view.mas_right).offset(-20);
//
// make.bottom.equalTo(self.view.mas_bottom).offset(-20);
// }];
}
@end