大家都知道如果想让UIImageView显示动态图片,可以设置animationImages赋值一个图片数组,然后设置一下动画时间,再开启动画。总感觉使用很麻烦,而且如果是一个gif格式或者其他格式的动态图,直接就无法使用了。后来在github上发现了YYImage,发现使用起来很方便,但同时也很好奇是怎么做到的,现在就以YYAnimatedImageView为主介绍一下这个库是怎么实现显示动态图的。废话不多说,上图
先写两句代码,运行一下,然后打断点进去看看是怎么加载的
YYAnimatedImageView* animatedView = [[YYAnimatedImageView alloc] init];

animatedView.frame=CGRectMake(0,0,200,150);

animatedView.center=self.view.center;

[self.view  addSubview:animatedView];

YYImage* image = [YYImage imageNamed:@"test.gif"];

animatedView.image= image;
这样就能显示动态图了。
- 首先从YYImage说起
A YYImage object is a high-level way to display animated image data
作者继承UIImage类写了YYImage,他自己的介绍是这是可以高效的展示动态图的类,我们从imageNamed:方法看起,这个方法主要是去遍历工程文件中是否有匹配的文件,如果找到路径然后直接获取图片的二进制文件,YYImage重写了initWithData:scale:方法,在这个里面使用了YYImageDecoder对图片进行界面,这就是YYImage为什么比较快的原因了
- 从
YYImageDecoder *decoder = [YYImageDecoder decoderWithData:datascale:scale]进入YYImagecoder去看看是怎么处理的
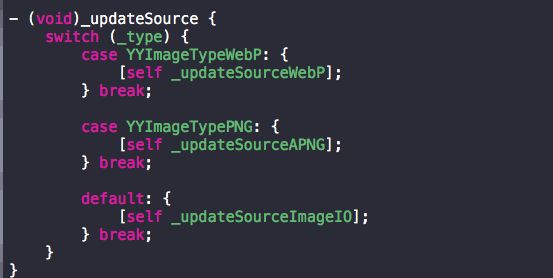
根据方法调用和参数传递,来到如上图所示方法,是yyImageCoder第一个做实事的方法,YYImageDetectType先得到这个图片的格式(比如PNG,JPEG,GIF等),具体怎么得出来的可以点进去仔细看看,大概就是获得这个二进制文件的前16字节,然后进行匹配,得到图片的格式,得到了图片格式之后进入下一步
[self _updateSource]
在这里作者对webp和apng格式的动画进行了专门的解码优化所以进入不同方法,总之这个方法就是对不同格式的图片进行解码路由,我们点进去_updateSourceImageIO看看怎么做的,看下主要代码(去除了一些条件判断)
//使用ImageIO框架去获得图片
//使用CGImageSourceCreateWithData获得图片类型是CGImageSourceRef
_source=CGImageSourceCreateWithData((__bridgeCFDataRef)_data,NULL);
//这里frameCount代表图片的数量,比如GIF其实就是一组图片
//下面是一些不同类型的判断
_frameCount = CGImageSourceGetCount(_source);
if (_type == YYImageTypeGIF) {
            //这字典打印出来是
            //FileSize = 487202;
            //"{GIF}" =     {
            //    HasGlobalColorMap = 1;
            //    LoopCount = 0;
            //};
            //  loopCount = 0 表示会无线循环当前的gif
            CFDictionaryRef properties = CGImageSourceCopyProperties(_source, NULL);
            if (properties) {
                CFTypeRef loop = CFDictionaryGetValue(properties, kCGImagePropertyGIFLoopCount);
                if (loop) CFNumberGetValue(loop, kCFNumberNSIntegerType, &_loopCount);

                CFRelease(properties);
            }
        }
//建立一个数组,把每个图片的索引,延迟时间等封装成_YYImageDecoderFrame类
    //加入到数组中
    NSMutableArray *frames = [NSMutableArray new];
    for (NSUInteger i = 0; i < _frameCount; i++) {
        _YYImageDecoderFrame *frame = [_YYImageDecoderFrame new];
        frame.index = i;
        frame.blendFromIndex = i;
        frame.hasAlpha = YES;
        frame.isFullSize = YES;
        [frames addObject:frame];
        //得到每一帧图片的属性
        //包括图片的 宽  高   延迟时间  颜色空间等
        CFDictionaryRef properties = CGImageSourceCopyPropertiesAtIndex(_source, i, NULL);
        if (properties) {
            NSTimeInterval duration = 0;
            NSInteger orientationValue = 0, width = 0, height = 0;
            CFTypeRef value = NULL;

            value = CFDictionaryGetValue(properties, kCGImagePropertyPixelWidth);
            if (value) CFNumberGetValue(value, kCFNumberNSIntegerType, &width);
            value = CFDictionaryGetValue(properties, kCGImagePropertyPixelHeight);
            if (value) CFNumberGetValue(value, kCFNumberNSIntegerType, &height);
            if (_type == YYImageTypeGIF) {
                CFDictionaryRef gif = CFDictionaryGetValue(properties, kCGImagePropertyGIFDictionary);
                //此处打断点 输出
                // {
                //    DelayTime = "0.07";
                //    UnclampedDelayTime = "0.07";
                // }
                //表示每一帧图片的延迟时间,也就是需要显示的时间
                if (gif) {

                    value = CFDictionaryGetValue(gif, kCGImagePropertyGIFUnclampedDelayTime);
                    if (!value) {
                        value = CFDictionaryGetValue(gif, kCGImagePropertyGIFDelayTime);
                    }
                    if (value) CFNumberGetValue(value, kCFNumberDoubleType, &duration);
                }
            }
            //对动画中需要到的关键属性进行赋值

            frame.width = width;
            frame.height = height;
            frame.duration = duration;
然后把每一帧图片加入到frames数组中,这基本上是YYImageCoder完成的大部分工作了
- 我们再回到YYImage中
YYImageCoder还是之前那个initWithData:scale方法,我加了注释,看一下
YYImageDecoder *decoder = [YYImageDecoder decoderWithData:data scale:scale];
        YYImageFrame *frame = [decoder frameAtIndex:0 decodeForDisplay:YES];
        UIImage *image = frame.image;
        if (!image) return nil;
        //这里返回的是第一帧的图片
        self = [self initWithCGImage:image.CGImage scale:decoder.scale orientation:image.imageOrientation];
        if (!self) return nil;
        _animatedImageType = decoder.type;
        //当frameCount >1 也就是 当图片是动态图的时候
        if (decoder.frameCount > 1) {
            //注意看这里,这里把decoder 当做自己成员变量了
            //为什么要这样做? 因为当时上面返回的是第一帧的图片,但是对于frameCount > 1的动态图,
           //当然返回一张是不够的,这里保留decoder,在需要使用YYAnimatedImageView代理方法的时候可以通过decoder来返回不同索引的图片
            _decoder = decoder;
            _bytesPerFrame = CGImageGetBytesPerRow(image.CGImage) * CGImageGetHeight(image.CGImage);
            _animatedImageMemorySize = _bytesPerFrame * decoder.frameCount;
        }
- 好了,
YYImage所做的工作已经完成了,我们现在来看看YYAnimatedImageView是怎么做最后的舞台的
从setImage:withType:方法出发,来到- (void)imageChanged方法,同样我也添加了注释
YYAnimatedImageType newType = [self currentImageType];
    id newVisibleImage = [self imageForType:newType];
    NSUInteger newImageFrameCount = 0;
    BOOL hasContentsRect = NO;

    if ([newVisibleImage isKindOfClass:[UIImage class]] &&
        //这句话其实就是把newVisibleImage当做代理对象使用
        //因为这里用的都是YYImage类型,YYImage已经实现了代理方法
        [newVisibleImage conformsToProtocol:@protocol(YYAnimatedImage)]) {
        //得到图片的个数
        newImageFrameCount = ((UIImage *) newVisibleImage).animatedImageFrameCount;
        if (newImageFrameCount > 1) {
            hasContentsRect = [((UIImage *) newVisibleImage) respondsToSelector:@selector(animatedImageContentsRectAtIndex:)];
        }
    }
    if (!hasContentsRect && _curImageHasContentsRect) {
        //这个是关闭默认的隐式动画,防止对自己的动画播放产生影响,
        //有兴趣的可以看看 core animation
        if (!CGRectEqualToRect(self.layer.contentsRect, CGRectMake(0, 0, 1, 1)) ) {
            [CATransaction begin];
            [CATransaction setDisableActions:YES];
            //设置layer的显示范围是整个寄宿图片
            self.layer.contentsRect = CGRectMake(0, 0, 1, 1);
            [CATransaction commit];
        }
    }
    _curImageHasContentsRect = hasContentsRect;
    if (hasContentsRect) {
        CGRect rect = [((UIImage *) newVisibleImage) animatedImageContentsRectAtIndex:0];
        [self setContentsRect:rect forImage:newVisibleImage];
    }

    if (newImageFrameCount > 1) {
        //如果是 图片数量>1 针对动态图
        //resetAnimated就是创建了一个CADisplayLink定时器去刷新图片显示
        [self resetAnimated];
        _curAnimatedImage = newVisibleImage;
        _curFrame = newVisibleImage;
        _totalLoop = _curAnimatedImage.animatedImageLoopCount;
        _totalFrameCount = _curAnimatedImage.animatedImageFrameCount;
        [self calcMaxBufferCount];
    }
    [self setNeedsDisplay];
    //开始播放动画
    [self didMoved];
在[self resetAnimated]方法中,使用dispatch_once来保证这个imageView中只起一次定时器,同时把这个定时器加到mainRunLoop,模式默认为NSRunLoopCommonModes,也就是说在你滑动的时候不会影响到动态图的播放,同时添加进通知中心,对于关于内存警告的通知,和后台的通知进行相应的一些处理,定时器定时调起step:方法,这个方法主要是做什么呢,
_time += link.duration;
        //拿到当前索引图片的延迟时间,也就是需要显示的时间
        delay = [image animatedImageDurationAtIndex:_curIndex];
        //如果当前的link.duration还没到,直接返回等到下一次调起
        //就拿文章头部的那个动态图来说,每张图显示的时间大约在0.07秒左右
        //而CADisplayLink每次任务执行的时间大约是0.016秒
        //所以不会用每次都刷新图片显示
        if (_time < delay) return;
        //如果调用了就用当前的时间减去 当前图片需要显示的时间
        _time -= delay;
        if (nextIndex == 0) {
            _curLoop++;
            if (_curLoop >= _totalLoop && _totalLoop != 0) {
                _loopEnd = YES;
                [self stopAnimating];
                //主动调起刷新layer,系统会调用displayLayer
                [self.layer setNeedsDisplay];
                return;
            }
        }
_curFrame就是当前要显示的图片,_curFrame的赋值也在step中,具体就不解释了,然后就通过下面这句代码完成了imageview的layer的寄宿图的设置
layer.contents = (__bridge id)_curFrame.CGImage;
好了到这,YYAnimatedImageView就开始播放动态图了。


