使用hexo, github, coding搭建免费博客
使用hexo, github, coding搭建免费博客
Updated March 6, 2018
准备环境
windows10 x64
熟练掌握git和github的基本操作
参考廖雪峰教程:github用户名.github.io
node.js+hexo
下载安装node.js,打开git-bash,分别输入npm -v和node -v,返回版本信息说明安装成功
新建文件夹D:\hexo,在文件夹hexo中使用git-bash进行操作
输入npm install -g hexo-cli来安装hexo
依次输入hexo init blog, cd blog和npm install建站
输入hexo generate生成静态页面
输入hexo server启动服务hexo server -p 5000
hexo配置
hexo官方文档:https://hexo.io/zh-cn/docs//hexo/blog/_config.yml文件
# Deployment
## Docs: https://hexo.io/docs/deployment.html
deploy:
  type: git
  repo: https://github.com/lema1987/lema1987.github.io.git
  branch: master
设置语言,网站标题,修改/hexo/blog/_config.yml文件
# Site
title: # 网站标题
subtitle:
description:
author: # 作者
language: zh-Hans # 语言
timezone:
菜单中添加分类页标签页:/hexo/blog/themes/next/_config.yml
menu:
  home: / || home
  关于我: /about/ || user
  tags: /tags/ || tags
  categories: /categories/ || th
  archives: /archives/ || archive
  #schedule: /schedule/ || calendar
  #sitemap: /sitemap.xml || sitemap
  #commonweal: /404/ || heartbeat
腾讯404公益http://www.qq.com/404/404.md:
https://github.com/hexojs/hexo-deployer-gitnpm install hexo-deployer-git --save
hexo主题配置
下载next主题:https://github.com/iissnan/hexo-theme-next/hexo/blog/themes/next中/hexo/blog/_config.yml文件:
# Extensions
## Plugins: https://hexo.io/plugins/
## Themes: https://hexo.io/themes/
theme: next
新建文章
在/hexo/blog/sources/_posts中新建文章.md
---
title: #文章标题
date: 2016-06-01 23:47:44 #文章生成時間
categories: "Hexo教程" #文章分類目錄 可以省略
tags: #文章標籤 可以省略
     - 标签1
     - 标签2
description: #你對本頁的描述 可以省略
---
部署项目
hexo clean  清除缓存
hexo g  生成页面
hexo d  一键部署项目到服务器上
或者 hexo clean && hexo g && hexo d

hexo s  启动本地服务器
实现各种优化
为主题增加动态粒子背景
教程:https://github.com/hustcc/canvas-nest.js/blob/master/README-zh.md/hexo/blog/themes/next/layout/_layout.swig中的
之前:
{% if theme.canvas_nest %}

{% endif %}
把/hexo/blog/themes/next/_config.yml中所有的canvas_nest设置为true值
hexo文章添加本地图片
方法1:此方法有时会出错,不能成功引入图片/hexo/blog/_config.yml中的post_asset_folder设置为true/hexo/blog/source下创建/images文件夹,本地图片丢里面[图片上传失败...(image-deba05-1527085003150)]
方法2:引入外链, 推荐使用第二种方法
添加字数统计,阅读时长功能
参考链接:https://www.jianshu.com/p/baea8c95e39b
安装插件
npm -i --save hexo-wordcount
npm install hexo-wordcount@2 --save
修改配置文件
/hexo/blog/themes/next/_config.yml
post_wordcount:
  item_text: true
  wordcount: true # 改为true
  min2read: true # 改为true
  totalcount: false
  separated_meta: true
编辑/hexo/blog/themes/next/layout/_macro/post.swig
    {{ wordcount(post.content) }} 字


    {{ min2read(post.content) }} 分钟
添加友链
编辑/hexo/blog/themes/next/_config.yml
# Blog rolls
links_icon: link
links_title: 友情链接
links_layout: block
#links_layout: inline
links:
  #Title: http://example.com/
  武沛齐: http://www.cnblogs.com/wupeiqi
  离别歌: https://www.leavesongs.com/
  Chybeta: https://chybeta.github.io/
  Sakura: http://eternalsakura13.com/
  andseclab: https://www.andseclab.cn/
自定义鼠标样式
打开/themes/next/source/css/_custom/custom.styl,输入
 * {
      cursor: url("http://om8u46rmb.bkt.clouddn.com/sword2.ico"),auto!important
  }
添加github丝带
在/hexo/blog/themes/next/layout/_layout.swig中加入相关代码
鼠标点击显示小红心
在/hexo/blog/themes/next/source/js/src目录下添加love.js文件,内容为
!function(e,t,a){function n(){c(".heart{width: 10px;height: 10px;position: fixed;background: #f00;transform: rotate(45deg);-webkit-transform: rotate(45deg);-moz-transform: rotate(45deg);}.heart:after,.heart:before{content: '';width: inherit;height: inherit;background: inherit;border-radius: 50%;-webkit-border-radius: 50%;-moz-border-radius: 50%;position: fixed;}.heart:after{top: -5px;}.heart:before{left: -5px;}"),o(),r()}function r(){for(var e=0;e在/hexo/blog/themes/next/layout/_layout.swing文件中添加一下代码(要在之前添加)
设置hexo首页文章不显示全文只显示预览
第一种方法:/hexo/blog/themes/next/_config.yml中将下面代码中的enable值改为true
# Automatically Excerpt. Not recommend.
# Please use  in the post to control excerpt accurately.
auto_excerpt:
  enable: true
  length: 150
第二种方法:
在每一篇文章中添加手动进行截断,推荐使用第二种方法
设置hexo支持评论系统
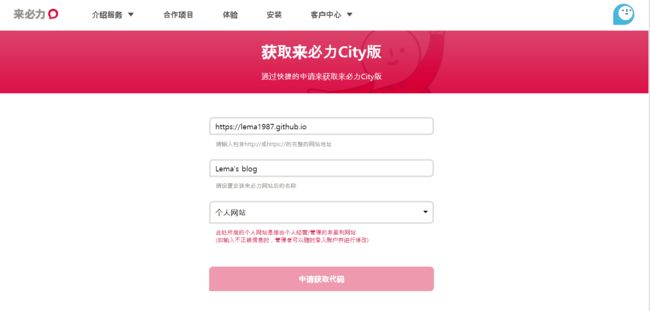
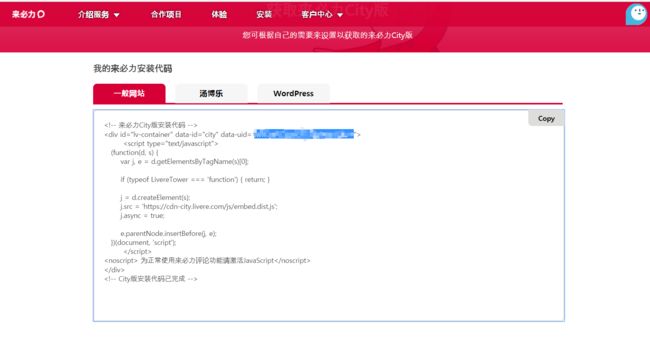
本文选用韩国的产品来必力: https://livere.com/, 支持多个国内外账号登录
然后在/hexo/blog/themes/next/_config.yml中找到livere_uid
livere_uid: 输入你的uid
修改超链接显示样式
将超链接设置为蓝色, 鼠标划过时显示下划线/hexo/blog/themes/next/source/css/_custom/custom.styl中添加以下css样式
.post-body p a {
    color: #0593d3;
    border-bottom: none;
    &:hover {
        color: #0477ab;
        text-decoration: underline;
    }
}
添加头像
在/hexo/blog/themes/next/_config.yml中找到并修改以下代码:
# Sidebar Avatar
# in theme directory(source/images): /images/avatar.gif
# in site  directory(source/uploads): /uploads/avatar.gif
avatar: http://p5zqim58x.bkt.clouddn.com/touxiang.jpg
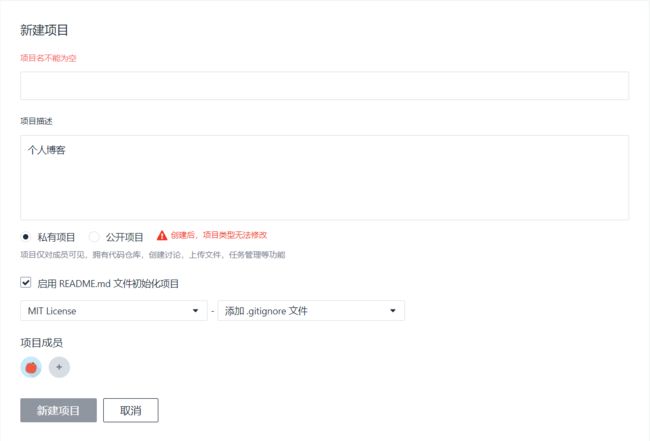
将博客托管到coding pages上
教程: https://blog.csdn.net/xiaoliuge01/article/details/50997754
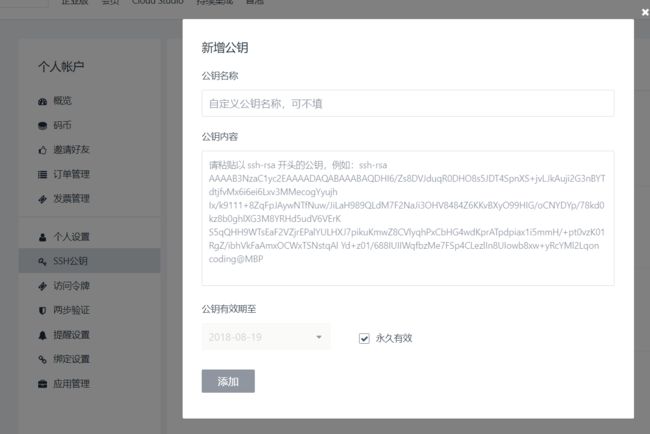
添加ssh key到coding上:
cd ~/.ssh
cat id_rsa.pub
复制一整串公钥
在coding上配置公钥
ssh -T [email protected] 看看是否配置成功
选择master分支, 开启https
hexo/blog/_config.yml修改添加以下代码
# Deployment
## Docs: https://hexo.io/docs/deployment.html
deploy:
type: git
repo:
github: https://github.com/lema1987/lema1987.github.io.git
coding: [email protected] :lema1987/lema1987.git
branch: master
本地项目部署到coding上
hexo clean
hexo g
hexo s
你可能感兴趣的:(使用hexo, github, coding搭建免费博客)
讯飞星火 VS 文心一言:谁是中文大语言模型的TOP1?
沉迷单车的追风少年
深度学习-计算机视觉 人工智能 文心一言 讯飞星火 百度 科大讯飞
在百度发布文心一言一个多月后,科大讯飞也发布了自己的大模型“讯飞星火大模型”。本篇博客就测评一下这两个在中文圈最受好评的大语言模型,顺便辅以ChatGPT为参考。大家一起来看看到底谁是中文大语言模型的TOP1?目录体验网址1、旅游攻略2、数理逻辑题3、故事创作4、古诗创作5、图片创作6、文案创作7、代码编写8、互联网黑话9、中文梗对比10、英文写作结论体验网址1、文心一言:文心一言2、ChatGP
Pytorch使用手册—使用TACOTRON2进行文本到语音转换(专题二十四)
AI专题精讲
Pytorch入门到精通 pytorch 人工智能 python
一、概述本教程展示了如何使用torchaudio中的预训练Tacotron2构建文本到语音的管道。文本到语音的管道流程如下:文本预处理首先,输入的文本被编码为一系列符号。在本教程中,我们将使用英语字符和音标作为符号。谱图生成从编码后的文本中生成谱图。我们使用Tacotron2模型来完成这一步。3.时域转换最后一步是将谱图转换为波形。从谱图生成语音的过程也称为Vocder(声码器)。在本教程中,我们
Pytorch使用手册--将 PyTorch 模型导出为 ONNX(专题二十六)
AI专题精讲
Pytorch入门到精通 pytorch 人工智能 python
注意截至PyTorch2.1,ONNX导出器有两个版本。torch.onnx.dynamo_export是最新的(仍处于测试阶段)导出器,基于PyTorch2.0发布的TorchDynamo技术。torch.onnx.export基于TorchScript后端,自PyTorch1.2.0起可用。一、torch.onnx.dynamo_export使用在60分钟入门中,我们有机会从高层次上了解PyT
Apache Lucene 详解及示例
微笑听雨。
java 进阶教程 apache lucene java 全文检索
ApacheLucene详解及示例1.简介ApacheLucene是一个开源的高性能全文搜索引擎库,广泛应用于构建各种搜索系统和信息检索应用。Lucene提供了丰富的API来进行索引和搜索,支持高效的文本处理和查询。本文将深入解析Lucene的核心概念和主要功能,并通过示例代码演示其使用方法。2.核心概念2.1倒排索引倒排索引(InvertedIndex)是Lucene的核心数据结构。它将文档中的
根据Excel生成建表语句sql——源码设计说明
忙碌的菠萝
java 环境搭建 sql java 数据库
根据Excel生成建表语句sql设计的人跟开发的人总不是同一个,这就导致了设计是设计的思路,开发是开发的思路,表也是一样,开发给加了字段不同步给设计人员,设计加了字段开发可能这个环境加了,另一个没加。为了避免比对和扯皮,以设计为准!序号内容连接地址1工具使用说明https://blog.csdn.net/qq_21271511/article/details/1219010642工具下载地址htt
【linux自动化实践】linux shell 脚本 替换某文本
忙碌的菠萝
linux自动化实践 linux 自动化 运维
在Linuxshell脚本中,可以使用sed命令来替换文本。以下是一个基本的例子,它将在文件example.txt中查找文本old_text并将其替换为new_textsed-i's/old_text/new_text/g'example.txt解释:sed:是streameditor的缩写,用于处理文本数据。-i:表示直接修改文件内容。s:表示替换操作。old_text:要被替换的文本。new_
【目录】PMP项目管理—基础认知篇—十五至尊图
洛北辰南
PMP PMP 项目管理 目录
笔者已经3A通过PMP考试,近期抽空会把上网课记录的笔记腾到博客中,以此文为目录链接全部内容,欢迎订阅关注。已整理完成基础认知篇、整合管理篇。持续更新中…知识领域启动过程组规划过程组执行过程组监控过程组收尾过程组项目整合管理4.1制定项目章程4.2制定项目管理计划4.3指导和管理项目工作4.4管理项目知识4.5监控项目工作4.6实施整体变更控制4.7结束项目或阶段项目范围管理5.1规划范围管理5.
Python连接SQL SEVER数据库全流程
m0_74824865
面试 学习路线 阿里巴巴 数据库 python sql
背景介绍在数据分析领域,经常需要从数据库中获取数据进行分析和处理。而SQLServer是一种常用的关系型数据库管理系统,因此学习如何使用Python连接SQLServer数据库并获取数据是非常有用的。以下是Python使用pymssql连接SQLServer数据库的全流程:安装pymssql库本地账号设置脚本连接数据导入函数实现一、安装pymssqlpymssql是Python连接SQLServe
类和对象——static修饰类的成员
Darkwanderor
c++学习 c++
static修饰类的成员static成员1static成员的概念2特性static成员有时会有这样的需求:计算程序中创建出了多少个类的对象,以及多少个正在使用的对象。因为构造函数和析构函数都只会调用一次,所以可以通过设置生命周期和main函数一致的计数变量进行统计。计数变量用全局变量还会有别的问题:c++讲究封装,用全局变量可能会被不明因素修改。#include#includeintn,m;cla
解释SQL和NoSQL数据库的区别,各自的适用场景是什么?
破碎的天堂鸟
学习教程 nosql 数据库
SQL与NoSQL数据库的深度对比及适用场景分析一、核心定义与数据模型差异1:SQL数据库结构化数据模型:基于关系型模型,数据以表格(行和列)形式存储,表之间通过外键建立关联。例如,客户表与订单表通过客户ID关联,形成严格的逻辑结构。预定义模式(Schema):需提前定义表结构(字段类型、主键、外键等),修改结构需通过ALTER等命令,灵活性较低。标准化查询语言:使用SQL(StructuredQ
网络安全工具 AWVS 与 Nmap:原理、使用及代码示例
阿贾克斯的黎明
网络安全 安全 web安全 网络
目录网络安全工具AWVS与Nmap:原理、使用及代码示例AWVS:Web漏洞扫描的利器1.工具概述2.工作原理3.使用方法4.代码示例(Python调用AWVSAPI进行扫描)Nmap:网络探测与端口扫描的神器1.工具概述2.工作原理3.使用方法4.代码示例(Python调用Nmap进行扫描)总结在网络安全领域,AWVS(AcunetixWebVulnerabilityScanner)和Nmap是
【数组】- 如何用C++数组统计相同数字出现的次数?
小鹏编程
C++ c++ 算法
统计数字出现次数数组是C++语言重要的数据结构,对它的一些基本操作要熟练掌握。那么,今天我们就来讨论,怎么使用数组统计一组数中每个数字出现的次数?案例题目描述有50个数(0-19),求这50个数中相同数字出现的最多次数为几次?输入50个数字。样例输入110201581270315015181671716911916121712431111421114611464111318703231819216
使用 acme.sh 申请和管理 免费SSL 证书:告别 certbot 的繁琐
lihuang319
linux ssl
使用acme.sh申请和管理SSL证书:告别certbot的繁琐引言介绍SSL证书的重要性传统certbot的痛点(如live目录、复杂的配置)acme.sh的优势(轻量、灵活、自动化)一、acme.sh简介什么是acme.shacme.sh的主要特点支持多种DNS服务商自动化续期直接指定证书路径无需额外依赖二、安装acme.sh基本安装curlhttps://get.acme.sh|sh-sem
Stable diffusion 3.5本地运行环境配置记录
寸先生的牛马庄园
扩散模型 stable diffusion
1.环境配置创建虚环境condacreate-nsd3.5python=3.10Pytorch(>2.0)condainstallpytorch==2.2.2torchvision==0.17.2torchaudio==2.2.2pytorch-cuda=12.1-cpytorch-cnvidiaJupyter能使用Anaconda虚环境condainstallipykernelpython-mi
Llama.cpp 服务器安装指南(使用 Docker,GPU 专用)
田猿笔记
AI 高级应用 llama 服务器 docker llama.cpp
前置条件在开始之前,请确保你的系统满足以下要求:操作系统:Ubuntu20.04/22.04(或支持Docker的Linux系统)。硬件:NVIDIAGPU(例如RTX4090)。内存:16GB+系统内存,GPU需12GB+显存(RTX4090有24GB)。存储:15GB+可用空间(用于源码、镜像和模型文件)。网络:需要互联网连接以下载源码和依赖。软件:已安装并运行Docker。已安装NVIDIA
文心一言产品拆解调研报告
Charlues.k
AI产品经理 文心一言 ai
目录一、产品概述二、目标用户与市场定位三、核心功能分析1.功能列表2.功能使用流程3.交互体验四、用户体验评估1.用户视角1.1学习曲线1.2操作流畅度1.3用户心理预期满足程度2.情感设计2.1细节设计与用户情感体验2.2界面与交互符合用户预期3.使用场景3.1高频场景下的操作体验3.2低频或紧急场景下的操作便利性总结五、数据和技术分析1.技术架构1.1技术架构概述1.2核心功能支持与稳定性1.
从零开始:使用ArcBlock构建你自己的DID
YekForth
区块链
随着区块链技术的发展,去中心化身份(DecentralizedIdentifiers,DID)成为了数字身份管理的重要组成部分。DID提供了一种去中心化的方式来验证和管理数字身份,使得用户可以更好地掌握自己的身份信息。在本文中,我们将介绍如何使用ArcBlock构建和管理自己的DID,并提供相关的源代码示例。DID是一个唯一标识符,它与特定的实体(如个人、组织或物品)相关联。ArcBlock是一个
端口映射/内网穿透方式及问题解决:warning: remote port forwarding failed for listen port
Davide~苏
Linux 服务器 运维 内网穿透 打洞 端口映射
文章目录需求:A机器是内网机器,B机器是公网服务器,想要从公网,访问A机器的端口方式:端口映射,内网穿透,使用ssh打洞端口:遇到问题:命令执行成功,但是端口转发失败分析:目标服务器ssh配置问题解决:修改ssh配置需求:A机器是内网机器,B机器是公网服务器,想要从公网,访问A机器的端口方式:端口映射,内网穿透,使用ssh打洞端口:1:配置configvim~/.ssh/config输入Hostr
Java微服务的注册中心Nacos
铁锤学代码
微服务 java 微服务 开发语言
文章目录Nacos的主要作用Nacos实现动态配置更新的技术Nacos实现CAPNacos实现CAP原理Nacos使用Distro和Raft分别干什么用?ZAB与Raft的区别Nacos的主要作用配置中心:可以将微服务中的一些配置信息放到Nacos进行统一管理,也可以通过Nacos实现动态配置管理。也可以将不同环境的配置放在不同的Namespace下的group下,实现动态选择配置发布部署。服务注
PyTorch使用常见异常和解决办法汇总
东哥说AI
机器学习与深度学习实战 PyTorch 异常 解决办法
文章目录1.使用conda安装PyTorch后同时在Jupyter导入失败Nomodulenamed'torch'2.PyTorch使用张量时报错expectedscalartypeDoublebutfoundFloat3.PyTorch创建Embedding时报错IndexError:indexoutofrangeinself1.使用conda安装PyTorch后同时在Jupyter导入失败No
spring cloud alibaba版本对应表(2024/6/26)
翻身仗
spring cloud spring boot 中间件
毕业版本依赖关系(推荐使用)由于SpringBoot3.0,SpringBoot2.7~2.4和2.4以下版本之间变化较大,目前企业级客户老项目相关SpringBoot版本仍停留在SpringBoot2.4以下,为了同时满足存量用户和新用户不同需求,社区以SpringBoot3.0和2.4分别为分界线,同时维护2022.x、2021.x、2.2.x三个分支迭代。如果不想跨分支升级,如需使用新特性,
免费虚拟主机
天道大帝
python django pygame virtualenv scrapy
天道论坛云服务免费虚拟主机https://www.pantd.com解锁高效开发:免费虚拟主机助力你的项目腾飞在当今数字化浪潮中,无论是初出茅庐的新手开发者渴望一展身手,还是经验丰富的编程大咖想要快速验证创意,一款优质的虚拟主机都至关重要。今天,就为大家揭开一款免费虚拟主机的神秘面纱,让你轻松开启线上项目之旅。一、便捷入门,零成本启航对于刚踏入编程世界的小白来说,资金往往是开启项目的一大阻碍。这款
Spring Bean 的生命周期全过程
2401_85327573
spring java 后端
SpringBean的生命周期是指从Bean的创建到销毁的整个过程。在这个过程中,Spring容器会按照一系列固定的步骤对Bean进行初始化、配置、使用和销毁。了解SpringBean的生命周期可以帮助我们更好地理解和使用Spring框架,尤其是通过自定义生命周期行为来实现特定功能。以下是SpringBean生命周期的全过程,按阶段详细说明:---###**1.实例化(Instantiation)
ArrayList 源码分析
2401_85327573
java 开发语言
ArrayList简介ArrayList的底层是数组队列,相当于动态数组。与Java中的数组相比,它的容量能动态增长。在添加大量元素前,应用程序可以使用ensureCapacity操作来增加ArrayList实例的容量。这可以减少递增式再分配的数量。ArrayList继承于AbstractList,实现了List,RandomAccess,Cloneable,java.io.Serializabl
C语言——转义字符
糙米薏仁汤女士
c语言 开发语言
转义字符,顾名思义,就是转变原来字符的意思\?在书写连续多个问号时使用,防止他们被解析成三字母词\'用于表示字符常量'\"用于表示一个字符串内部的双引号\\用于表示一个反斜杠,防止它被解释为一个转义序列符\a警告字符,触发电脑的蜂鸣\b退格符\f进纸符\n换行\r回车\t水平制表符\v垂直制表符\dddddd表示1~3个八进制的数字。如:\130X(八进制的130转化为十进制—88,所对应的ASC
javaweb文件上传:@MultipartConfig注解与Apache Commons FileUpload对比
yuren_xia
后端技术 apache java tomcat
在JavaWeb应用中处理文件上传时,可以选择使用@MultipartConfig注解或第三方库如ApacheCommonsFileUpload(通常简称为fileupload)。以下是两者的比较和建议:使用@MultipartConfig注解简介:@MultipartConfig是JavaServlet规范中用于处理multipart/form-data请求(通常是文件上传)的注解。它简化了在S
pytorch基础-比较矩阵是否相等
yuweififi
pytorch 人工智能
1、使用NumPy库NumPy是Python中用于科学计算的常用库,它提供了array_equal和allclose函数来判断矩阵是否相等。array_equal用于精确比较,allclose用于考虑一定误差范围的近似比较,适合浮点数矩阵。importnumpyasnp#创建示例矩阵matrix_a=np.array([[1,2,3],[4,5,6]])matrix_b=np.array([[1,
Exception:data did not match any variant of untagged enum PyPreTokenizerTypeWrapper at line 69 解决方案
爱编程的喵喵
Python基础课程 python tokenizer PyPreTokenizer 解决方案
大家好,我是爱编程的喵喵。双985硕士毕业,现担任全栈工程师一职,热衷于将数据思维应用到工作与生活中。从事机器学习以及相关的前后端开发工作。曾在阿里云、科大讯飞、CCF等比赛获得多次Top名次。现为CSDN博客专家、人工智能领域优质创作者。喜欢通过博客创作的方式对所学的知识进行总结与归纳,不仅形成深入且独到的理解,而且能够帮助新手快速入门。 本文主要介绍了Exception:datadidn
一学就会:A*算法详细介绍(Python)
不去幼儿园
人工智能(AI) # 启发式算法 算法 python 人工智能 机器学习 开发语言
本篇文章是博主人工智能学习以及算法研究时,用于个人学习、研究或者欣赏使用,并基于博主对相关等领域的一些理解而记录的学习摘录和笔记,若有不当和侵权之处,指出后将会立即改正,还望谅解。文章分类在启发式算法专栏:【人工智能】-【启发式算法】(6)---《一学就会:A*算法详细介绍(Python)》一学就会:A*算法详细介绍(Python)目录A*算法介绍A*算法的核心概念A*算法的特点A*算法示例:迷宫
C++游戏开发系列教程之第二篇:面向对象编程与游戏架构设计
放氮气的蜗牛
深度博客 游戏
大家好,欢迎回到C++游戏开发系列教程!在第一篇中,我们介绍了C++游戏开发的基本概念和如何搭建一个简单的游戏循环,为新手打开了C++游戏开发的大门。本篇博客将深入讲解面向对象编程(OOP)在游戏开发中的重要性,以及如何设计一个简单而有效的游戏架构。通过本篇文章,你将学到如何利用C++的类与继承构建游戏中的各个对象(如玩家、敌人等),并结合游戏循环实现一个基础的游戏状态管理系统。所有代码均附有详细
jquery实现的jsonp掉java后台
知了ing
java jsonp jquery
什么是JSONP?
先说说JSONP是怎么产生的:
其实网上关于JSONP的讲解有很多,但却千篇一律,而且云里雾里,对于很多刚接触的人来讲理解起来有些困难,小可不才,试着用自己的方式来阐释一下这个问题,看看是否有帮助。
1、一个众所周知的问题,Ajax直接请求普通文件存在跨域无权限访问的问题,甭管你是静态页面、动态网页、web服务、WCF,只要是跨域请求,一律不准;
2、
Struts2学习笔记
caoyong
struts2
SSH : Spring + Struts2 + Hibernate
三层架构(表示层,业务逻辑层,数据访问层) MVC模式 (Model View Controller)
分层原则:单向依赖,接口耦合
1、Struts2 = Struts + Webwork
2、搭建struts2开发环境
a>、到www.apac
SpringMVC学习之后台往前台传值方法
满城风雨近重阳
springMVC
springMVC控制器往前台传值的方法有以下几种:
1.ModelAndView
通过往ModelAndView中存放viewName:目标地址和attribute参数来实现传参:
ModelAndView mv=new ModelAndView();
mv.setViewName="success
WebService存在的必要性?
一炮送你回车库
webservice
做Java的经常在选择Webservice框架上徘徊很久,Axis Xfire Axis2 CXF ,他们只有一个功能,发布HTTP服务然后用XML做数据传输。
是的,他们就做了两个功能,发布一个http服务让客户端或者浏览器连接,接收xml参数并发送xml结果。
当在不同的平台间传输数据时,就需要一个都能解析的数据格式。
但是为什么要使用xml呢?不能使json或者其他通用数据
js年份下拉框
3213213333332132
java web ee
<div id="divValue">test...</div>测试
//年份
<select id="year"></select>
<script type="text/javascript">
window.onload =
简单链式调用的实现技术
归来朝歌
方法调用 链式反应 编程思想
在编程中,我们可以经常遇到这样一种场景:一个实例不断调用它自身的方法,像一条链条一样进行调用
这样的调用你可能在Ajax中,在页面中添加标签:
$("<p>").append($("<span>").text(list[i].name)).appendTo("#result");
也可能在HQ
JAVA调用.net 发布的webservice 接口
darkranger
webservice
/**
* @Title: callInvoke
* @Description: TODO(调用接口公共方法)
* @param @param url 地址
* @param @param method 方法
* @param @param pama 参数
* @param @return
* @param @throws BusinessException
Javascript模糊查找 | 第一章 循环不能不重视。
aijuans
Way
最近受我的朋友委托用js+HTML做一个像手册一样的程序,里面要有可展开的大纲,模糊查找等功能。我这个人说实在的懒,本来是不愿意的,但想起了父亲以前教我要给朋友搞好关系,再加上这也可以巩固自己的js技术,于是就开始开发这个程序,没想到却出了点小问题,我做的查找只能绝对查找。具体的js代码如下:
function search(){
var arr=new Array("my
狼和羊,该怎么抉择
atongyeye
工作
狼和羊,该怎么抉择
在做一个链家的小项目,只有我和另外一个同事两个人负责,各负责一部分接口,我的接口写完,并全部测联调试通过。所以工作就剩下一下细枝末节的,工作就轻松很多。每天会帮另一个同事测试一些功能点,协助他完成一些业务型不强的工作。
今天早上到公司没多久,领导就在QQ上给我发信息,让我多协助同事测试,让我积极主动些,有点责任心等等,我听了这话,心里面立马凉半截,首先一个领导轻易说
读取android系统的联系人拨号
百合不是茶
android sqlite数据库 内容提供者 系统服务的使用
联系人的姓名和号码是保存在不同的表中,不要一下子把号码查询来,我开始就是把姓名和电话同时查询出来的,导致系统非常的慢
关键代码:
1, 使用javabean操作存储读取到的数据
package com.example.bean;
/**
*
* @author Admini
ORACLE自定义异常
bijian1013
数据库 自定义异常
实例:
CREATE OR REPLACE PROCEDURE test_Exception
(
ParameterA IN varchar2,
ParameterB IN varchar2,
ErrorCode OUT varchar2 --返回值,错误编码
)
AS
/*以下是一些变量的定义*/
V1 NUMBER;
V2 nvarc
查看端号使用情况
征客丶
windows
一、查看端口
在windows命令行窗口下执行:
>netstat -aon|findstr "8080"
显示结果:
TCP 127.0.0.1:80 0.0.0.0:0 &
【Spark二十】运行Spark Streaming的NetworkWordCount实例
bit1129
wordcount
Spark Streaming简介
NetworkWordCount代码
/*
* Licensed to the Apache Software Foundation (ASF) under one or more
* contributor license agreements. See the NOTICE file distributed with
Struts2 与 SpringMVC的比较
BlueSkator
struts2 spring mvc
1. 机制:spring mvc的入口是servlet,而struts2是filter,这样就导致了二者的机制不同。 2. 性能:spring会稍微比struts快。spring mvc是基于方法的设计,而sturts是基于类,每次发一次请求都会实例一个action,每个action都会被注入属性,而spring基于方法,粒度更细,但要小心把握像在servlet控制数据一样。spring
Hibernate在更新时,是可以不用session的update方法的(转帖)
BreakingBad
Hibernate update
地址:http://blog.csdn.net/plpblue/article/details/9304459
public void synDevNameWithItil()
{Session session = null;Transaction tr = null;try{session = HibernateUtil.getSession();tr = session.beginTran
读《研磨设计模式》-代码笔记-观察者模式
bylijinnan
java 设计模式
声明: 本文只为方便我个人查阅和理解,详细的分析以及源代码请移步 原作者的博客http://chjavach.iteye.com/
import java.util.ArrayList;
import java.util.List;
import java.util.Observable;
import java.util.Observer;
/**
* “观
重置MySQL密码
chenhbc
mysql 重置密码 忘记密码
如果你也像我这么健忘,把MySQL的密码搞忘记了,经过下面几个步骤就可以重置了(以Windows为例,Linux/Unix类似):
1、关闭MySQL服务
2、打开CMD,进入MySQL安装目录的bin目录下,以跳过权限检查的方式启动MySQL
mysqld --skip-grant-tables
3、新开一个CMD窗口,进入MySQL
mysql -uroot
再谈系统论,控制论和信息论
comsci
设计模式 生物 能源 企业应用 领域模型
再谈系统论,控制论和信息论
偶然看
oracle moving window size与 AWR retention period关系
daizj
oracle
转自: http://tomszrp.itpub.net/post/11835/494147
晚上在做11gR1的一个awrrpt报告时,顺便想调整一下AWR snapshot的保留时间,结果遇到了ORA-13541这样的错误.下面是这个问题的发生和解决过程.
SQL> select * from v$version;
BANNER
-------------------
Python版B树
dieslrae
python
话说以前的树都用java写的,最近发现python有点生疏了,于是用python写了个B树实现,B树在索引领域用得还是蛮多了,如果没记错mysql的默认索引好像就是B树...
首先是数据实体对象,很简单,只存放key,value
class Entity(object):
'''数据实体'''
def __init__(self,key,value)
C语言冒泡排序
dcj3sjt126com
算法
代码示例:
# include <stdio.h>
//冒泡排序
void sort(int * a, int len)
{
int i, j, t;
for (i=0; i<len-1; i++)
{
for (j=0; j<len-1-i; j++)
{
if (a[j] > a[j+1]) // >表示升序
自定义导航栏样式
dcj3sjt126com
自定义
-(void)setupAppAppearance
{
[[UILabel appearance] setFont:[UIFont fontWithName:@"FZLTHK—GBK1-0" size:20]];
[UIButton appearance].titleLabel.font =[UIFont fontWithName:@"FZLTH
11.性能优化-优化-JVM参数总结
frank1234
jvm参数 性能优化
1.堆
-Xms --初始堆大小
-Xmx --最大堆大小
-Xmn --新生代大小
-Xss --线程栈大小
-XX:PermSize --永久代初始大小
-XX:MaxPermSize --永久代最大值
-XX:SurvivorRatio --新生代和suvivor比例,默认为8
-XX:TargetSurvivorRatio --survivor可使用
nginx日志分割 for linux
HarborChung
nginx linux 脚本
nginx日志分割 for linux 默认情况下,nginx是不分割访问日志的,久而久之,网站的日志文件将会越来越大,占用空间不说,如果有问题要查看网站的日志的话,庞大的文件也将很难打开,于是便有了下面的脚本 使用方法,先将以下脚本保存为 cutlog.sh,放在/root 目录下,然后给予此脚本执行的权限
复制代码代码如下:
chmo
Spring4新特性——泛型限定式依赖注入
jinnianshilongnian
spring spring4 泛型式依赖注入
Spring4新特性——泛型限定式依赖注入
Spring4新特性——核心容器的其他改进
Spring4新特性——Web开发的增强
Spring4新特性——集成Bean Validation 1.1(JSR-349)到SpringMVC
Spring4新特性——Groovy Bean定义DSL
Spring4新特性——更好的Java泛型操作API
Spring4新
centOS安装GCC和G++
liuxihope
centos gcc
Centos支持yum安装,安装软件一般格式为yum install .......,注意安装时要先成为root用户。
按照这个思路,我想安装过程如下:
安装gcc:yum install gcc
安装g++: yum install g++
实际操作过程发现,只能有gcc安装成功,而g++安装失败,提示g++ command not found。上网查了一下,正确安装应该
第13章 Ajax进阶(上)
onestopweb
Ajax
index.html
<!DOCTYPE html PUBLIC "-//W3C//DTD XHTML 1.0 Transitional//EN" "http://www.w3.org/TR/xhtml1/DTD/xhtml1-transitional.dtd">
<html xmlns="http://www.w3.org/
How to determine BusinessObjects service pack and fix pack
blueoxygen
BO
http://bukhantsov.org/2011/08/how-to-determine-businessobjects-service-pack-and-fix-pack/
The table below is helpful. Reference
BOE XI 3.x
12.0.0.
y BOE XI 3.0 12.0.
x.
y BO
Oracle里的自增字段设置
tomcat_oracle
oracle
大家都知道吧,这很坑,尤其是用惯了mysql里的自增字段设置,结果oracle里面没有的。oh,no 我用的是12c版本的,它有一个新特性,可以这样设置自增序列,在创建表是,把id设置为自增序列
create table t
(
id number generated by default as identity (start with 1 increment b
Spring Security(01)——初体验
yang_winnie
spring Security
Spring Security(01)——初体验
博客分类: spring Security
Spring Security入门安全认证
首先我们为Spring Security专门建立一个Spring的配置文件,该文件就专门用来作为Spring Security的配置


