承接上文iOS设计模式二(适配器,桥接,外观)
本文为去耦合--获取源码
目录
1.中介者模式
2.观察者模式
1.中介者模式
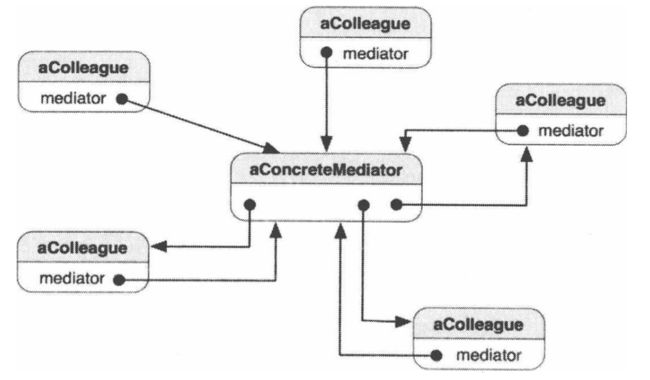
中介者模式用一个中介者,定义一个集中的场所,使对象间的交互可以在这个场所内集中处理,其他对象可以互相交互而不必彼此依赖,达到解耦的目的
飞机,汽车通过一个GPS控制台互相知晓位置的例子:
(OSZ为oldSixZhu缩写)
首先,我们需要飞机,这里定义一个飞机基类就可以了.
OSZPlane.h:
#import
#import "OSZMediatorManager.h"
@interface OSZPlane : NSObject
//名字
@property (nonatomic, copy) NSString *name;
//位置
@property (nonatomic, assign) CGPoint location;
//中介者
@property (nonatomic, strong) OSZMediatorManager *mediator;

//告诉控制台(中介者)自己的位置
- (void)sendSelfLocation;
//从控制台(中介者)知道别人的位置
- (void)getOtherLocation:(id)plane;
@end
OSZPlane.m:
#import "OSZPlane.h"
@implementation OSZPlane
- (void)sendSelfLocation
{
    [self.mediator getObjLocation:self];
}
- (void)getOtherLocation:(id)plane
{
    NSString *location = [self.mediator sendObjLocation:plane];
    NSLog(@"位置为%@",location);
}
@end
再定义三个子类,OSZPlaneA,OSZPlaneB,OSZPlaneC,
都可以重写或者重载基类的方法,加一些特有的逻辑,这个例子里就不动了
还需要一个地勤车,也可以是基类,方法与飞机方法相同即可
OSZSignalCar.h:
#import
#import "OSZMediatorManager.h"
@interface OSZSignalCar : NSObject
//名字
@property (nonatomic, copy) NSString *name;
//位置
@property (nonatomic, assign) CGPoint location;
//中介者
@property (nonatomic, strong) OSZMediatorManager *mediator;

//告诉控制台(中介者)自己的位置
- (void)sendSelfLocation;
//从控制台(中介者)知道别人的位置
- (void)getOtherLocation:(id)car;
@end
OSZSignalCar.m:
#import "OSZSignalCar.h"
@implementation OSZSignalCar
- (void)sendSelfLocation
{
    [self.mediator getObjLocation:self];
}
- (void)getOtherLocation:(id)car
{
    NSString *location = [self.mediator sendObjLocation:car];
    NSLog(@"位置为%@",location);
}
@end
也可以创建几个子类,更好地扩展,这个例子就不做了
接下来是中介者(mediator):
OSZMediatorManager.h:
#import
#import "singleton.h"

//#import "OSZPlaneA.h"
//#import "OSZPlaneB.h"
//#import "OSZPlaneC.h"
@class OSZPlaneA;
@class OSZPlaneB;
@class OSZPlaneC;
@class OSZSignalCar;

@interface OSZMediatorManager : NSObject

//存储各飞机位置信息
@property (nonatomic, strong) OSZPlaneA *planeA;
@property (nonatomic, strong) OSZPlaneB *planeB;
@property (nonatomic, strong) OSZPlaneC *planeC;
@property (nonatomic, strong) OSZSignalCar *car;

//接收plane位置信息
- (void)getObjLocation:(id)obj;

//发送plane位置信息
- (NSString *)sendObjLocation:(id)obj;

////直接返回飞机的全部信息
//- (id)sendPlane:(id)plane;

//保证只有一个中介者(见iOS设计模式一单例模式宏)
singleton_h(OSZMediatorManager)

@end
OSZMediatorManager.m:
#import "OSZMediatorManager.h"
#import "OSZPlaneA.h"
#import "OSZPlaneB.h"
#import "OSZPlaneC.h"
#import "OSZSignalCar.h"
@implementation OSZMediatorManager
//单例模式宏
singleton_m(OSZMediatorManager)

- (void)getObjLocation:(id)obj
{
    if ([obj isKindOfClass:[OSZPlaneA class]])
    {
        self.planeA = obj;
    }
    else if ([obj isKindOfClass:[OSZPlaneB class]])
    {
        self.planeB = obj;
    }
    else if ([obj isKindOfClass:[OSZPlaneC class]])
    {
        self.planeC = obj;
    }
    else if ([obj isKindOfClass:[OSZSignalCar class]])
    {
        self.car = obj;
    }
    else
    {
        NSLog(@"不是管辖范围内的飞机");
    }
}

//可以选择有返回值的方法
- (NSString *)sendObjLocation:(id)obj
{
    if ([obj isKindOfClass:[OSZPlaneA class]])
    {
        NSString *location = NSStringFromCGPoint(self.planeA.location);
        return location;
    }
    else if ([obj isKindOfClass:[OSZPlaneB class]])
    {
        NSString *location = NSStringFromCGPoint(self.planeB.location);
        return location;
    }
    else if ([obj isKindOfClass:[OSZPlaneC class]])
    {
        NSString *location = NSStringFromCGPoint(self.planeC.location);
        return location;
    }
    else if ([obj isKindOfClass:[OSZSignalCar class]])
    {
        NSString *location = NSStringFromCGPoint(self.car.location);
        return location;
    }
    else
    {
        NSLog(@"不是管辖范围内的飞机");
        return 0;
    }
}
@end
控制器OSZSixVC.m:
#import "OSZSixVC.h"
#import "OSZMediatorManager.h"
#import "OSZPlaneA.h"
#import "OSZPlaneB.h"
#import "OSZPlaneC.h"
#import "OSZSignalCar.h"

@interface OSZSixVC ()

@end

@implementation OSZSixVC

- (void)viewDidLoad
{
    [super viewDidLoad];

    self.view.backgroundColor = [UIColor redColor];
    OSZMediatorManager *mediator = [[OSZMediatorManager alloc]init];

    OSZPlaneA *a = [[OSZPlaneA alloc]init];
    a.name = @"飞机a";
    a.location = CGPointMake(100, 100);
    a.mediator = mediator;

    OSZPlaneB *b = [[OSZPlaneB alloc]init];
    b.name = @"飞机b";
    b.location = CGPointMake(200, 200);
    b.mediator = mediator;

    OSZPlaneC *c = [[OSZPlaneC alloc]init];
    c.name = @"飞机c";
    c.location = CGPointMake(300, 300);
    c.mediator = mediator;

    //三者通过把自身的信息发送给中介者,
    //达到了互相联系但不互相引入头文件
    //若是互相引入头文件会越来越乱,方法也会重复
    //但是把处理逻辑都集中在了中介者身上,中介者就会变得复杂
    [a sendSelfLocation];
    [b sendSelfLocation];
    [c sendSelfLocation];

    [a getOtherLocation:b];//位置为{200, 200}
    [a getOtherLocation:c];//位置为{300, 300}

    [b getOtherLocation:a];//位置为{100, 100}
    [b getOtherLocation:c];//位置为{300, 300}

    [c getOtherLocation:a];//位置为{100, 100}
    [c getOtherLocation:b];//位置为{200, 200}

    //当我们继续扩展,加一个地勤信号车与三个飞机通讯的时候
    //只需要在中介者中改改就好了,很方便
    //扩展性很好
    OSZSignalCar *car = [[OSZSignalCar alloc]init];
    car.name = @"飞机b";
    car.location = CGPointMake(200, 200);
    car.mediator = mediator;

    [car sendSelfLocation];
    [car getOtherLocation:a];//位置为{100, 100}
    [car getOtherLocation:b];//位置为{200, 200}
    [car getOtherLocation:c];//位置为{300, 300}
}
@end
我们看到,方法的整体是一个中型的if-else语句块,如果是巨型的switch-case或者if-else就应该考虑使用别的算法,如策略模式,接下来我会更新.
因此酌情使用吧
扩展:
Mediator(中介者)模式在iOS开发当中的使用
iOS 设计模式 - 中介者模式
iOS设计模式之中介者模式
iOS设计模式——中介者模式
2 观察者模式
观察者模式也叫做发布-订阅模式,可以用通知和KVO(Key Value Observing)两种方法来实现.
通知的使用就不多说了,典型的一对多时使用,当然,一对一使用也可以.
- (void)postNotification{
    NSNotification *notification = [NSNotification notificationWithName:@"nslog" object:self];
    NSNotificationCenter *center = [NSNotificationCenter defaultCenter];
    [center addObserver:self selector:@selector(nslog) name:@"nslog" object:self];
    [center postNotification:notification];
}

- (void)nslog{
    NSLog(@"通知触发调用的方法");
}
一个很常见的KVO监听tableView滚动,改变头视图透明度的例子:
控制器OSZSevenVC.m:
#import "OSZSevenVC.h"
@interface OSZSevenVC ()
@property (weak , nonatomic)UITableView *userVCTableView;
@property (weak , nonatomic)UIView      *alphaView;
@end

@implementation OSZSevenVC
- (void)viewDidLoad
 {
    [super viewDidLoad];
    [self setupUI];
    /* tableViewController 观察 tableView 的 contentOffset */
    [self.userVCTableView addObserver:self forKeyPath:@"contentOffset" options:NSKeyValueObservingOptionOld|NSKeyValueObservingOptionNew context:@"JDUserVCContext"];
}
//不移除会崩溃
-(void)dealloc
{
    [self.userVCTableView removeObserver:self forKeyPath:@"contentOffset" context:@"JDUserVCContext"];
}
-(void)setupUI
{
    UITableView *tableView = [[UITableView alloc]initWithFrame:CGRectMake(0, 0, kScreenWidth, kScreenHeight)];
    //保存tableview
    self.userVCTableView = tableView;
    self.userVCTableView.delegate = self;
    [self.view addSubview:self.userVCTableView];

    //头视图
    UIView *barView = [[UIView alloc]initWithFrame:CGRectMake(0, 0, kScreenWidth, 64)];
    barView.backgroundColor = [UIColor clearColor];
    [self.view addSubview:barView];

    UIView *alphaView = [[UIView alloc]initWithFrame:barView.frame];
    alphaView.backgroundColor = [UIColor blueColor];
    alphaView.alpha = 0;
    self.alphaView = alphaView;
    [barView addSubview:alphaView];
}

//当观察者的观察对象的属性一发生变化时, 就调用这个方法
- (void)observeValueForKeyPath:(NSString *)keyPath ofObject:(id)object change:(NSDictionary *)change context:(void *)context
{
    if ([object isEqual:self.userVCTableView] && [keyPath isEqualToString:@"contentOffset"])
    {
        CGPoint offset = self.userVCTableView.contentOffset;
        /* 那么我先算出头视图的高度 */
        CGFloat cycleScrollViewHeight = kScreenWidth * 120 / 300;
        /* 用 offset 值比上头视图的高度,那么,当轮播滚动范围的 y 值等于轮播图的高度时, navigationBar 就完全不透明了 */
        CGFloat alpha = MIN(1, fabs(offset.y / cycleScrollViewHeight));
        /* 设置实时透明度 */
        self.alphaView.alpha = alpha;
    }
}
@end


