Phoenix默认的打包工具是Brunch,然而,目前最主流的打包工具肯定要属Webpack了,Vue官方也支持Webpack作为工具,我们来看一下如何把Phoenix,Vue,Webpack三者结合起来。
Vue CLI
首先我们看一下vue project的默认结构是怎么样的。
$ npm install -g vue-cli
安装vue-cli,vue项目模板生成工具。
它的使用方式是:
$ vue init
这里的template-name主要有以下五种:
- webpack - A full-featured Webpack + vue-loader setup with hot reload, linting, testing & css extraction.
- webpack-simple - A simple Webpack + vue-loader setup for quick prototyping.
- browserify - A full-featured Browserify + vueify setup with hot-reload, linting & unit testing.
- browserify-simple - A simple Browserify + vueify setup for quick prototyping.
- simple - The simplest possible Vue setup in a single HTML file
这里我们主要看一下Webpack-Simple和Webpack这两个模板。其中Webpack模板包含的东西最为全面,涵盖了开发环境、测试环境、生产环境的配置以及完整的项目结构,我们以它为例。
Vue Webpack
首先看一下Vue Webpack模板的目录结构:
.
├── build/                      # webpack config files
│   └── ...
├── config/
│   ├── index.js                # main project config
│   └── ...
├── src/
│   ├── main.js                 # app entry file
│   ├── App.vue                 # main app component
│   ├── components/             # ui components
│   │   └── ...
│   └── assets/                 # module assets (processed by webpack)
│       └── ...
├── static/                     # pure static assets (directly copied)
├── test/
│   └── unit/                   # unit tests
│   │   ├── specs/              # test spec files
│   │   ├── index.js            # test build entry file
│   │   └── karma.conf.js       # test runner config file
│   └── e2e/                    # e2e tests
│   │   ├── specs/              # test spec files
│   │   ├── custom-assertions/  # custom assertions for e2e tests
│   │   ├── runner.js           # test runner script
│   │   └── nightwatch.conf.js  # test runner config file
├── .babelrc                    # babel config
├── .editorconfig.js            # editor config
├── .eslintrc.js                # eslint config
├── index.html                  # index.html template
└── package.json                # build scripts and dependencies
参照项目中的Integrating with Backend Framework这篇文档,我们来看一下如何与后端框架结合。
如果你构建的是纯静态Vue应用,即不和后端API一起部署,那么你不需要修改config/index.js。如果你要将Vue应用和其他后端框架一起使用,如Rails/Django/Laravel或是我们这里的Phoenix,那么你需要编辑config/index.js来为你后端项目直接生成前端资源。
默认的config/index.js如下:
var path = require('path')

module.exports = {
  build: {
    index: path.resolve(__dirname, 'dist/index.html'),
    assetsRoot: path.resolve(__dirname, 'dist'),
    assetsSubDirectory: 'static',
    assetsPublicPath: '/',
    productionSourceMap: true
  },
  dev: {
    port: 8080,
    proxyTable: {}
  }
}
Phoenix
这里我们使用Webpack,所以在生成新项目时不使用Brunch。
$ mix phoenix.new --no-brunch pxvue
* creating pxvue/config/config.exs
...
* creating pxvue/web/views/page_view.ex

Fetch and install dependencies? [Yn] y
* running mix deps.get

We are all set! Run your Phoenix application:

    $ cd pxvue
    $ mix phoenix.server

You can also run your app inside IEx (Interactive Elixir) as:

    $ iex -S mix phoenix.server

Before moving on, configure your database in config/dev.exs and run:

    $ mix ecto.create
然后我们在phoenix的目录中使用vue-cli生成项目模板,这里首先使用mix phoenix.new生成项目再使用vue init生成项目的原因是前者不能在已有目录创建,后者考虑到和后端项目结合,能够在已有目录创建。
$ vue init webpack pxvue

? Target directory exists. Continue? Yes
? Project name pxvue
? Project description A Vue.js project
? Author loongmxbt
? Use ESLint to lint your code? Yes
? Pick an ESLint preset Standard
? Setup unit tests with Karma + Mocha? Yes
? Setup e2e tests with Nightwatch? Yes

   vue-cli · Generated "pxvue".

   To get started:

     cd
     npm install
     npm run dev

   Documentation can be found at https://vuejs-templates.github.io/webpack
我们来看一下现在主要有哪些文件夹:
.
├── _build
│   └── dev
│       └── lib
│           └── pxvue
├── build
├── config
├── deps
│   ├── connection
│   ├── cowboy
│   ├── cowlib
│   ├── db_connection
│   ├── decimal
│   ├── ecto
│   ├── fs
│   ├── gettext
│   ├── phoenix
│   ├── phoenix_ecto
│   ├── phoenix_html
│   ├── phoenix_live_reload
│   ├── plug
│   ├── poison
│   ├── poolboy
│   ├── postgrex
│   └── ranch
├── lib
│   └── pxvue
├── priv
│   ├── gettext
│   │   └── en
│   ├── repo
│   │   └── migrations
│   └── static
│       ├── css
│       ├── images
│       └── js
├── src
│   ├── assets
│   └── components
├── static
├── test
│   ├── channels
│   ├── controllers
│   ├── e2e
│   │   ├── custom-assertions
│   │   └── specs
│   ├── models
│   ├── support
│   ├── unit
│   │   └── specs
│   └── views
└── web
    ├── channels
    ├── controllers
    ├── models
    ├── static
    │   └── vendor
    ├── templates
    │   ├── layout
    │   └── page
    └── views
可以看到,主要的文件夹其实差不多,有的已经自动合并了内容,如config和test,但是,里面也有不太协调的部分,主要有这几个:
-
build(vue)和_build(phoenix),一个存放webpack配置文件,一个则是phoenix项目编译后的文件。 -
static(vue)和web/static(phoenix)和priv/static(phoenix),均是存放静态资源文件。 -
src(vue)和web(phoenix)两者一个为前端代码,存放ui组件和资源,一个为后端代码,存放mvc相关代码。
这里我们如果需要修改build文件夹,比方说把它重命名为webpack,需要修改许多文件内容,其中包括了package.json,karma.conf.js,e2e/runner.js,webpack.dev.conf.js里面的build/均改为webpack/。
然后我们把config/dev.exs中对watchers进行修改。
watchers: [node: ["webpack/dev-server.js"]]
这里主要遇到的问题有两个:
- 这里webpack template运行的dev-server基于express之上
- Ctrl+C关闭Phoenix服务器时node进程没有退出,这是webpack的bug,需要添加flag
--watch-stdin解决。
好了,现在从Hard模式积累了经验,重新回到Webpack-Simple模板再战!毕竟Webpack的模板比Webpack Simple的复杂太多,改起来也不方便是不。
Vue Webpack Simple
看一下Webpack Simple的目录结构,简洁明了。
.
├── README.md
├── index.html
├── package.json
├── src
│   ├── App.vue
│   └── main.js
└── webpack.config.js
我们将webpack.conf.js中的output修改为:
  output: {
    path: './priv/static/js',
    filename: 'app.js'
  },
将dev.exs中的watchers修改为:
watchers: [node: ["node_modules/webpack/bin/webpack.js", "--watch-stdin", "--colors", "--progress"]]
现在,直接运行mix phoenix.server看到的会是Phoenix的默认主页,我们需要修改layout模板和index模板,来注入vue的内容。
将app.html.eex中的body修改为:
<%= render @view_module, @view_template, assigns %>
将index.html.eex修改为:
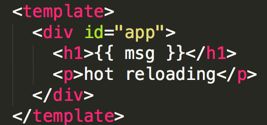
修改App.vue中的template测试hot reloading:
可以看到:
至此,一个简单的Phoenix+Vue+Webpack 热重载模板就构建成功了。
关于 webpack-dev-server
Webpack-dev-server十分小巧,这里的作用是用来伺服资源文件,不能替代后端的服务器,因此如果你还要进行后端开发,就要采用双服务器模式:一个后端服务器和一个资源服务器(即Webpack-dev-server)。
[1] Webpack-dev-server结合后端服务器的热替换配置
[2] WEBPACK DEV SERVER
关于Phoenix和webpack-dev-server在后续文章中实践。
模板地址
- https://github.com/loongmxbt/pxvue
扩展阅读
- Phoenix+Vue+Webpack 热重载模板
- Automatically Building Your Phoenix Assets With Webpack
- Phoenix and Vue.js(Brunch)

