服务器环境由被破坏了,又重新装下tensorflow
1)miniconda安装后不能使用conda 命令,此时需要将执行路径导入环境变量:
echo 'export PATH="/home/xwl/miniconda3/bin:$PATH"' >> ~/.bashrc
source ~/.bashrc
2)创建一个新的虚拟环境,方法是选择 Python 解析器并创建一个 ./tf目录来存放它:
conda create -n tf pip python=3.6
顺便激活环境 source activate tf 或者 conda activate tf
失活命令 // conda deactivate 或者source deactivate
3)在虚拟环境中tensorflow安装
pip install --upgrade tensorflow-gpu -i https://pypi.mirrors.ustc.edu.cn/simple/
4)lsb_release -a
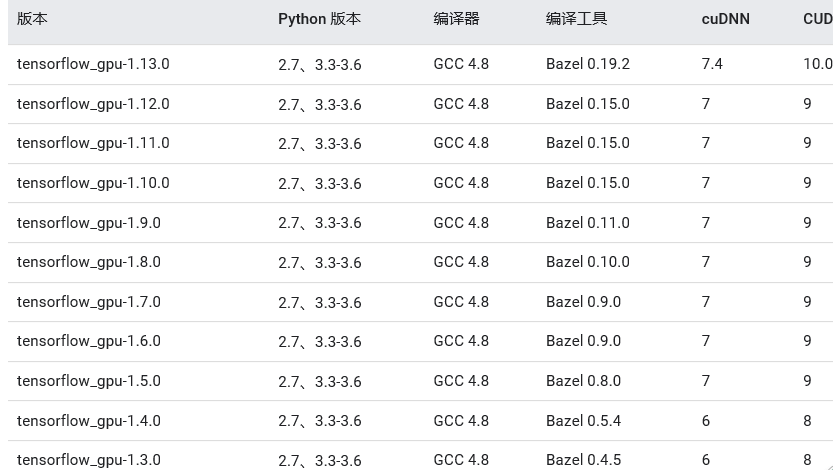
5)
Latest TensorFlow supports cuda 8-10. cudnn 6-7.
Each TensorFlow binary has to work with the version of cuda and cudnn it was built with. If they don't match, you have to change either the TensorFlow binary or the Nvidia softwares.
Official tensorflow-gpu binaries (the one downloaded by pip or conda) are built with cuda 9.0, cudnn 7 since TF 1.5, and cuda 10.0, cudnn 7 since TF 1.13. These are written in the release notes. You have to use the matching version of cuda if using the official binaries.
If you don't like to change your Nvidia software, you can:
(1) Use a different version of TensorFlow
(2) Use non-official binaries built by others. e.g.: https://github.com/mind/wheels/releases, https://github.com/hadim/docker-tensorflow-builder#builds,
https://github.com/inoryy/tensorflow-optimized-wheels
(3) Build the binaries by yourself from source with your version of Nvidia software.
6)镜像地址
阿里云 http://mirrors.aliyun.com/pypi/simple/
中国科技大学 https://pypi.mirrors.ustc.edu.cn/simple/
豆瓣(douban) http://pypi.douban.com/simple/
清华大学 https://pypi.tuna.tsinghua.edu.cn/simple/
中国科学技术大学 http://pypi.mirrors.ustc.edu.cn/simple/
使用:pip install tensorflow-gpu==1.12.0 -i http://pypi.douban.com/simple
7)
https://tensorflow.google.cn/install/source
8) pip install opencv-python