简介
Retrofit是Square开发的一个Android和Java的REST客户端库。这个库非常简单并且具有很多特性,相比其他的网络库,更容易让初学者快速掌握。它可以处理GET、POST、PUT、DELETE...等请求,还可以使用picasso加载图片。
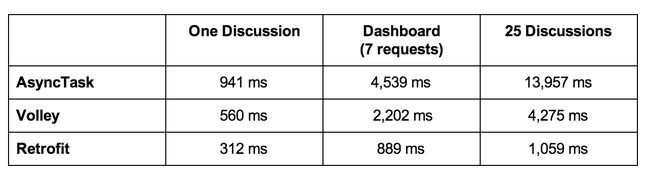
为什么要使用retrofit,看一下下面一张图就明了了。
实现步骤
1、添加Retrofit库到项目中
MAVEN
  com.squareup.retrofit2
  retrofit
  2.0.0-beta3
或者Gradle
compile 'com.squareup.retrofit2:retrofit:2.0.0-beta3'
2、添加网络权限
3、实例化Retrofit
Retrofit retrofit = new Retrofit.Builder() .baseUrl(HttpUtil.URL_BASE) .build();
baseUrl里面的一般都放基本的链接
在Retrofit 2.0中,OkHttp 是必须的,并且自动设置为了依赖,OkHttp已经自动被用作HTTP 接口。下面的代码是从Retrofit 2.0的pom文件中抓取的。你不需要再做任何事情了。
3.0.0


        com.squareup.okhttp3
        okhttp
        ${okhttp.version}
4、设置解析库
在Retrofit 2.0中,Converter 不再包含在package 中了。你需要自己插入一个Converter, 不然的话Retrofit 只能接收字符串结果。同样的,Retrofit 2.0也不再依赖于Gson 。如果你想接收json 结果并解析成DAO,你必须把Gson Converter 作为一个独立的依赖添加进来。
compile 'com.squareup.retrofit2:converter-gson:2.0.0-beta3'
然后使用addConverterFactory把它添加进来。注意RestAdapter的别名仍然为Retrofit。
        Retrofit retrofit = new Retrofit.Builder()
                .baseUrl(HttpUtil.URL_BASE)
                .addConverterFactory(GsonConverterFactory.create())
                .build();
注意:
如果你不需要解析json,只要字符串,那就不需要使用addConverterFactory。
当然,Retrofit 2 现在支持许多种解析方式来解析响应数据,如下:
Gson: com.squareup.retrofit2:converter-gson
Jackson: com.squareup.retrofit2:converter-jackson
Moshi: com.squareup.retrofit2:converter-moshi
Protobuf: com.squareup.retrofit2:converter-protobuf
Wire: com.squareup.retrofit2:converter-wire
Simple XML: com.squareup.retrofit2:converter-simplexml
Scalars (primitives, boxed, and String): com.squareup.retrofit2:converter-scalars
5、service接口
public interface APIService {
@GET("getForumNoteListV1.0.php")
Call>> loadForumNoteList(@Query("plateItemID") String plateItemID,@Query("searchType") String searchType,@Query("index") int index);
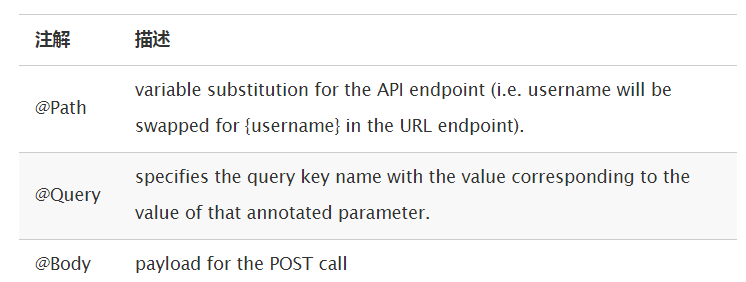
@GET("adat/sk/{cityId}.html")
Call getWeather(@Path("cityId") String cityId);
}
如上述代码中的2个Endpoints,需要提醒以下几点:
a)@GET是指用get请求,@POST是指post请求
b)Retrofit 2后,返回值始终是一个参数化了的Call对象,比如
Call。如果你不需要任何类型安全的响应,你可以把返回值指定为Call。
c)一般地,base URL是在实例化 Retrofit instance的时候定义的。Retrofit 2 允许你在注解里面重写base URL 。例如HttpUtil.URL_BASE的值为
http://www.xxxx.com/appapi/,那么第一个Endpoints的地址就是
http://www.xxxx.com/appapi/getForumNoteListV1.0.php
当然,写法不同,地址就不同,出于安全考虑,
建议:
- Base URL: 总是以 /结尾
- @Url: 不要以 / 开头
d)每个endpoint 都指定了一个关于HTTP(GET, POST, 等等。) 方法的注解以及用于分发网络调用的方法。而且这些方法的参数也可以有特殊的注解。
6、接口请求
做好了上述准备后,就可以在代码中请求数据了。
public void loadData(final String plateItemID, final String plateItemName, String searchType, int page) {

        Retrofit retrofit = new Retrofit.Builder()
                .baseUrl(HttpUtil.URL_BASE)
                .addConverterFactory(GsonConverterFactory.create())
                .build();

        APIService service = retrofit.create(APIService.class);
        Call>> call = service.loadForumNoteList(plateItemID, searchType, page);

        call.enqueue(new Callback>>() {
            @Override
            public void onResponse(Response>> response) {
                modelList.clear();
                String mTotalCount = "";

                String success = response.body().getSuccess();
                LogCat.i("success=" + success);

                if (success != null && success.equals(Constant.JSON_SUCCESS_BACK)) {
                    modelList = response.body().getData().getDataList();
                    mTotalCount = response.body().getData().getTotalCount();
                    LogCat.i("mTotalCount=" + mTotalCount);
                }
            }

            @Override
            public void onFailure(Throwable t) {
            }
        });

    }
以上代码发起了一个在后台线程的请求并从response 的response.body()方法中获取一个结果对象。注意这里的onResponse和onFailure方法是在主线程中调用的。
参考文献:
http://square.github.io/retrofit/
https://github.com/square/retrofit
使用Retrofit请求API数据
Retrofit 2.0:有史以来最大的改进