aircraft-war(五)
大体上,这个游戏已经有了最初设计的样子,还差:
- Hero被敌机撞击会坠毁
- 游戏开始暂停
- 掉落道具——使用道具
- 得分系统
- 音效
- 完善游戏开始、结束
- 优化
Hero被敌机撞击会坠毁
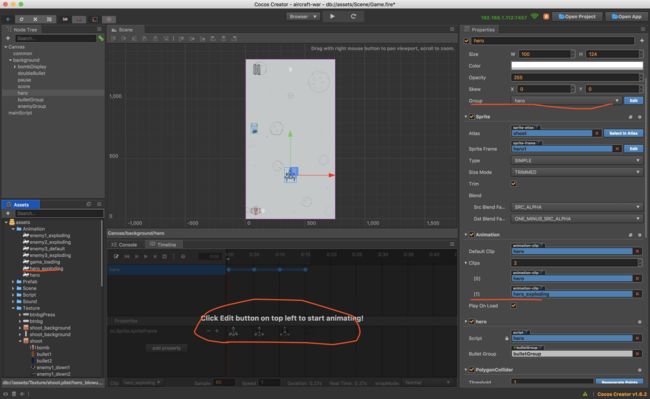
接下来一步步来完善这些点,先来让无敌的Hero变成平民。首先,和敌机一样,给Hero添加爆炸动画:
  // 碰撞组件
    onCollisionEnter: function (other, self) {
        if (other.node.name === 'doubleBullet') {
            this.bulletGroup.changeBullet(other.node.name);
        }
        if (other.node.group === 'enemy') {
            console.log(other.node);
            let anim = this.getComponent(cc.Animation);
            let animName = this.node.name + '_exploding';
            anim.play(animName);
            anim.on('finished', this.onHandleDestroy, this);
        }
    },
    onHandleDestroy: function () {
        this.node.destroy();
        // 暂停正在运行的场景,该暂停只会停止游戏逻辑执行,但是不会停止渲染和 UI 响应
        cc.director.pause();
    }
现在Hero被敌机撞击后,就会爆炸,然后让游戏暂停,已然变成了平民。
游戏开始暂停
游戏暂停开始,配合刚开始做的地方main.js,只需要加上如下代码:
let pause = false;

cc.Class({
    extends: cc.Component,

    properties: {
        pause: cc.Button,
        scoreDisplay: cc.Label,
        bombAmount: cc.Label,
        bombDisplay: cc.Node,
        pauseSprite: {
          default: [],
          type: cc.SpriteFrame,
          tooltip:'暂停按钮图片组',
        },
    },

    // use this for initialization
    onLoad: function () {

    },
    // 暂停
    handlePause: function () {
        if (pause) {
            this.pause.normalSprite = this.pauseSprite[0];
            this.pause.pressedSprite = this.pauseSprite[1];
            this.pause.hoverSprite = this.pauseSprite[1];
            // 暂停正在运行的场景
            cc.director.resume();
            return pause = !pause
        }
        this.pause.normalSprite = this.pauseSprite[2];
        this.pause.pressedSprite = this.pauseSprite[3];
        this.pause.hoverSprite = this.pauseSprite[3];
        // 开始正在运行的场景
        cc.director.pause();
        return pause = !pause;
    },


    // called every frame, uncomment this function to activate update callback
    // update: function (dt) {

    // },
});
现在开始暂停的功能就完成了,跑起来运行一下,发现一个问题:暂停时hero还是可以被拖动。
检查一下hero的脚步,发现是添加的监听没有被关闭,所以需要把hero的移除监听方法交给main去执行。
需要改变以下两个脚本:
// hero.js
cc.Class({
      // ...
    // use this for initialization
    onLoad: function () {
        // 监听拖动事件
        this.onDrag();
        // 获取碰撞检测系统
        let manager = cc.director.getCollisionManager();
        // 开启碰撞检测系统
        manager.enabled = true;
    },
    // 添加拖动监听
    onDrag: function () {
        this.node.on('touchmove', this.onHandleHeroMove, this);
    },
    // 去掉拖动监听
    offDrag: function(){
        this.node.off('touchmove', this.onHandleHeroMove, this);
    },
    // Hero拖动
    onHandleHeroMove: function (event) {
        // touchmove事件中 event.getLocation() 获取当前已左下角为锚点的触点位置(world point)
        let position = event.getLocation();
        // 实际hero是background的子元素,所以坐标应该是随自己的父元素进行的,所以要将“world point”转化为“node point”
        let location = this.node.parent.convertToNodeSpaceAR(position);
        this.node.setPosition(location);
    },

    // 碰撞组件
    onCollisionEnter: function (other, self) {
        if (other.node.name === 'doubleBullet') {
            this.bulletGroup.changeBullet(other.node.name);
        }
        if (other.node.group === 'enemy') {
            let anim = this.getComponent(cc.Animation);
            let animName = this.node.name + '_exploding';
            anim.play(animName);
            anim.on('finished', this.onHandleDestroy, this);
        }
    },
    onHandleDestroy: function () {
        // this.node.destroy();
        // 暂停正在运行的场景,该暂停只会停止游戏逻辑执行,但是不会停止渲染和 UI 响应
        this.offDrag();
        // this.pause();
        cc.director.pause();
    }
});
// ...
let pause = false;

cc.Class({
    extends: cc.Component,

    properties: {
        pause: cc.Button,
        scoreDisplay: cc.Label,
        bombAmount: cc.Label,
        bombDisplay: cc.Node,
        pauseSprite: {
          default: [],
          type: cc.SpriteFrame,
          tooltip:'暂停按钮图片组',
        },
        hero: {
            default: null,
            type: require('hero')
        },
    },
    // use this for initialization
    onLoad: function () {

    },
    // 暂停
    handlePause: function () {
        if (pause) {
            this.pause.normalSprite = this.pauseSprite[0];
            this.pause.pressedSprite = this.pauseSprite[1];
            this.pause.hoverSprite = this.pauseSprite[1];
            // 开始正在运行的场景
            cc.director.resume();
            // 添加Hero拖拽监听
            this.hero.onDrag();
            return pause = !pause
        }
        this.pause.normalSprite = this.pauseSprite[2];
        this.pause.pressedSprite = this.pauseSprite[3];
        this.pause.hoverSprite = this.pauseSprite[3];
        // 暂停正在运行的场景
        cc.director.pause();
        // 移除Hero拖拽监听
        this.hero.offDrag();
        return pause = !pause;
    },
    // called every frame, uncomment this function to activate update callback
    // update: function (dt) {

    // },
});
代码在这里
掉落道具
目前掉落的道具有两种,一种是双弹道子弹,一种是炸弹。前者已经实现了功能,后者还没有实现功能。现在先来实现随机掉落,参考enemyGroup的实现方式,没有太大区别。
先添加一个ufo的脚步,制作一个tnt-ufo组件,再将脚本挂在两种道具上,然后将组件从层级选择器拖拽至资源选择器变成Prefab:
cc.Class({
    extends: cc.Component,

    properties: {
        speedMax: 0,
        speedMin: 0,
    },

    // use this for initialization
    onLoad: function () {
        // 速度随机[speedMax, speedMin]
        this.speed = Math.random() * (this.speedMax - this.speedMin + 1) + this.speedMin;

        let manager = cc.director.getCollisionManager();
        manager.enabled = true;
    },
    //碰撞检测
    onCollisionEnter: function(other, self){
        this.ufoGroup.destroyUfo(this.node);
    },
    // called every frame, uncomment this function to activate update callback
    update: function (dt) {
        this.node.y -= dt * this.speed;
        //出屏幕后
        if (this.node.y < -this.node.parent.height / 2) {
            this.ufoGroup.destroyUfo(this.node);
        }
    },
});
然后又是熟悉的套路,ufoGroup:
const ufoG = cc.Class({
   name: 'ufoG',
   properties: {
       name: '',
       prefab: cc.Prefab,
       freq: 0,
       poolAmount: 0,
       delayMax: {
           default: 0,
           tooltip: '最大延时'
       },
       delayMin: {
           default: 0,
           tooltip: '最小延时'
       },
   }
});

cc.Class({
    extends: cc.Component,

    properties: {
        ufoG: {
            default: [],
            type: ufoG
        }
    },

    // use this for initialization
    onLoad: function () {
        D.common.batchInitNodePool(this, this.ufoG);
        this.startAction();
    },
    // 填充弹药
    startAction: function () {
        for(let i = 0; i < this.ufoG.length; i++) {
            let ufoName = this.ufoG[i].name;
            let freq = this.ufoG[i].freq;
            this[ufoName] = function (ii) {
                let delay = Math.random() * (this.ufoG[ii].delayMax - this.ufoG[ii].delayMin) + this.ufoG[ii].delayMin;
                // 内存定时器,随机掉落时间
                this.scheduleOnce(function() {
                    this.genNewUfo(this.ufoG[ii]);
                }.bind(this), delay);
            }.bind(this, i);
            // 外层定时器,循环掉落
            this.schedule(this[ufoName], freq);
        }
    },
    // 生成ufo
    genNewUfo: function (ufoInfo) {
        let poolName = ufoInfo.name + 'Pool';
        let newNode = D.common.genNewNode(this[poolName], ufoInfo.prefab, this.node);
        let pos = this.getNewEnemyPosition(newNode);
        newNode.setPosition(pos);
        newNode.getComponent('ufo').ufoGroup = this;
    },
    //随机生成的位置
    getNewEnemyPosition: function(newEnemy) {
        //位于上方,先不可见
        var randx = cc.randomMinus1To1() * (this.node.parent.width / 2 - newEnemy.width / 2);
        var randy = this.node.parent.height / 2 + newEnemy.height / 2;
        return cc.v2(randx,randy);
    },
    // 销毁
    destroyUfo: function (node) {
        D.common.putBackPool(this, node);
    }

    // called every frame, uncomment this function to activate update callback
    // update: function (dt) {

    // },
});
基本和之前的实现方式一样,具体代码可以参考代码在这里
使用道具(TNT炸弹)
炸弹道具可以销毁当前屏幕内所有的敌机,也就是将当前被创建的敌机放回自己的对象池。
在原作者A123asdo11的代码中,他是直接使用this.enemyGroup.node.removeAllChildren();销毁parent下所有的子节点。但是这样对象池空了,就会创建新的对象,这样不断重复,对象池没有被很好的利用,以下是测试结果截图:
所以我的做法是,将已经被创建的敌机重新放回对象池中,如果想要效果更好,那么就引爆所有敌机。
首先,先来整理一下代码,把组件的开关交给mainScript组件:
// main.js
properties: {
        pause: cc.Button,
        scoreDisplay: cc.Label,
        bombAmount: cc.Label,
        bombDisplay: cc.Node,
        pauseSprite: {
          default: [],
          type: cc.SpriteFrame,
          tooltip:'暂停按钮图片组',
        },
        hero: {
            default: null,
            type: require('hero')
        },
        bulletGroup: require('bulletGroup'),
        enemyGroup: require('enemyGroup'),
        ufoGroup: require('ufoGroup'),
    },

    // use this for initialization
    onLoad: function () {
        this.enemyGroup.startAction();
        this.bulletGroup.startAction();
        this.ufoGroup.startAction();
    },
接下来,把bulletGroup ufoGroup enemyGroup中的startAction方法从onload中去掉,交给main.js:
 // use this for initialization
    onLoad: function () {
        this.enemyGroup.startAction();
        this.bulletGroup.startAction();
        this.ufoGroup.startAction();
    },
接着就是炸弹的功能了,在创建对象的时候,不管是敌机组还是子弹组,都绑在各自的**Group组件上,作为他们各自的children,所以,”出现的敌机” === nemyGroup.node.children所以:
    // 使用tnt炸弹
    useBomb: function () {
        // 把当前的node.children 赋值给一个新的对象
        let enemy = new Array(...this.enemyGroup.node.children);
        for(let i = 0; i < enemy.length; i++) {
            enemy[i].getComponent('enemy').explodingAnim();
        }
    }
然后再给bombDisplay加上Button组件,然后给click events添加一个触发函数:
现在炸弹的功能基本实现了(代码在这里),接下来需要做的就是,Hero触发炸弹,炸弹计数+1,没有炸弹的时候,是不可以使用的。
回忆一下,项目刚开始的时候,有个全局变量对象,此时想一下如何使用它:
// global.js
// declare global variable "D"
window.D = {
    // singletons
    common: null, //公共方法
    commonState: {}, //定义的一些常量
};
需要做的修改比较杂,单都很好理解,代码放在这里了。可以好好看一下CCClass进阶参考,有关为什么用箭头函数,这里都会有答案。
知识点:
.toString()可以将所有的的数据都转换为字符串,但是要排除null和undefined
String()可以将null和undefined转换为字符串,但是没法转进制字符串
得分
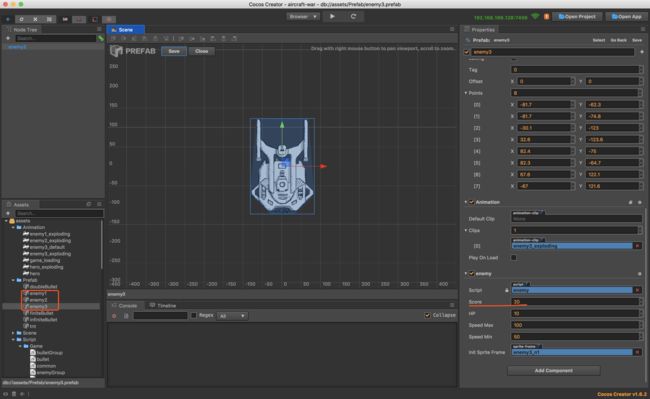
先给enemy脚本组件添加分数属性,然后要给Prefab的属性选择器中输入数值:
enemy.js:
 properties: {
        score: {
            default: 0,
            type: cc.Integer,
            tooltip: '敌机分数',
        },
        HP: {
            default: 0,
            type: cc.Integer,
            tooltip: '敌机血量',
        },
        speedMax: 0,
        speedMin: 0,
        initSpriteFrame: {
            default: null,
            type: cc.SpriteFrame,
            tooltip: '初始化图像'
        }
    },
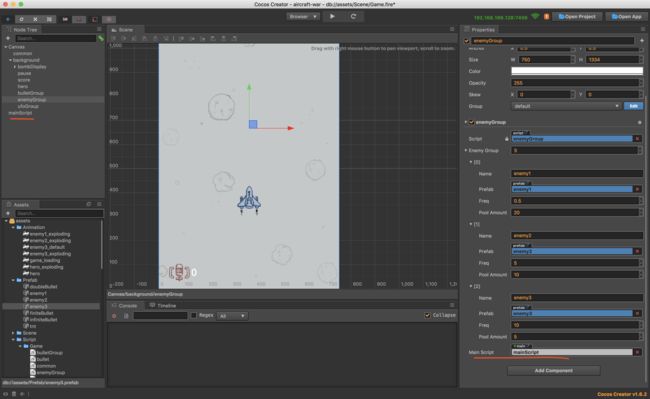
然后要给敌机Prefab的属性检查器中的score赋值,enemyGroup脚本属性中添加mainScript。
接下来讲一下思路,敌机摧毁得分,敌机穿过战区不得分,所以可以把分数传给enemyGroup来处理,然后赋值给全局变量。
// enemy.js
   this.enemyGroup.destroyEnemy(this.node, this.score);
// enemyGroup.js
// 销毁
    destroyEnemy: function (node, score = 0) {
        D.common.putBackPool(this, node);
        score && this.mainScript.changeScore(score);
    }
// main.js
   // 分数
    changeScore: function (score) {
        console.log(score);
        D.commonState.gameScore += score;
        this.scoreDisplay.string = D.commonState.gameScore.toString();
    }
很好理解,代码在这里。
总结
到这里,游戏的整体功能大体就已经完成了,首先非常感谢A123asdo11,他的代码写的质量非常好,而且通过这个小游戏,自己很快入了门。其次非常感谢cocos creator 的团队,非常感谢你们辛苦的工作与付出,让creator变得如此的优秀易用。
好了,最后还剩三个部分需要做,放在最后一章总结。
- 音效
- 完善游戏开始、结束
- 优化


