在Linux上我们少不了安装软件,在centos7中有两种方法rpm与yum安装方式。但在我们用rpm安装过程中你会发现,我们往往装个软件命令行要写的很长,要写那个包的完整路径。有时候还要解决包的依赖问题,那么有没有一种短一点的呢?
那就是我们配yum源来安装,基本用yum install {rpmfile}就可以安装,不仅方便还解决了包之间的依赖问题。那么最大的问题就是创建yum仓库。
下面我们搭建一个属于自己的ftp(yum源)仓库:
1.我们要准备光盘(centos 6 准备6的光盘,centos7准备7的光盘);
2.安装ftp所需的程序包vsftpd,默认没安装
[root@centos7 ~]#rpm -qi vsftp
package vsftp is not installed  注:通过查询没有安装
[root@centos7 ~]#rpm -ivh /misc/cd/Packages/vsftpd-3.0.2-21.el7.x86_64.rpm  注:安装vsftpd包
warning: /misc/cd/Packages/vsftpd-3.0.2-21.el7.x86_64.rpm: Header V3 RSA/SHA256 Signature, key ID f4a80eb5: NOKEY
Preparing...                          ################################# [100%]
Updating / installing...
   1:vsftpd-3.0.2-21.el7              ################################# [100%]
[root@centos7 ~]#rpm -qi vsftpd  安装成功显示详细信息
Name        : vsftpd
Version     : 3.0.2
Release     : 21.el7
Architecture: x86_64
Install Date: Tue 13 Jun 2017 09:51:15 PM +10
Group       : System Environment/Daemons
Size        : 356228
.......
vsftpd is a Very Secure FTP daemon. It was written completely from
scratch.
3.启动ftp服务:
[root@centos7 ~]#netstat -ntl
Active Internet connections (only servers)
Proto Recv-Q Send-Q Local Address           Foreign Address         State
tcp        0      0 0.0.0.0:111             0.0.0.0:*               LISTEN
tcp        0      0 192.168.122.1:53        0.0.0.0:*               LISTEN
tcp        0      0 0.0.0.0:22              0.0.0.0:*               LISTEN
tcp        0      0 127.0.0.1:631           0.0.0.0:*               LISTEN
tcp        0      0 127.0.0.1:25            0.0.0.0:*               LISTEN
tcp6       0      0 :::111                  :::*                    LISTEN
tcp6       0      0 :::22                   :::*                    LISTEN
tcp6       0      0 ::1:631                 :::*                    LISTEN
tcp6       0      0 ::1:25                  :::*                    LISTEN
[root@centos7 ~]#systemctl start vsftpd  注:启动ftp服务
[root@centos7 ~]#netstat -ntl   注:打开了21端口
Active Internet connections (only servers)
Proto Recv-Q Send-Q Local Address           Foreign Address         State
tcp        0      0 0.0.0.0:111             0.0.0.0:*               LISTEN
tcp        0      0 192.168.122.1:53        0.0.0.0:*               LISTEN
tcp        0      0 0.0.0.0:22              0.0.0.0:*               LISTEN
tcp        0      0 127.0.0.1:631           0.0.0.0:*               LISTEN
tcp        0      0 127.0.0.1:25            0.0.0.0:*               LISTEN
tcp6       0      0 :::111                  :::*                    LISTEN
tcp6       0      0 :::21                   :::*                    LISTEN
tcp6       0      0 :::22                   :::*                    LISTEN
tcp6       0      0 ::1:631                 :::*                    LISTEN
tcp6       0      0 ::1:25                  :::*                    LISTEN
这个启动只是相对暂时的,等到下次再启动Linux就失效了,因此我们可以设置开机启动
[root@centos7 ~]#systemctl enable vsftpd
Created symlink from /etc/systemd/system/multi-user.target.wants/vsftpd.service to /usr/lib/systemd/system/vsftpd.service.
注:在centos上安装方式一样,但启动有点不一样:
[root@centos6 ~]#service vsftpd start 注:启动服务打开21端口
Starting vsftpd for vsftpd:                                [  OK  ]
[root@centos6 ~]#chkconfig vsftpd on注:开机启动
现在我们可以看到有了这个文件夹
[root@centos7 ~]#cd /var/ftp
[root@centos7 ftp]#ls
pub
[root@centos7 pub]#touch hello.txt  注:在ftp/pub下创建一个文件
[root@centos7 pub]#cat >hello.txt
hello world!
[root@centos7 pub]#ls
hello.txt
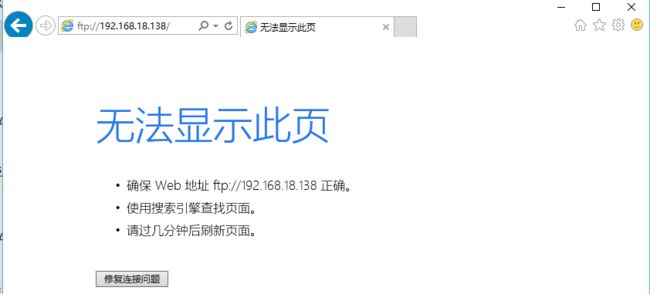
我们可以通过ifconfig来查询IP通过IP访问下,我们会发现我们并不能打开它!
[root@centos7 ~]#ifconfig
ens33: flags=4163  mtu 1500
        inet 192.168.18.138  netmask 255.255.255.0  broadcast 192.168.18.255
       ......
ens34: flags=4163  mtu 1500
        inet 172.17.253.83  netmask 255.255.0.0  broadcast 172.17.255.255
这是因为 我们还没有禁用防火墙,默认情况下现在还不能访问!
[root@centos7 ~]#iptables -nvL   注:查询防火墙(目前是开启状态)
Chain INPUT (policy ACCEPT 0 packets, 0 bytes)
 pkts bytes target     prot opt in     out     source               destination
    0     0 ACCEPT     udp  --  virbr0 *       0.0.0.0/0            0.0.0.0/0            udp dpt:53
    0     0 ACCEPT     tcp  --  virbr0 *       0.0.0.0/0            0.0.0.0/0            tcp dpt:53
    0     0 ACCEPT     udp  --  virbr0 *       0.0.0.0/0            0.0.0.0/0            udp dpt:67
    0     0 ACCEPT     tcp  --  virbr0 *       0.0.0.0/0            0.0.0.0/0            tcp dpt:67
99841  304M ACCEPT     all  --  *      *       0.0.0.0/0            0.0.0.0/0            ctstate RELATED,ESTABLISHED
    0     0 ACCEPT     all  --  lo     *       0.0.0.0/0            0.0.0.0/0
 5150  708K INPUT_direct  all  --  *      *       0.0.0.0/0            0.0.0.0/0
 5150  708K INPUT_ZONES_SOURCE  all  --  *      *       0.0.0.0/0            0.0.0.0/0
 5150  708K INPUT_ZONES  all  --  *      *       0.0.0.0/0            0.0.0.0/0
    0     0 DROP       all  --  *      *       0.0.0.0/0            0.0.0.0/0            ctstate INVALID
 5147  708K REJECT     all  --  *      *       0.0.0.0/0            0.0.0.0/0            reject-with icmp-host-prohibited

Chain FORWARD (policy ACCEPT 0 packets, 0 bytes)
 pkts bytes target     prot opt in     out     source               destination
    0     0 ACCEPT     all  --  *      virbr0  0.0.0.0/0            192.168.122.0/24     ctstate RELATED,ESTABLISHED
    0     0 ACCEPT     all  --  virbr0 *       192.168.122.0/24     0.0.0.0/0
    0     0 ACCEPT     all  --  virbr0 virbr0  0.0.0.0/0            0.0.0.0/0
    0     0 REJECT     all  --  *      virbr0  0.0.0.0/0            0.0.0.0/0            reject-with icmp-port-unreachable
    0     0 REJECT     all  --  virbr0 *       0.0.0.0/0            0.0.0.0/0            reject-with icmp-port-unreachable
........
 pkts bytes target     prot opt in     out     source               destination

Chain IN_public_log (1 references)
 pkts bytes target     prot opt in     out     source               destination

Chain OUTPUT_direct (1 references)
 pkts bytes target     prot opt in     out     source               destination
[root@centos7 ~]#systemctl stop firewalld.service  注:关闭防护墙
[root@centos7 ~]#iptables -nvL   注:现已关闭
Chain INPUT (policy ACCEPT 0 packets, 0 bytes)
 pkts bytes target     prot opt in     out     source               destination

Chain FORWARD (policy ACCEPT 0 packets, 0 bytes)
 pkts bytes target     prot opt in     out     source               destination

Chain OUTPUT (policy ACCEPT 0 packets, 0 bytes)
 pkts bytes target     prot opt in     out     source               destination
[root@centos7 ~]#systemctl disable firewalld.service 注:默认情况下开机启动了防火墙,如果下次还继续用,可暂时开启开机禁用防火墙。
Removed symlink /etc/systemd/system/dbus-org.fedoraproject.FirewallD1.service.
Removed symlink /etc/systemd/system/basic.target.wants/firewalld.service.
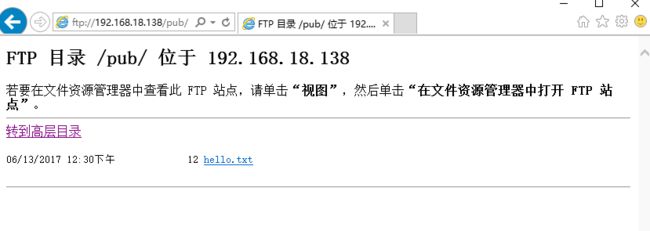
然后我们在进行访问ftp
就可以访问了......
4.在pub下创建yum仓库并从光盘拷贝
[root@centos7 pub]#cd /var/ftp/pub
[root@centos7 pub]#mkdir centos7
[root@centos7 pub]#ls
centos7
[root@centos7 pub]#cp -ar /misc/cd/* centos7
[root@centos7 pub]#cd centos7/
[root@centos7 centos7]#ls
CentOS_BuildTag  EULA  images    LiveOS    repodata              RPM-GPG-KEY-CentOS-Testing-7
EFI              GPL   isolinux  Packages  RPM-GPG-KEY-CentOS-7  TRANS.TBL
现在我们已经拷贝完毕!可以配置yum的[name].repo文件
[root@centos7 pub]#cd /etc/yum.repos.d/
[root@centos7 yum.repos.d]#ls  注:这是原有的repo配置文件
CentOS-Base.repo  CentOS-Debuginfo.repo  CentOS-Media.repo    CentOS-Vault.repo
CentOS-CR.repo    CentOS-fasttrack.repo  CentOS-Sources.repo
[root@centos7 yum.repos.d]#mkdir backup
[root@centos7 yum.repos.d]#mv *.repo backup 注:我们可以把原有的repo文件移动到创建的backup目录下
[root@centos7 yum.repos.d]#ls
backup
[root@centos7 yum.repos.d]#vim base.repo  注:创建新的repo文件
[root@centos7 yum.repos.d]#cat base.repo
[base]
name=centos 7
baseurl=ftp://192.168.18.138/pub/centos7/
gpgcheck=0
现在我们就可以正常访问ftp了,也可以用自己搭建的yum源安装软件
[root@centos7 ~]#yum install tree
Loaded plugins: fastestmirror, refresh-packagekit, security
.........
--> Running transaction check
---> Package tree.x86_64 0:1.6.0-10.el7 will be installed
--> Finished Dependency Resolution

Dependencies Resolved

==============================================================================================================
 Package                Arch                     Version                          Repository             Size
==============================================================================================================
Installing:
 tree                   x86_64                   1.6.0-10.el7                            base            46 k


Transaction Summary
============================================
......
如有不足请多多指教。


