Overview
整理一下es的snapshot功能,分两块,一块是本地磁盘disk存储,一块是远程hdfs作存储,目录如下,
0. Overview
1. Version
2. Install plugin
3. Disk
   - create repo
   - create snapshot
   - restore
   - setp
4. HDFS
   - create hdfs repo
   - insert data
   - create hdfs snapshot
   - restore from hdfs
5. Restoring to a different cluster
   - registering repository
   - list snapshot
   - starting restore from a snapshot
6. benchmark
   - snapshoting speed
   - restoring speed
7. plugin auto route
8. other
9. Reference
Version
- elasticsearch-5.4.3.zip
- repository-hdfs-5.4.3.zip
Install plugin
# need to specified absolute path
bin/elasticsearch-plugin install file:///data/mapleleaf/es_snapshot/repository-hdfs-5.4.3.zip

# check hdfs master namenode ip and port using webhdfs
curl -i "http://localhost:8081/webhdfs/v1/?op=LISTSTATUS"

# start es
sh bin/elasticsearch -d
ps aux | grep elasticsearch | grep -v "grep" | awk '{print $2}' | xargs kill -9
ps aux | grep elasticsearch | grep -v "grep" | awk '{print $2}' | xargs kill -9 ; sleep 3 && sh bin/elasticsearch -d && ps aux | grep elasticsearch | grep -v "grep" && tailf logs/es_snap.log
Disk
create repo
# add below line to esyml
path.repo: ["/data/mapleleaf/es_snapshot/my_backup"]

# create repo, named: my_backup
curl -XPUT 'http://localhost:9200/_snapshot/my_backup' -H 'Content-Type: application/json' -d '{
    "type": "fs",
    "settings": {
        "location": "/data/mapleleaf/es_snapshot/my_backup",
        "compress": true
    }
}'

curl -X GET "localhost:9200/_snapshot/my_backup?pretty"
curl -X DELETE "localhost:9200/_snapshot/my_backup"
create snapshot
# create snapshot
curl -X PUT "localhost:9200/_snapshot/my_backup/snapshot_1?wait_for_completion=true&pretty"
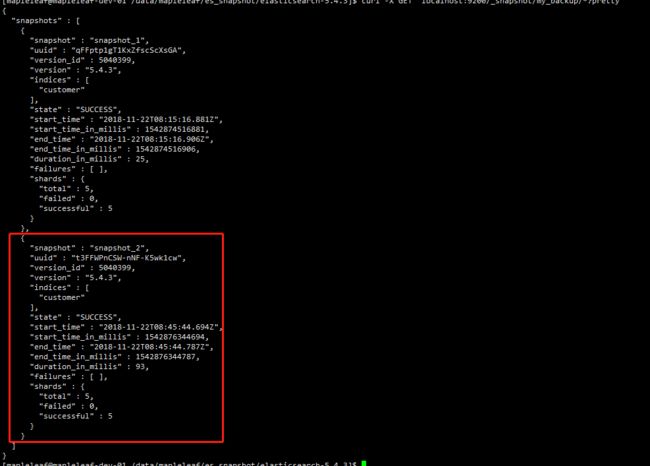
curl -X GET "localhost:9200/_snapshot/my_backup/*?pretty"
curl -X GET "localhost:9200/_snapshot/my_backup/snapshot_1/_status?pretty"
curl -X DELETE "localhost:9200/_snapshot/my_backup/snapshot_1?pretty"
restore
# restore
curl -X POST "localhost:9200/_snapshot/my_backup/snapshot_1/_restore?pretty"
setp
- check index
curl -X PUT "localhost:9200/customer" -H 'Content-Type: application/json' -d'
{
    "settings" : {
        "index" : {
            "number_of_shards" : 5,
            "number_of_replicas" : 0
        }
    }
}
'

curl -X GET "localhost:9200/_cat/indices?v"
curl -X DELETE "localhost:9200/customer?pretty"
- insert data
for i in {1..10000};
do
    curl -s -X POST "localhost:9200/customer/external/?pretty" -H 'Content-Type: application/json' -d"
    {
      \"id\": ${i},
      \"num\": ${i},
      \"name\": \"John Doe\"
    }" > /dev/null
done
- close index
curl -X POST "localhost:9200/customer/_close?pretty"
- restore
因为之前我store了一次backup,当时backup只有1条doc,当插入1万条之后,close,然后restore,是以当时store的snapshot来恢复。
- reinsert
curl -X GET "localhost:9200/_search?pretty" -H 'Content-Type: application/json' -d'
{
    "query": {
        "match_all": {}
    }
}'
- create snapshot_2
7 close & restore
HDFS
create hdfs repo
curl -X PUT "localhost:9200/_snapshot/my_hdfs_repository?pretty" -H 'Content-Type: application/json' -d'
{
  "type": "hdfs",
  "settings": {
    "uri": "hdfs://xxxxx:xxxx",
    "path": "elasticsearch/respositories/my_hdfs_repository",
    "compress": true
  }
}'
如果在这一步出现异常,可以参考这里。
insert data
create hdfs snapshot
curl -X PUT "localhost:9200/_snapshot/my_hdfs_repository/snapshot_hdfs_1?wait_for_completion=true&pretty"
在jvm.optiopns添加插件的安全配置
restore from hdfs
- 随意增加一些docs,使得与snapshot时的index有差异,便于观察restore效果。
- close index
- restore
curl -X POST "localhost:9200/_snapshot/my_hdfs_repository/snapshot_hdfs_1/_restore?pretty"
Restoring to a different cluster
All that is required is
registeringthe repository containing the snapshot in the new cluster andstartingthe restore process.
curl -X GET "localhost:9201/_cat/indices?v"
clusterB initial
registering repository
curl -X PUT "localhost:9201/_snapshot/my_hdfs_repository?pretty" -H 'Content-Type: application/json' -d'
{
  "type": "hdfs",
  "settings": {
    "uri": "hdfs://xxxxx:xxxx",
    "path": "elasticsearch/respositories/my_hdfs_repository",
    "compress": true
  }
}'
list snapshot
curl -X GET "localhost:9201/_snapshot/my_hdfs_repository/*?pretty"
starting restore
curl -X POST "localhost:9201/_snapshot/my_hdfs_repository/snapshot_hdfs_1/_restore?pretty"
benchmark
会用esrally将数据写入
snapshoting speed
# backgroud running
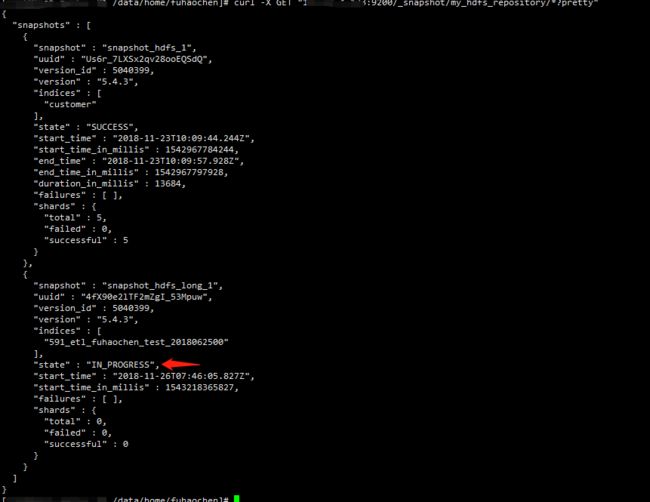
curl -X PUT "XXX:9200/_snapshot/my_hdfs_repository/snapshot_hdfs_long_1" -H 'Content-Type: application/json' -d'
{
  "indices": "591_etl_fuhaochen_test_2018062500",
  "ignore_unavailable": true,
  "include_global_state": false
}'

# check running status
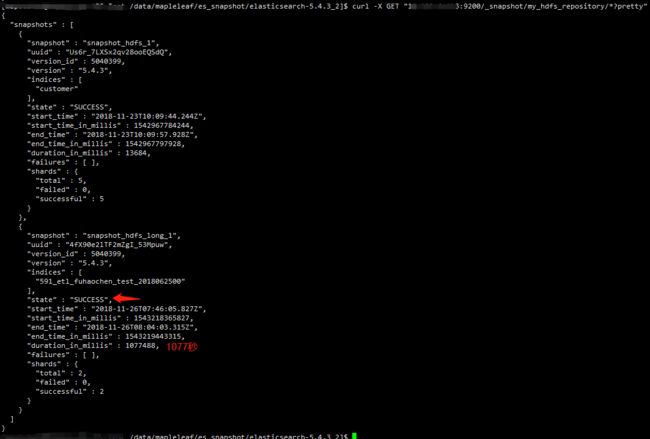
curl -X GET "XXX:9200/_snapshot/my_hdfs_repository/*?pretty"
restoring speed
date
curl -X POST "XXX:9201/_snapshot/my_hdfs_repository/snapshot_hdfs_long_1/_restore?wait_for_completion=true&pretty"
date
snapshoting耗时远比restoring高。
plugin auto route
测试一下插件会不会自动路由,即是否需要在每一个节点(datanode,masternode等)都安装?还是只需要在整个es集群的其中一个node安装之后,该node就会将plugin自动路由安装到集群的其他node上?
自动路由不可用。
other
- 尝试snapshot更大的index,但是报错了,配置应该没有问题(因为小索引是snapshot成功的)
Self-suppression not permitted这个error应该是hadoop的DataNode剩余空间不够导致。
Reference
- modules-snapshots
- repository-hdfs-config
- SecurityException issue
- ElasticSearch映射到hdfs的快照
- ES HDFS快照手册
- snapshot探索(增量,incremental)


