本章练习我们继续使用第五章和第六章的练习Passport App,在本章练习中,Passport App会增加Auto Layout功能,App的界面会随着不同的设备(iPhone、iPad)不同方向(横屏、竖屏)进行自适应和自我调节(见图7-18)。
Exercise: Building More on the Passport App | Page 201
打开Passport工程,点击Project Navigator中的Passport,显示工程详细信息。往下滑把Devices设置成Universal,接着勾选Upside Down、Landscape Left、Landscape Right。然后打开Images.xcassets文件,选中AppIcon,敲击键盘删除键。接着在白色的sidebar点击鼠标右键,选择New App Icon,一个全新的iPad和iPhone应用图标格子出现。然后打开图标文件夹,把对应的图标拖动到对应的格子中。
模拟器选择下拉菜单顶部工具栏Passport字样的右边。
下拉菜单中包括了所有当前模拟器可用的设备(见图7-19)。选择iPad Air,点击Play按钮。现在iOS模拟器启动iPad Air样式。
iPad Air的模拟器非常大,所以要调小一些,点击模拟器,然后顶部菜单选择Window -> Scale -> 50%(见图7-20)。iPad Air模拟器会调整成标准尺寸的50%。
Page 202 | Chapter 7: Devices and Auto Layout
Passport App在iPad上看起来并不好看。图片的位置变化了,然后labels也偏移了位置(见图7-21)。这是因为当前的控件位置使用的是固定的宽高坐标。
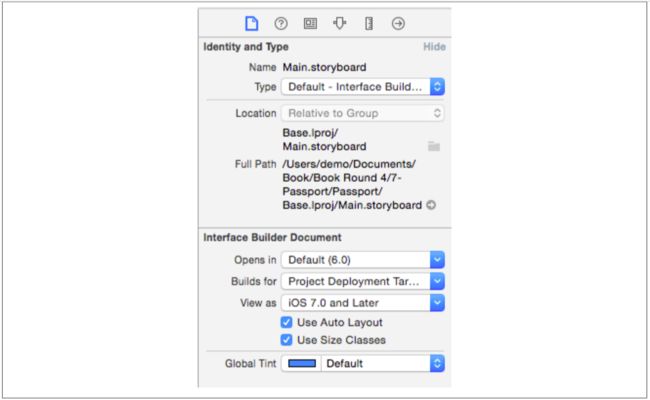
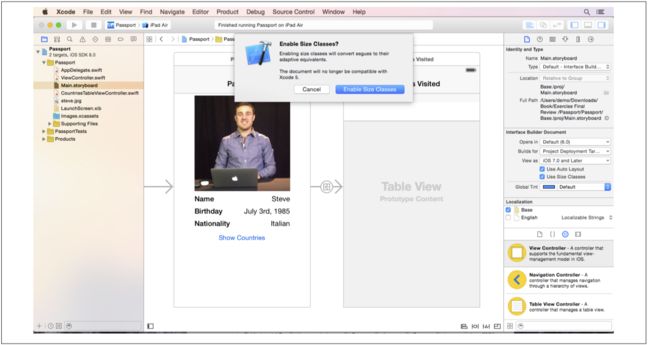
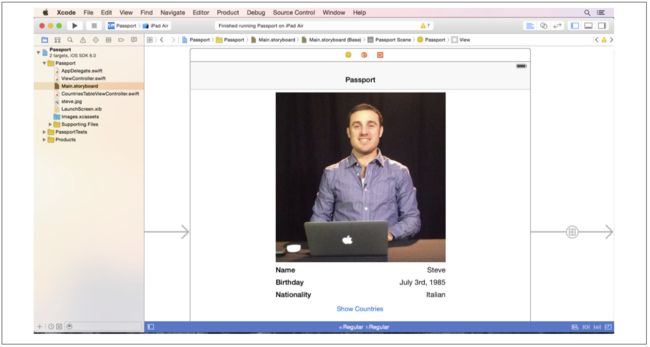
你需要把控件位置设置成Auto Layout。打开Main.storyboard文件,选择File Inspector(见图7-22),勾选Use Auto Layout,勾选Use Size Classes。点击Enable Size Classes(见图7-23)
Exercise: Building More on the Passport App | Page 203
Size classes用来调整不同设备下的布局,现在我们可以使用Auto Layout了,要使用Auto Layout,首先我们要给控件增加约束(constraints)。打开Passport Scene。
Page 204 | Chapter 7: Devices and Auto Layout
借助辅助线把Image View放到界面的中间,然后把Image View往上移动直到上方出现一条水平的辅助线。点击Align按钮,选择Horizontal Center in Container,然后点击Add 1 Constraint。接着点击Pin按钮,上下左右四个方向选中上方竖线,值从下拉框中选择Use Standard Value,选中Width和Height两个选项,点击Add 3 Constraints(见图7-24)。
把右侧的三个Label放到Image View的右侧下方,Label的右边距和Image View的右边距相同对齐,选中这三个右侧Label,点击Align按钮,勾选Trailing Edges选项,点击Add Constraints。然后点击Pin按钮,勾选上方向竖线,选择Use Standard Value,Update Frames选项下拉选择Items of New Constraints,点击Add Constraints(见图7-25)。
Exercise: Building More on the Passport App | Page 205
把左侧的三个Label放到Image View的左侧下方,Label的左边距和Image View的左边距相同对齐,选中这三个左侧Label,点击Align按钮,勾选Leading Edges选项,点击Add Constraints。然后点击Pin按钮,勾选上方向竖线,选择Use Standard Value,Update Frames选项下拉选择Items of New Constraints,点击Add Constraints(见图7-26)。
Page 206 | Chapter 7: Devices and Auto Layout
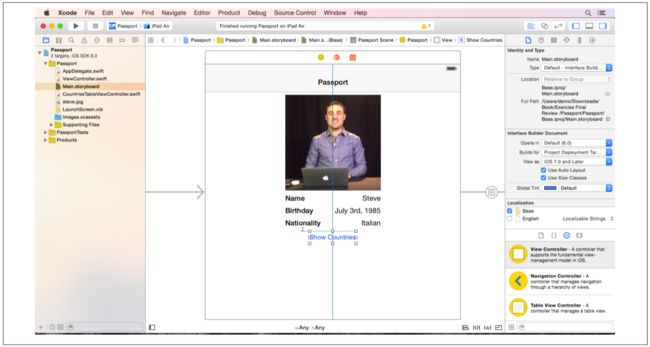
选中按钮,借助辅助线把按钮放到水平居中的位置,放到Label的下方。点击Align按钮,勾选Horizontal Center in Container,点击Add 1 Constraint,最后点击Pin按钮,勾选上方向竖线,选择Use Current Canvas Value,点击Add 1 Constraint(见图7-27)。
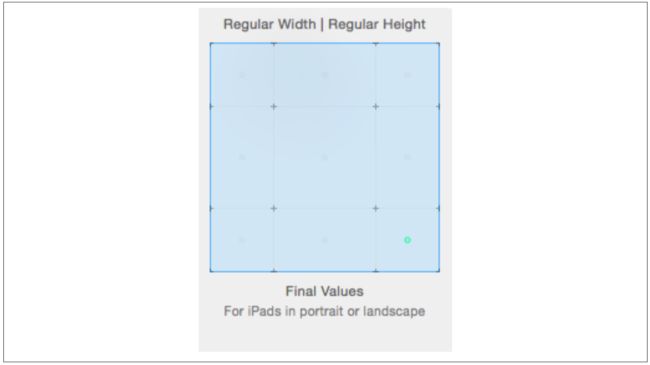
刚刚设置的这些约束会应用到所有的size classes和layouts中。现在,我们要为某个size class设置单独的约束了。点击最下方的“Any,Any”,会出现一个小的格子框,这里控制着当前我们编辑的是哪个size class,点击格子框的右下角(见图7-28),这个size class是用来设计iPad的横屏和竖屏。
Exercise: Building More on the Passport App | Page 207
选中Image View,一条蓝色竖线出现在Image View的右侧,这时Image View的高度约束,双击这条约束,把值由225改为400,接着双击Image View下方的蓝色竖线,这是宽度约束,双击,把值由225改为400。Image View的大小已经重新设定了,Label和Button会自动调整它们的位置(见图7-29)。
Page 208 | Chapter 7: Devices and Auto Layout
想要预览刚刚修改的约束效果,我们可以使用Previewer,在打开Previewer之前,我们最好给窗口腾出一些屏幕空间来,隐藏Project Navigator和Inspector,打开Assistant Editor,就是两个圆圈相交的图标,在Assistant Editor的工具栏中,点击Automatic,会出现一个下拉菜单,选择Preview -> Main.storyboard(Preview)(见图7-30)。
右侧出现了一个4英寸iPhone的预览图,点击左下角的加号,选择iPad,一个iPad的预览效果就出现在Previewer中了(见图7-31)。现在各个控件在iPad上的效果看起来好多了。点击iPad preview下方的弯曲箭头,就可以调整iPad的方向,虽然方向变化了,但是控件的位置还是放置正确,调整一下4英寸iPhone,方向变化后,界面看起来不太友好了,各个控件的位置似乎并不合适。
Exercise: Building More on the Passport App | Page 209
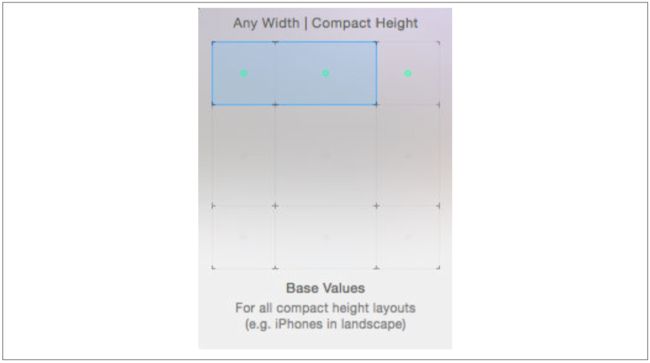
在最下方点击“Regular,Regular”,然后点击最上边一行格子的中间的那个格子,这时size class变成了“Any,Compact”(见图7-32)。这个size class是用来设计iPhone横屏的效果,这时界面会调整方向,有些控件会无法出现在界面中。为了解决这个问题,我们需要从顶部菜单栏中点击Edit -> Select All,这样所有的控件都选中了,把Image View拖到界面的最顶部,所有的控件都显示出来了。
Page 210 | Chapter 7: Devices and Auto Layout
这个size class需要全新的Layout(见图7-33)。点击Resolve Auto Layout Issues按钮,选择最下边的Clear Constraints,这样就会清除这个size class下的所有约束条件。接着把Image View放到屏幕的左上方,直到左边和上方都出现了辅助线,选中Image View,点击Pin按钮,勾选上方方向竖线,选择Use Standard Value,左侧方向竖线,选择Use Current Canvas Value。勾选Width和Height选项,点击Add Constraints,把Label和Button放到图片右侧上方,直到上方出现了辅助线,以及Image View的右侧也出现了辅助线,点击Pin按钮,上方方向竖线选择Use Standard Value,左侧方向竖线,选择Use Current Canvas Value,点击Add Constraints。
所有的设置都已经完成了,可以对App进行测试了,模拟器选择iPhone 5s,点击Play按钮(Command+R),选择Hardware -> Rotate Right(Command+方向键)(见图7-34),在iPad Air上运行也没有问题(见图7-35)
Exercise: Building More on the Passport App | Page 211
如果App没有按照你想要的结果运行,或者程序有了错误或警告,不要太担心,学习的最佳方式就是试错,熟能生巧,到我们的网站上下载示例代码,对比一下代码,多试几次,直到搞定这个程序为止。
Page 212 | Chapter 7: Devices and Auto Layout


