1.概念及相关知识点
推送通知就是向用户推送一条信息来通知用户某件事件,可以在应用退到后台后,或者关闭后,能够通过推送一条消息通知用户某件事情,比如版本更新等等。
推送通知的常用应用场景:
推送通知的常用展示样式:
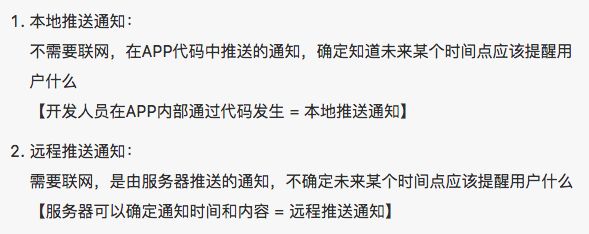
推送通知分类:
使用原则:谁确定通知时间和内容,谁就可以发生
2.本地推送通知
1.本地推送通知步骤:
1.在iOS8以后使用本地推送通知,需要得到用户的许可
2.创建UILocalNotification本地通知对象,并设置必要属性
3.开始本地推送通知:
第一种方法:延时推送,根据本地通知对象的fireDate设置进行本地推送通知
[[UIApplication shareApplication] scheduleLocalNotification:notification];
第二种方法:立刻推送,忽略本地通知对象的fireDate设置进行本地推送通知
[[UIApplication shareApplication] presentLocalNotificationNow:notification];
4.监听用户点击通知:
- APP处于前台,此时不会弹框通知用户,但会调用对应的代理方法 :
-(void)application:(UIApplication *)application didReceiveLocalNotification;
- APP处于后台,屏幕上方会弹出横幅,用户点击横幅后,会进入前台,调用上面的代理方法
- APP已关闭,屏幕上方会弹出横幅,用户点击横幅后,会启动APP,调用以下方法:
-(BOOL)application:(UIApplication *)application
       didFinishLaunchingWithOptions:(NSDictionary *)launchOptions;
/* 通过参数launchOptions获取本地推送通知内容 */
UILocalNotification *local = launchOptions[UIApplicationLaunchOptionsLocalNotificationKey];
5.调用UIApplication的对象方法,取消本地推送通知:
/* 取消指定的本地推送通知 */
-(void)cancelLocalNotification:(UILocalNotification *)notification;
/* 取消全部本地推送通知 */
-(void)cancelAllLocalNotification;
2.Demo:
- 注册通知代码以及UIAlertView显示通知方法代码
- (BOOL)application:(UIApplication *)application
        didFinishLaunchingWithOptions:(NSDictionary *)launchOptions
 {
    //因为是storyboard启动,这里就没有其他启动代码了

    //iOS8.0以后,如果需要使用推送通知,需要得到用户许可
    if (application.currentUserNotificationSettings.types == UIUserNotificationTypeNone) {
        //注册通知,有横幅通知、应用数字通知、应用声音通知
        UIUserNotificationSettings * setting =
              [UIUserNotificationSettings settingsForTypes:UIUserNotificationTypeAlert |
                                                           UIUserNotificationTypeBadge |
                                                           UIUserNotificationTypeSound
                                                categories:nil];
        [application registerUserNotificationSettings:setting];
    } else {
        //当APP关闭后接收到通知,在启动中获取本地推送通知对象
        UILocalNotification *notification = launchOptions[UIApplicationLaunchOptionsLocalNotificationKey];
        [self showLocalNotification:notification];
    }
    return YES;
}
/* 弹框UIAlertView显示本地通知的信息 */
- (void)showLocalNotification:(UILocalNotification *)notification
{
    /* 显示本地通知 */
    NSDictionary *userInfo = notification.userInfo;
    NSString *title = @"本地通知";
    NSString *msg = userInfo[@"msg"];
    UIAlertView *alert = [[UIAlertView alloc] initWithTitle:title
                                                    message:msg
                                                   delegate:nil
                                          cancelButtonTitle:@"取消"
                                          otherButtonTitles:@"确定", nil];
    [alert show];
    //移除本地通知
    [[UIApplication sharedApplication] cancelLocalNotification:notification];
}
2.创建本地通知代码
/* 创建一个本地通知 */
- (UILocalNotification *)makeLocalNotification{
    //创建本地推送通知对象
    UILocalNotification *notification = [[UILocalNotification alloc] init];
    //设置调用时间
    notification.fireDate = [NSDate dateWithTimeIntervalSinceNow:10.0];//通知触发的时间,10s以后
    notification.repeatInterval = NSCalendarUnitMinute;//每隔多久重复发一次本地通知
    //设置通知属性
    notification.alertBody = @"最近添加了诸多有趣的特性,是否立即体验?";//通知主体
    notification.applicationIconBadgeNumber = 1;//应用程序图标右上角显示的消息数
    notification.alertAction = @"打开应用"; //待机界面的滑动动作提示
    notification.alertLaunchImage = @"Default";//通过点击通知打开应用时的启动图片,这里使用程序启动图片
    notification.soundName = UILocalNotificationDefaultSoundName;//收到通知时播放的声音,默认消息声音
    //设置用户信息
    notification.userInfo = @{ @"id":@1,
                               @"user":@"Kenshin Cui",
                               @"msg":@"我来了一发本地通知"};//绑定到通知上的其他附加信息
    return notification;
}
如果需要每天的中午12点准时本地推送怎么办呢?
就像这么办,修改fireDate和repeatInterval属性
NSDateFormatter *formatter1 = [[NSDateFormatter alloc]init];
[formatter setDateFormat:@"yyyy-MM-dd HH-mm-sss"];
NSDate *resDate = [formatter dateFromString:@"2016-04-09 12-00-00"];
notification.fireDate = resDate;//设定为明天中午12点触发通知
//记得设置当前时区,没有设置的话,fireDate将不考虑时区,这样的通知会不准确
notification.timeZone = [NSTimeZone defaultTimeZone];
notification.repeatInterval = NSCalendarUnitDay;//每隔一天触发一次
3.监听用户点击
/* 注册本地通知完成会调用,即用户点击确定授权后调用 */
- (void)application:(UIApplication *)application
        didRegisterUserNotificationSettings:(UIUserNotificationSettings *)notificationSettings
{
    //在这里我们尝试发送本地推送通知
    if (notificationSettings.types != UIUserNotificationTypeNone) {
        UILocalNotification *notification = [self makeLocalNotification];
        //延迟调用通知
        [application scheduleLocalNotification:notification];
        //立刻发送通知
        //[application presentLocalNotificationNow:notification];
    }
}
/* 应用还在运行,无论前台还是后台,都会调用该方法处理通知 */
- (void)application:(UIApplication *)application
        didReceiveLocalNotification:(UILocalNotification *)notification
{
    if( notification ) {
        [self showLocalNotification:notification];
    }
}
/* 应用进入前台,去除应用边角数字显示 */
- (void)applicationWillEnterForeground:(UIApplication *)application {
    //去除应用边角数字
    [application setApplicationIconBadgeNumber:0];
}
效果如图:
3.远程推送通知
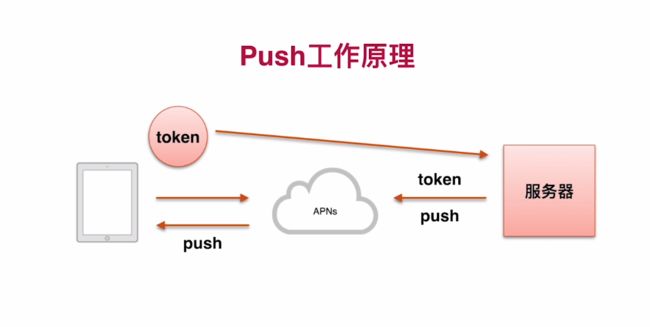
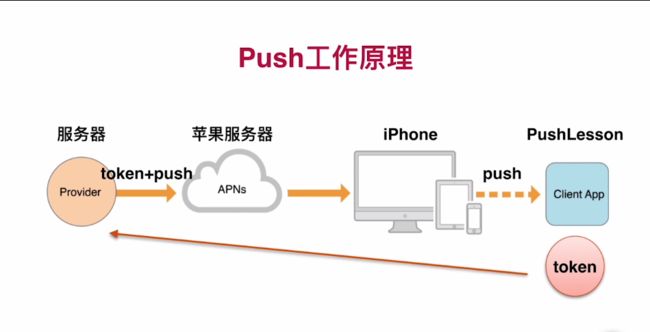
原理图:
1.相关知识点
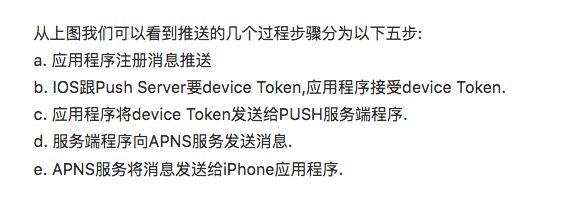
下面是更详细的流程:
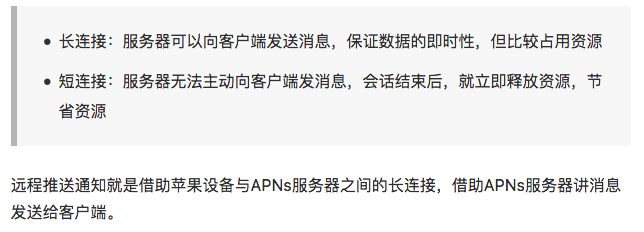
所有的苹果设备,在联网状态下,都会和苹果服务器APNs建立一个长连接
2.远程推送通知实现的条件
1.必须有真机,只有真机具备UDID,才能生成deviceToken设备令牌
2.需要开发推送Cer证书
证书的申请请参考:iOS学习笔记21-推送证书与秘钥申请
** deviceToken的生成算法只有Apple掌握,为了确保算法发生变化后仍然能够正常接收服务器端发送的通知,每次应用程序启动都重新获得deviceToken**
3.远程推送通知步骤
1.iOS8以后,使用远程通知,需要请求用户授权
2.注册远程通知成功后会调用以下方法,获取deviceToken设备令牌:
-(void)application:(UIApplication *)application
       didRegisterForRemoteNotificationsWithDeviceToken:(NSData *)deviceToken;
3.把deviceToken设备令牌发送给服务器,时刻保持deviceToken是最新的
4.监听远程推送通知:
-(void)application:(UIApplication *)application
       didReceiveRemoteNotification:(NSDictionary *)userInfo;
4.Demo:
1. 注册远程推送通知代码:
- (BOOL)application:(UIApplication *)application
        didFinishLaunchingWithOptions:(NSDictionary *)launchOptions
{
   //iOS8.0以后,如果需要使用本地推送通知,需要得到用户许可
    if (![application isRegisteredForRemoteNotifications]) {
        UIUserNotificationSettings * setting =
              [UIUserNotificationSettings settingsForTypes:UIUserNotificationTypeAlert |
                                                           UIUserNotificationTypeBadge |
                                                           UIUserNotificationTypeSound
                                                categories:nil];
        [application registerUserNotificationSettings:setting];
        //注册远程推送通知
        [application registerForRemoteNotifications];
    }
    return YES;
}
2. 注册成功调用代码:
/* 注册远程推送通知成功会调用 ,在此接收设备令牌deviceToken */
- (void)application:(UIApplication *)application
        didRegisterForRemoteNotificationsWithDeviceToken:(NSData *)deviceToken
{
    [self addDeviceToken:deviceToken];
}
/* 保存deviceToken,并同步服务器上保存的deviceToken,以便能正确推送通知 */
- (void)addDeviceToken:(NSData *)deviceToken
{
    NSString *key = @"DeviceToken";
    NSUserDefaults *defaults = [NSUserDefaults standardUserDefaults];
    //取出原来的deviceToken,进行比较
    NSData *oldToken = [defaults objectForKey:key];
    if ([oldToken isEqualToData:deviceToken]) {
        //存入新的deviceToken
        [defaults setObject:deviceToken forKey:key];
        [defaults synchronize];
        //发送网络请求到服务器,说明deviceToken发生了改变
        [self sendDeviceTokenWithOldDeviceToken:oldToken newDeviceToken:deviceToken];
    }
}
/* 发送网络请求到服务器,说明deviceToken发生了改变,服务器那边也要同步改变 */
- (void)sendDeviceTokenWithOldDeviceToken:(NSData *)oldToken newDeviceToken:(NSData *)newToken
{
    //发送到服务器,下面是服务器的一个接口
    NSString *urlStr = @"http://192.168.1.101/RegisterDeviceToken.aspx";
    urlStr = [urlStr stringByAddingPercentEscapesUsingEncoding:NSUTF8StringEncoding];
    NSURL *url = [NSURL URLWithString:urlStr];
    //POST网络请求
    NSMutableURLRequest *requestM = [NSMutableURLRequest requestWithURL:url];
    requestM.HTTPMethod = @"POST";
    //POST请求的请求体
    NSString *bodyStr = [NSString stringWithFormat:@"oldToken=%@&newToken=%@",oldToken,newToken];
    requestM.HTTPBody = [bodyStr dataUsingEncoding:NSUTF8StringEncoding];
    //使用会话来发送网络请求
    NSURLSession *session = [NSURLSession sharedSession];
    NSURLSessionDataTask *dataTask =
          [session dataTaskWithRequest:requestM
                     completionHandler:^(NSData *data,NSURLResponse *response,NSError *error){
        if(!error){
            NSLog(@"Send Success !");
        } else {
            NSLog(@"Send Failure, error = %@",error.localizedDescription);
        }
    }];
    //网络请求任务启动
    [dataTask resume];
}
3.监听远程推送通知:
/* 收到远程推送通知时会调用 */
- (void)application:(UIApplication *)application
        didReceiveRemoteNotification:(NSDictionary *)userInfo
{
    NSString *title = @"远程推送通知";
    NSString *msg = userInfo[@"msg"];
    UIAlertView *alert = [[UIAlertView alloc] initWithTitle:title
                                                    message:msg
                                                   delegate:nil
                                          cancelButtonTitle:@"取消"
                                          otherButtonTitles:@"确定", nil];
    [alert show];
}
iOS推送总结:http://www.jianshu.com/p/34a408b2f53a#
4.第三方远程推送简介
上面的远程推送过程如果觉得实现比较麻烦,你可以使用第三方推送(具体的集成步骤及使用方法,请查看对应的官方文档,非常详细),例如:
- 极光推送( JPush ):https://www.jiguang.cn/push#B_vid=8707896807058745439
ios 极光推送的集成及注意事项(含收到通知后点击弹框跳转):https://www.jianshu.com/p/1d37efd7d65c - 百度云推送:http://push.baidu.com/
- 腾讯信鸽:https://www.qcloud.com/product/XGPush?fromSource=gwzcw.12791.12791.12791
- 个推:http://www.getui.com/cn/index.html
- 友盟推送:http://push.umeng.com/pushIndex?utm_source=bdsem&utm_medium=search&utm_campaign=push
- 教你一步一步获取App ID:http://www.jianshu.com/p/074bc6fffd0e
- 教你一步一步获取Provisioning Profiles:http://www.jianshu.com/p/6aa72b177daf
5.详解百度推送的具体使用
大致步骤
百度云iOS文档:http://push.baidu.com/doc/ios/api
1.创建应用拿到AppKey(需要先拿到证书)
2.生成推送所需要的证书
3.创建iOS工程,集成百度SDK
1.1注册百度账号
http://push.baidu.com/
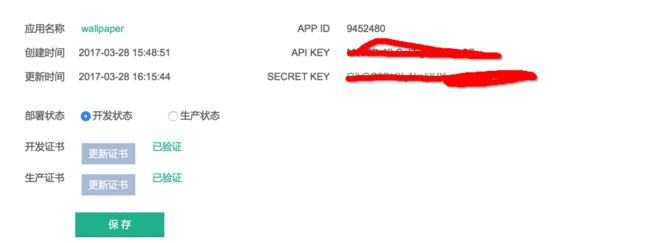
2.创建应用获取AppKey
设置应用名称
应用配置完成 得到API KEY
3.生成推送所需要的pem证书
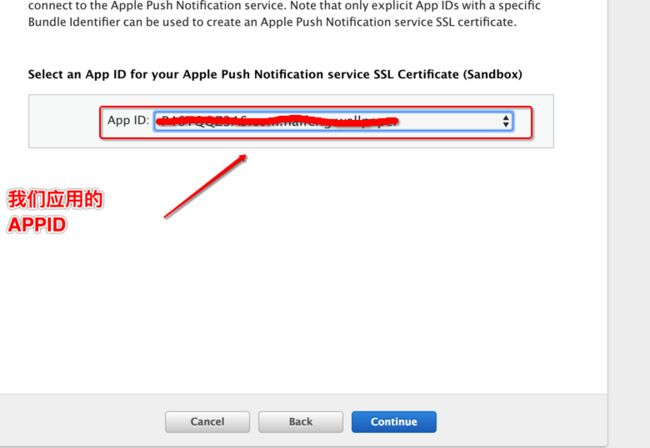
3.1 在开发者中找到我们的应用对应的APPID
3.2 选择证书关联的APPID
3.3 选择电脑钥匙串办法的证书
3.4 同样的操作就会生成两个cer证书,双击安装到我们的钥匙串中
3.5导出两个P12文件
3.6将导出的P12通过命令导出百度需要的pem证书
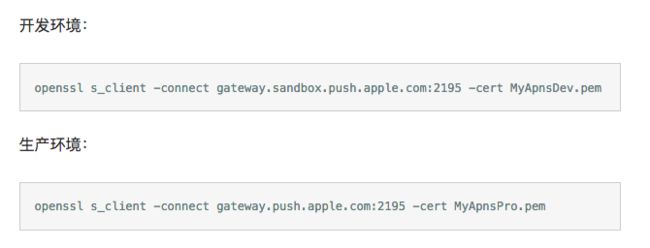
3.7 证书与证书校验
与 APNs 之间是加密的连接,因此需要使用证书来加密连接。每个的推送环境有自己单独的推送证书,即开发证书和生产证书。再将证书最终转为 pem 格式后,可通过与 APNs 连接来测试证书是否有效。
3.8通知的两种推送环境
在使用 iOS 远程推送功能时,有两种不同的环境。开发环境(Development)以及生产环境(Production);
App 当前使用的推送环境与 Xcode - Build Settings - Code Signing - Provisioning Profile 文件的模式一致
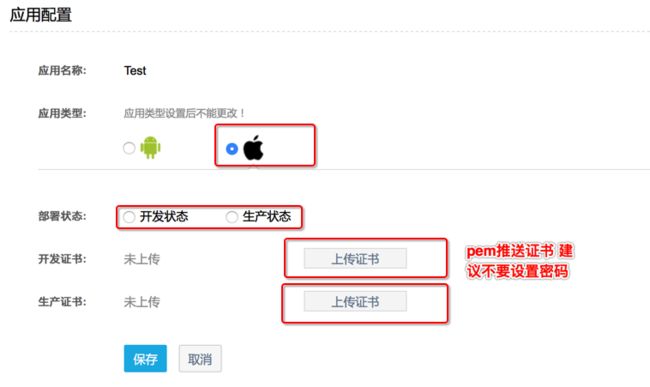
3.9 将pem证书上传到我们百度创建的应用中
这样我们前期的配置工作就完成了。由于苹果APNS是加密过的,所以我们需要将证书传递给百度,接下来我们在我们项目中将DeviceToken传递给百度,它会绑定生成一个对应的channel_ID.
channel_id : channel_id是用于表示一台设备的唯一标识, 在推送消息时,用于指定消息的目标接收设备.
4. 工程中集成百度SDK
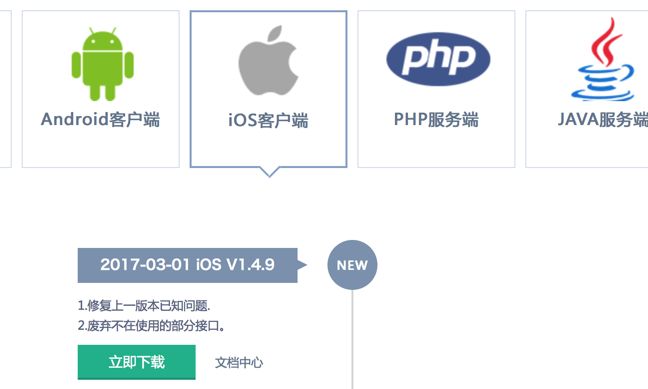
4.1 下载百度SDK地址
下载后的文件目录
4.2 将红色的部分拖进项目中去,test.caf不需要
4.3 对于Xcode8.0配置
4.4 在AppDelegate.m中初始化百度推送(先导入BPush.h)
大致的模板如下AB部分代码(具体一些细节的代码、回调等具体情况自己分析添加...)
A. 系统方法中配置推送消息
- (BOOL)application:(UIApplication *)application
    didFinishLaunchingWithOptions:(NSDictionary *)launchOptions {

     ......
    // 百度推送
    // iOS8 下需要使用新的 API
    if ([[[UIDevice currentDevice] systemVersion] floatValue] >= 8.0) {

        UIUserNotificationType myTypes = UIUserNotificationTypeBadge |
          UIUserNotificationTypeSound | UIUserNotificationTypeAlert;

        UIUserNotificationSettings *settings = [UIUserNotificationSettings
           settingsForTypes:myTypes categories:nil];
        [[UIApplication sharedApplication] registerUserNotificationSettings:settings];
    }

    BOOL isDebug;
    BPushMode model;

#ifdef DEBUG
    isDebug = YES;
    model = BPushModeDevelopment;// 推送模式设置
    // 在debug环境下开启日志手机
    [BugManager redirectNSLogToDocumentFolder];
#else
    isDebug = NO;
    model = BPushModeProduction;
#endif

    // 在App启动时注册百度云推送服务,需要提供 Apikey
    [BPush registerChannel:launchOptions apiKey:BDApikey pushMode:model
      withFirstAction:nil withSecondAction:nil withCategory:nil isDebug:isDebug];

    NSDictionary *userInfo = [launchOptions objectForKey:
          UIApplicationLaunchOptionsRemoteNotificationKey];

       if (userInfo) {

            [BPush handleNotification:userInfo];
            [self didAcceptPushNotification:userInfo isAction:YES];//这个
             是自己写的方法:里面有接受通知后显示的内容、弹框、跳转....
        }
    //角标清0
    [[UIApplication sharedApplication] setApplicationIconBadgeNumber:0];
    SXLog(@"%@",NSLocalizedStringEx(@"NAME", nil));
     ......
    return YES;
}
B. 添加以下方法
#pragma mark -- 推送相关回调
1.// 在iOS8系统中,还需要添加这个方法。通过新的ApI 注册推送服务
- (void)application:(UIApplication *)application
didRegisterUserNotificationSettings:(UIUserNotificationSettings *)notificationSettings
{
   [application registerForRemoteNotifications];
}

2.// 当注册成功时候返回 deviceToken(用于获取 APNs 返回给设备的 DeviceToken)
- (void)application:(UIApplication *)application
didRegisterForRemoteNotificationsWithDeviceToken:(NSData *)deviceToken {

        ......
}

3.// 当 DeviceToken 获取失败时,系统会调用此回调方法(用于当获取不到 DeviceToken 时,查看其错误原因)
- (void)application:(UIApplication *)application
didFailToRegisterForRemoteNotificationsWithError:(NSError *)error
{
    NSLog(@"DeviceToken 获取失败,原因:%@",error);
}


4.// 当用户点击了通知 应用在前台或者开启后台并且应用在后台 时调用
- (void)application:(UIApplication *)application
didReceiveRemoteNotification:(NSDictionary *)userInfo fetchCompletionHandler:(void (^)(UIBackgroundFetchResult))completionHandler
{
        ......
}
举例代码:
#import "AppDelegate.h"
#import
#import "BPush.h"
#import "ViewController.h"
@interface AppDelegate ()

@end

@implementation AppDelegate


- (BOOL)application:(UIApplication *)application didFinishLaunchingWithOptions:(NSDictionary *)launchOptions {


    // iOS10 下需要使用新的 API
    if ([[[UIDevice currentDevice] systemVersion] floatValue] >= 10.0) {
#ifdef NSFoundationVersionNumber_iOS_9_x_Max
        UNUserNotificationCenter* center = [UNUserNotificationCenter currentNotificationCenter];

        [center requestAuthorizationWithOptions:(UNAuthorizationOptionAlert + UNAuthorizationOptionSound + UNAuthorizationOptionBadge)
                              completionHandler:^(BOOL granted, NSError * _Nullable error) {
                                  // Enable or disable features based on authorization.
                                  if (granted) {
                                      [application registerForRemoteNotifications];
                                  }
                              }];
#endif
    }
    else if ([[[UIDevice currentDevice] systemVersion] floatValue] >= 8.0) {
        UIUserNotificationType myTypes = UIUserNotificationTypeBadge | UIUserNotificationTypeSound | UIUserNotificationTypeAlert;

        UIUserNotificationSettings *settings = [UIUserNotificationSettings settingsForTypes:myTypes categories:nil];
        [[UIApplication sharedApplication] registerUserNotificationSettings:settings];
    }else {
        UIRemoteNotificationType myTypes = UIRemoteNotificationTypeBadge|UIRemoteNotificationTypeAlert|UIRemoteNotificationTypeSound;
        [[UIApplication sharedApplication] registerForRemoteNotificationTypes:myTypes];
    }


    #warning 测试 开发环境 时需要修改BPushMode为BPushModeDevelopment 需要修改Apikey为自己的Apikey

     [BPush registerChannel:launchOptions apiKey:@"M4a6DvXbCnl7rgvLcVeIwSFw" pushMode:BPushModeDevelopment withFirstAction:@"打开" withSecondAction:@"关闭" withCategory:@"test" useBehaviorTextInput:YES isDebug:YES];

    // App 使用户点击推送消息启动
    NSDictionary *userInfo = [launchOptions objectForKey:UIApplicationLaunchOptionsRemoteNotificationKey];
    if (userInfo) {
        [BPush handleNotification:userInfo];
    }

    // 清除角标
    [[UIApplication sharedApplication] setApplicationIconBadgeNumber:1.0];
    return YES;
}

#pragma Gegistnotification

// 在iOS8中,还需要添加这个方法。通过新的ApI 注册推送服务
- (void)application:(UIApplication *)application didRegisterUserNotificationSettings:(UIUserNotificationSettings *)notificationSettings
{
    [application registerForRemoteNotifications];
}


// 当 DeviceToken 获取失败时,系统会调用此回调方法
- (void)application:(UIApplication *)application didFailToRegisterForRemoteNotificationsWithError:(NSError *)error
{
    NSLog(@"DeviceToken 获取失败, 原因是: %@", error);
}

// 当注册成功时候返回 deviceToken
- (void)application:(UIApplication *)application didRegisterForRemoteNotificationsWithDeviceToken:(NSData *)deviceToken
{
    NSLog(@"%@-----", deviceToken);
    [BPush registerDeviceToken:deviceToken];

    // 绑定Push服务通道 error_code为0是绑定成功 绑定成功后可以获取appid,channelid,userid等信息
    [BPush bindChannelWithCompleteHandler:^(id result, NSError *error) {

        if (result) {
            if ([result[@"error_code"] intValue] != 0) {
                return ;
            }

            // 获取channel_id
            NSString *myChange_id = [BPush getChannelId];
//            [BPush getAppId];
//            [BPush getUserId];
            NSLog(@"%@", myChange_id);

            [BPush setTag:@"MyTag" withCompleteHandler:^(id result, NSError *error) {
                if (result) {
                    // BPushCallBack中有设置标签结果的反馈,,error_code 为0时设置成功会得到设置结果。
                    NSLog(@"result==================%@", result);

                }
            }];

        }
    }];

}


// 当用户点击了通知 应用在前台 或者开启后台并且应用在后台 是调用
- (void)application:(UIApplication *)application didReceiveRemoteNotification:(NSDictionary *)userInfo fetchCompletionHandler:(void (^)(UIBackgroundFetchResult))completionHandler
{

    NSLog(@"%@", userInfo);


    // 应用在前台 不跳转页面
    if (application.applicationState == UIApplicationStateActive) {
        UIAlertView *alert = [[UIAlertView alloc] initWithTitle:@"收到一条消息" message:userInfo[@"aps"][@"alert"] delegate:self cancelButtonTitle:@"取消" otherButtonTitles:@"确定", nil];

        [alert show];
    }
    // 杀死情况下 直接跳转到页面
    if (application.applicationState == UIApplicationStateInactive) {

        /*
            SkipViewController *skipCtr = [[SkipViewController alloc] init];
            [_tabBarCtr.selectedViewController pushViewController:skipCtr animated: YES];
         */
    }

    // 应用在后台 当后台设置apps字段里的
    if(application.applicationState == UIApplicationStateBackground){

         ViewController *vc = (ViewController *)self.window.rootViewController;


        vc.textView.text = userInfo.description;

    }
}
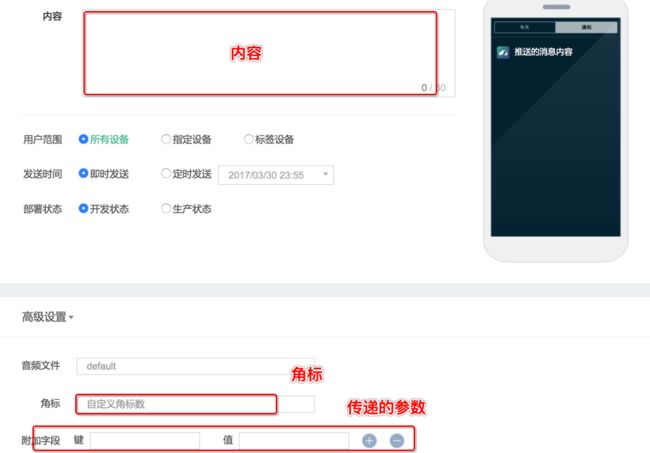
4.5 在百度后台创建发送通知
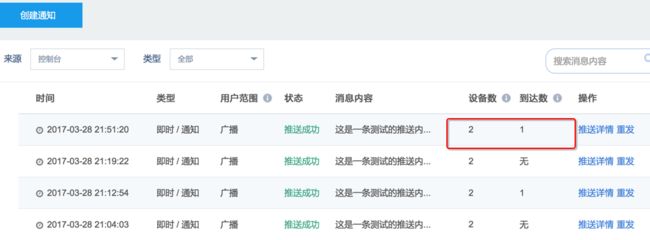
4.6 查看推送列表
5.对于证书过期的处理
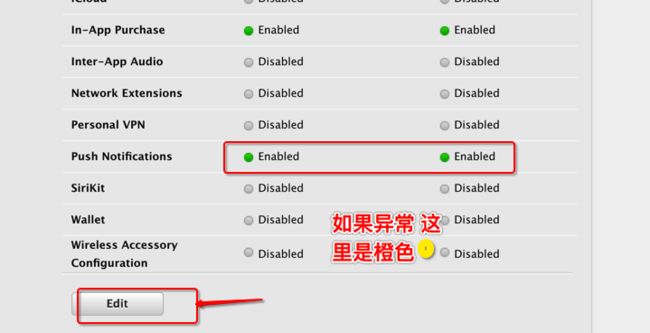
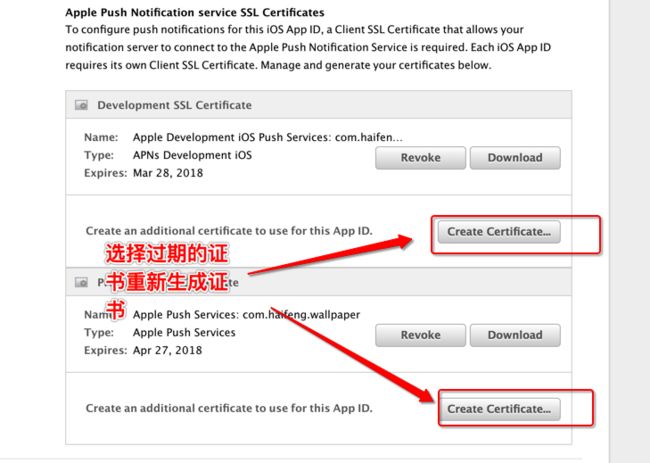
5.1 到苹果开发者中心,找到对应的AppID
5.2 选择过期的证书 重新生成对应的证书
5.3 按这上面的步骤上传到百度我们创建的应用中,就可以正常的发送通知了
拓展:用PHP集成百度推送
1.下载PHP对应SDK
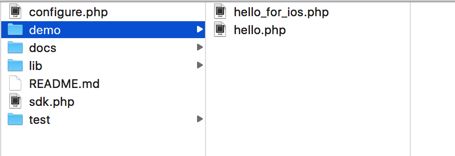
下载后的SDK目录:
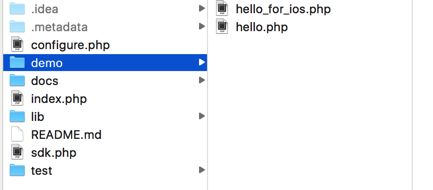
将项目拖拽到我们本地的服务器站点
2.配置项目
- 修改configure.php中的defaultapiKey及defaultsecurekey,填入在Setp 2中获得的apikey及secure key.
在hello_for_ios.php 中脚本中发送一个推送
推送消息的格式


