什么是 Decision Tree?
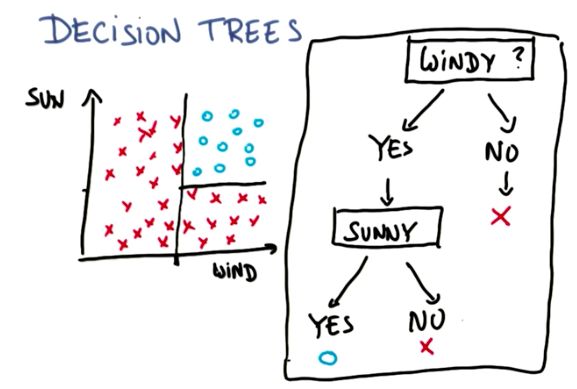
Decision Tree 可以把 Input 映射到离散的 Labels。对每个节点上的 Attribute 提问,取不同的 Value 走向不同的 Children,最终得到结果。
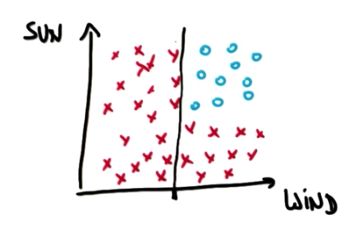
例如,这是一个不能 Linearly Separated 的问题,但是可以被 Decision Tree 分开。
当 instances 是连续的时候也可以用 DT。
怎样构建 Decision Tree?
先要找到最佳的 Attribute,然后提出合适的问题,可以把数据尽量地分成两份。
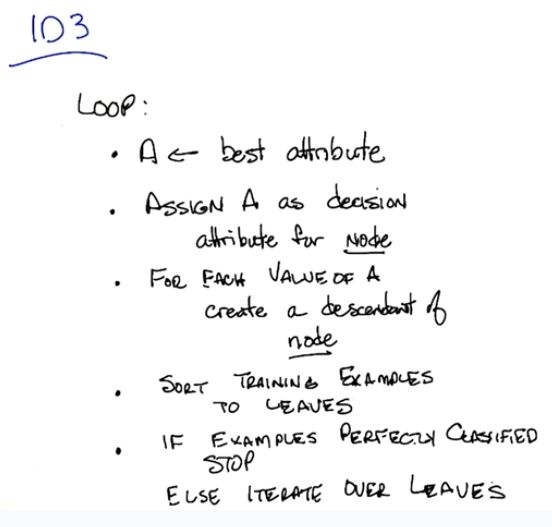
ID3 Algorithm 可以用来寻找 Best Attribute。
什么是 Best Attribute?
通俗地讲,就是最好可以直接把数据分成目标类别,用数学的角度衡量就是用 Entropy 来计算 Information Gain。
用 sklearn 来 create 和 train Decision Trees。
Step-1: Decision Tree Classifier
Resources:
http://scikit-learn.org/stable/modules/tree.html#classification
def classify(features_train, labels_train):

    ### your code goes here--should return a trained decision tree classifer
    from sklearn import tree

    clf=tree.DecisionTreeClassifier()
    clf=clf.fit(features_train, labels_train)


    return clf
#!/usr/bin/python

""" lecture and example code for decision tree unit """

import sys
from class_vis import prettyPicture, output_image
from prep_terrain_data import makeTerrainData

import matplotlib.pyplot as plt
import numpy as np
import pylab as pl
from classifyDT import classify

features_train, labels_train, features_test, labels_test = makeTerrainData()


### the classify() function in classifyDT is where the magic
### happens--fill in this function in the file 'classifyDT.py'!
clf = classify(features_train, labels_train)


#### grader code, do not modify below this line

prettyPicture(clf, features_test, labels_test)
output_image("test.png", "png", open("test.png", "rb").read())
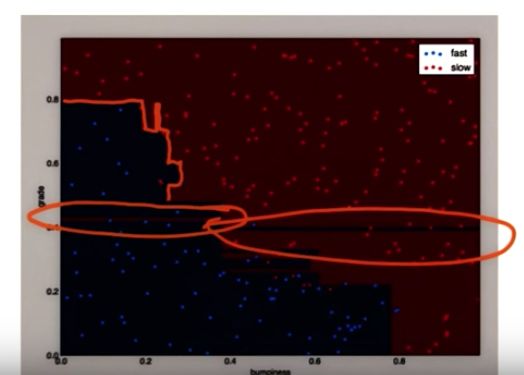
Decision Tree Boundary 很独特,像现代艺术,还有一些小岛。
但是有些 Overfitting,
Step-2: Accuracy
Resources:
http://scikit-learn.org/stable/modules/generated/sklearn.metrics.accuracy_score.html
import sys
from class_vis import prettyPicture
from prep_terrain_data import makeTerrainData

import numpy as np
import pylab as pl

features_train, labels_train, features_test, labels_test = makeTerrainData()

#################################################################################

########################## DECISION TREE #################################

#### your code goes here
from sklearn import tree
clf=tree.DecisionTreeClassifier()
clf=clf.fit(features_train, labels_train)
labels_predict=clf.predict(features_test)

from sklearn.metrics import accuracy_score


acc = accuracy_score(labels_test,labels_predict)
### you fill this in!
### be sure to compute the accuracy on the test set


def submitAccuracies():
  return {"acc":round(acc,3)}
上述 Classifier 得到准确率大约在 91%,在这里有一些 Overfitting,我们也许可以通过 Tuning some Parameters 来改善这个精度。
Step-3: 接下来看哪些 Parameters 可以 Tune
Resource:
Parameters of Decision Tree
http://scikit-learn.org/stable/modules/generated/sklearn.tree.DecisionTreeClassifier.html#sklearn.tree.DecisionTreeClassifier
DecisionTreeClassifier 有如下几个 Parameters
class sklearn.tree.
DecisionTreeClassifier
(criterion='gini',
splitter='best',
max_depth=None,
min_samples_split=2,
min_samples_leaf=1,
min_weight_fraction_leaf=0.0,
max_features=None,
random_state=None,
max_leaf_nodes=None,
class_weight=None,
presort=False)
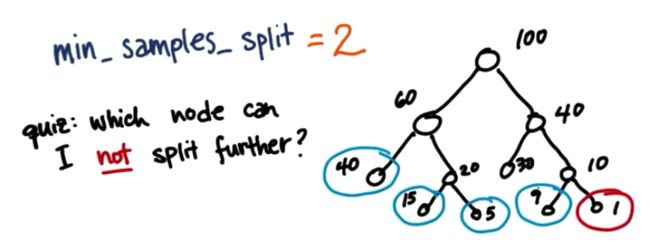
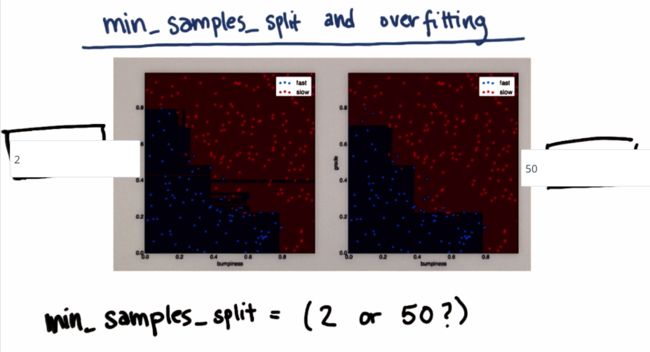
其中 min_samples_split 如果太小,可能会造成 Overfitting,因为它的意思是,当 Node 上的值小于什么时就不能再分下去了,因此越小的话,分出来的层就越多。当把默认值改成 50 时,就看不到 Overfitting 的那条线了。
用代码运行一下,看哪个值可以得到更高的准确率:
import sys
from class_vis import prettyPicture
from prep_terrain_data import makeTerrainData

import matplotlib.pyplot as plt
import numpy as np
import pylab as pl

features_train, labels_train, features_test, labels_test = makeTerrainData()


########################## DECISION TREE #################################


### your code goes here--now create 2 decision tree classifiers,
### one with min_samples_split=2 and one with min_samples_split=50
### compute the accuracies on the testing data and store
### the accuracy numbers to acc_min_samples_split_2 and
### acc_min_samples_split_50, respectively

from sklearn import tree
clf_2=tree.DecisionTreeClassifier(min_samples_split=2)
clf_2=clf_2.fit(features_train, labels_train)
labels_predict_2=clf_2.predict(features_test)

clf_50=tree.DecisionTreeClassifier(min_samples_split=50)
clf_50=clf_50.fit(features_train, labels_train)
labels_predict_50=clf_50.predict(features_test)

from sklearn.metrics import accuracy_score

acc_min_samples_split_2=accuracy_score(labels_test,labels_predict_2)
acc_min_samples_split_50=accuracy_score(labels_test,labels_predict_50)


def submitAccuracies():
  return {"acc_min_samples_split_2":round(acc_min_samples_split_2,3),
          "acc_min_samples_split_50":round(acc_min_samples_split_50,3)}
比较 min_samples_split 等于50 的时候,精度比 2 的时候大。
{"message": "{'acc_min_samples_split_50': 0.912, 'acc_min_samples_split_2': 0.908}"}
熵,很重要,决定着 Decision Tree 如何划分 data。
Definition: measure of impurity of a bunch of examples.
Formular:
例:
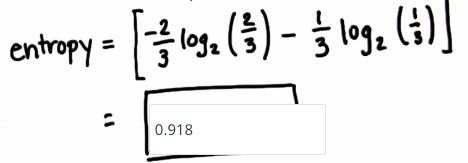
下面这个例子,计算它的 Entropy:
最后的 Entropy 结果如下:
那么熵是如何影响 Decision Tree 的呢?
Information Gain:
Decision Tree 就是要最大化 Information Gain
现在看 grade 这个node上,当 grade=steep 时,slow和fast的熵是多少,当 grade=flat 时,这个熵=0,因为只有一类 fast,取对数时=0. Remember we are calculating entropy, not counting observations. What is the entropy of a set that contains observations of the same class?
例:
数据:
要计算Information Gain:
Entropy of Parent,即 speed
Entropy of Children,即 grade
其中 flat children的熵是:
其中 steep children的熵是:
接着计算公式的后半部分:
最后得到 Information gain=1-3/4*0.9184-0=0.3112
接着计算下一个Children
所以 bumpiness 的 Information Gain=0,也就是我们没有从 bumpiness 得到任何有用的信息。
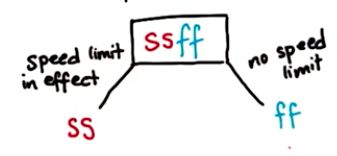
接着看 speed limit 这个children的 Information Gain=1,也就是非常的 Pure,这是我们希望用来 split 的因素。
综上,
steep children 的 Information gain=0.3112
bumpiness 的 Information Gain=0
speed limit 的 Information Gain=1
所以选择 speed limit 来作为split node。
此外 Decision Tree 的这个Parameter :criterion='gini' 也是可以 Tune 的,gini index 是类似于 metric of impurity,它和 Entropy Information Gain 略有不同,但是效果是一样的。
Bias and Variance
Strengths and Weakness
Weakness:
prone to overfitting: when lots of features, complicate tree
so, need to tune parameters, stop the growth of trees at appropriate time.
Strengths:
Ensemble method: Build bigger classifier out of decision trees,

