效果图
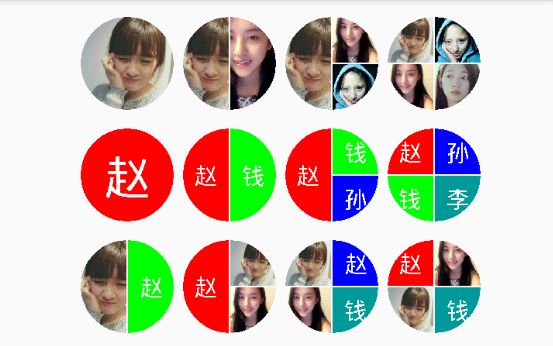
一个仿钉钉群组头像显示效果,支持图片和文字,可以任意组合,非常方便,代码量也非常少,非常适合拿来学习。
绘制一个圆形图片头像
这里我首先新建了一个画布,然后把画布切割成圆形,接下来,通过Bitmap的createScaledBitmap把bitmap缩放到指定大小(这里是画布大小),最后把bitmap绘制到画布上,代码如下:
        final Bitmap result = Bitmap.createBitmap(width, height, Bitmap.Config.ARGB_8888);
        Canvas canvas = new Canvas(result);

        Path mPath = new Path();
        mPath.addCircle(width/2, height/2, width/2, Path.Direction.CCW);
        canvas.clipPath(mPath); //切割画布
        Bitmap bmp = Bitmap.createScaledBitmap(bitmap, mWidth, mHeight, false);
        canvas.drawBitmap(bmp, 0, 0, null);
这样就可以实现图中第一行第一个的效果了,是不是很简单。
绘制半圆
接下来是第二个,它由左右两个半圆组成,我们看下左半圆,按上面的方法把bitmap缩放到画布大小,我们取中间部分来展示,所用的方法是Bitmap的createBitmap(Bitmap source, int x, int y, int width, int height),它以source为原图,创建新的图片,指定起始坐标以及新图像的高宽。由于是取中间部分,所以起始坐标x=mWidth/4,y=0,宽度width=mWidth/2,高度height=mHeight,最后调用canvas的drawBitmap(Bitmap bitmap, float left, float top, Paint paint)进行绘制,如果是左半部分left=0,top=0,右半部份left=mWidth / 2,top = 0,代码如下(marginWhiteWidth 为中间间隔的宽度):
       x = mWidth / 4 + marginWhiteWidth / 2;
       y = 0;
       width = mWidth / 2 - marginWhiteWidth / 2;// 中间留有1px白条
       height = mHeight;
       //左半部分
       left=0;
       top=0;
       //右半部分
       //left=mWidth / 2 + marginWhiteWidth / 2;
       //top=0;
       // 比例缩放
       Bitmap bmp = Bitmap.createScaledBitmap(bitmap, mWidth, mHeight, false);
       // 裁取中间部分(从x点裁取置顶距离)
       Bitmap dstBmp = Bitmap.createBitmap(bmp, x, y, width,  height);
       // 绘图
       canvas.drawBitmap(dstBmp, left, top, null);
绘制四分之一圆
//接下来看第四个,绘制四分之一圆,把bitmap的宽高缩放到画布的一半,根据位置调整drawBitmap方法的left和top就可以了。
dstWidth = mWidth/2 - marginWhiteWidth / 2;
dstHeight = mHeight/2 - marginWhiteWidth / 2;
//左上
left = 0;
top = 0;
//左下
//left = 0;
//top = mHeight/2 + marginWhiteWidth / 2;
//右上
//left = mWidth/2 + marginWhiteWidth / 2;
//top = 0;
//右下
//left = mWidth/2 + marginWhiteWidth / 2;
//top = mHeight/2 + marginWhiteWidth / 2;
// 比例缩放
Bitmap bmp = Bitmap.createScaledBitmap(bitmap, dstWidth, dstHeight, false);
// 绘图
canvas.drawBitmap(bmp, left, top, null);
绘制一个圆形文字头像
首先给文字绘制背景
Paint textBgPaint = new Paint();
textBgPaint.setColor(Color.parseColor(bgColer));
canvas.drawRect(bgLeft, bgTop, bgRight, bgBottom, textBgPaint);
调整bgLeft, bgTop, bgRight, bgBottom的值就可以调整背景的区域。
接下来绘制文字
Paint textPaint = new Paint();
textPaint.setColor(Color.WHITE);
textPaint.setTextSize(textSize);
textPaint.setStyle(Paint.Style.FILL);
//该方法即为设置基线上那个点究竟是left,center,还是right  这里我设置为center
textPaint.setTextAlign(Paint.Align.CENTER);
Paint.FontMetrics fontMetrics = textPaint.getFontMetrics();
float top = fontMetrics.top;//为基线到字体上边框的距离,即上图中的top
float bottom = fontMetrics.bottom;//为基线到字体下边框的距离,即上图中的bottom
x = mWidth/2;
y = (int) (mHeight/2 - top/2 - bottom/2);//基线中间点的y轴计算公式
canvas.drawText(text, x, y, textPaint);
可以调整x,y的值来调整文字的位置,具体请看源码。部分参考自DingDingImage,特此感谢。
源码