前言
其实,这一篇的题目,我觉得应该是RxSwift对代理的封装,最后还是沿用官方Example的命名吧。
效果说明
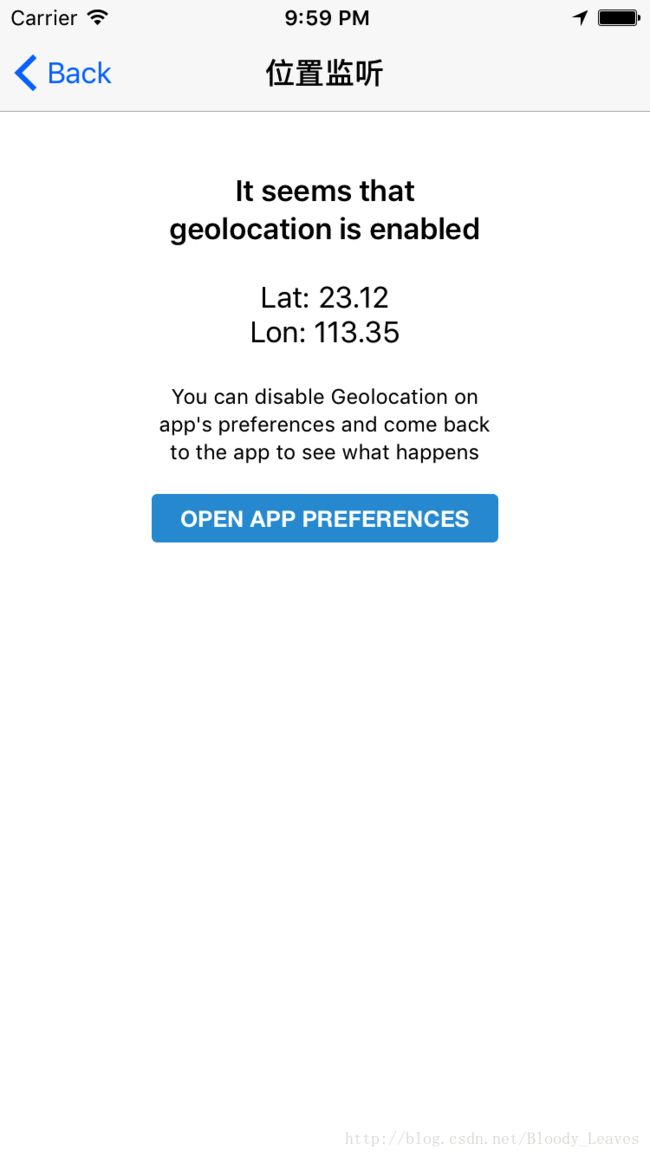
图一
图二
图一是当App可以使用定位信息时,显示当前的经纬度。
图二是当App被禁止使用定位信息时,显示的提示信息
代码解释
比起上两个Example,这个Example复杂的多了。主要复杂在对Delegate的封装。
如何使用RxSwift对Delegate的封装稍后再说,先看看封装后的使用。
let service = GeolocationService.instance
        // 将是否允许使用定位的“Bool”绑定noGeolocationView.rx.isHidden
        service.authorized
        .drive(noGeolocationView.rx.isHidden)
        .addDisposableTo(disposeBag)
        // 将定位信息绑定在showLocationLabel.rx.coordinates
        service.location
        .drive(showLocationLabel.rx.coordinates)
        .addDisposableTo(disposeBag)
1、对UILabel的扩展
可以看到上面的例子,将CLLocationCoordinate2D的经纬度信息绑定在label上了。当想绑定的在视图信息越多,我们就需要对UILabel进行扩展。
扩展方法如下:
/*
意思就是当Reactive的Base对象是UILabel时,增加一个类型为UIBindingObserver的coordinates属性。
*/
private extension Reactive where Base: UILabel {
    var coordinates: UIBindingObserver {
        return UIBindingObserver(UIElement: base, binding: { (label, location) in
            label.text = "Lat: \(location.latitude)\nLon: \(location.longitude)"
        })
    }
}
在后面的block参数列表中,label的类型是泛型中的Base类型(例子是UILabel),location是泛型中的CLLocationCoordinate2D对象。因此,我们只要在block中对label和location对象做操作即可。
2、封装CLLocationManagerDelegate
2.1、创建CLLocationManagerDelegate的代理Proxy
为了创建Proxy对象,我们需要继承DelegateProxy,并且遵守DelegateProxyType协议,该协议必须实现以下两个方法。
/// 返回object的代理对象
    class func currentDelegateFor(_ object: AnyObject) -> AnyObject? {
        let locationManager: CLLocationManager = object as! CLLocationManager
        return locationManager.delegate
    }

    /// 设置objct代理对象
    class func setCurrentDelegate(_ delegate: AnyObject?, toObject object: AnyObject) {
        let locationManager: CLLocationManager = object as! CLLocationManager
        if let delegate = delegate {
            locationManager.delegate = (delegate as! CLLocationManagerDelegate)
        } else {
            locationManager.delegate = nil
        }
    }
2.2、创建PublishSubject对象
先来简单回顾一下概念:
subject的概念
Subject可以看做是一种代理和桥梁。它既是订阅者又是订阅源,这意味着它既可以订阅其他Observable对象,同时又可以对它的订阅者们发送事件。
PublishSubject的概念
当你订阅PublishSubject的时候,你只能接收到订阅他之后发生的事件
因此为了能够成为代理的代理,我们需要监听代理的事件,并且能够让外部进行监听,所以我们创建了以下两个publishSubject对象
internal lazy var didUpdateLocationsSubject = PublishSubject<[CLLocation]>()
    internal lazy var didFailWithErrorSubject = PublishSubject()
将代理事件通过subject传递出去,记得调用_forwardToDelagate?.method方法,因为我们这里只是做了一层监听中转
public func locationManager(_ manager: CLLocationManager, didUpdateLocations locations: [CLLocation]) {
        _forwardToDelegate?.locationManager(manager, didUpdateLocations: locations)
        didUpdateLocationsSubject.onNext(locations)
    }

    public func locationManager(_ manager: CLLocationManager, didFailWithError error: Error) {
        _forwardToDelegate?.locationManager(manager, didFailWithError: error)
        didFailWithErrorSubject.onNext(error)
    }
代理和proxy之间的层级关系图:
      +-------------------------------------------+
      |                                           |
      | UIView subclass (UIScrollView)            |
      |                                           |
      +-----------+-------------------------------+
                  |
                  | Delegate
                  |
                  |
      +-----------v-------------------------------+
      |                                           |
      | Delegate proxy : DelegateProxyType        +-----+---->  Observable
      |                , UIScrollViewDelegate     |          |
      +-----------+-------------------------------+     +---->  Observable
                  |                                     |
                  |                                     +---->  Observable
                  |                                     |
                  | forwards events                     |
                  | to custom delegate                  |
                  |                                     v
      +-----------v-------------------------------+
      |                                           |
      | Custom delegate (UIScrollViewDelegate)    |
      |                                           |
      +-------------------------------------------+
2.3、对CLLocationManager做扩展
将想被监听的属性,通过刚才创建Proxy传递出来,于是我们只需要创建对应的Observable。
代码如下:
extension Reactive where Base: CLLocationManager {
    /**
     Reactive wrapper for `delegate`.

     For more information take a look at `DelegateProxyType` protocol documentation.
     */
    public var delegate: DelegateProxy {
        return RxCLLocationManagerDelegateProxy.proxyForObject(base)
    }

    // MARK: Responding to Authorization Changes

    /**
     Reactive wrapper for `delegate` message.
     */
    public var didChangeAuthorizationStatus: Observable {
        return delegate.methodInvoked(#selector(CLLocationManagerDelegate.locationManager(_:didChangeAuthorization:)))
            .map { a in
                let number = try castOrThrow(NSNumber.self, a[1])
                return CLAuthorizationStatus( rawValue: Int32(number.intValue)) ?? .notDetermined
        }
    }

    // MARK: Responding to Location Events

    /**
     Reactive wrapper for `delegate` message.
     */
    public var didUpdateLocations: Observable<[CLLocation]> {
        return (delegate as! RxCLLocationManagerDelegateProxy).didUpdateLocationsSubject.asObservable()
    }

    /**
     Reactive wrapper for `delegate` message.
     */
    public var didFailWithError: Observable {
        return (delegate as! RxCLLocationManagerDelegateProxy).didFailWithErrorSubject.asObservable()
    }
}
这里值得一提的是调后delegate.methodInvoked,会返回Observable<[Any]>,其中数组装的就是传递给selector的参数,所以后面的map的block中,a[1]代表的就是CLAuthorizationStatus枚举类型。
此外,还定义了一个转类型的函数,转失败后,会发出Error
fileprivate func castOrThrow(_ resultType: T.Type, _ object: Any) throws -> T {
    guard let returnValue = object as? T else {
        throw RxCocoaError.castingError(object: object, targetType: resultType)
    }

    return returnValue
}
2.4、定义service层
class GeolocationService {
static let instance = GeolocationService()
private (set) var authorized: Driver
private (set) var location: Driver

private let locationManager = CLLocationManager()

private init() {

    locationManager.distanceFilter = kCLDistanceFilterNone
    locationManager.desiredAccuracy = kCLLocationAccuracyBestForNavigation

    // deferred会为每一位订阅者observer创建一个新的可观察序列
    authorized = Observable.deferred { [weak locationManager] in
        let status = CLLocationManager.authorizationStatus()
        guard let locationManager = locationManager else {
            return Observable.just(status)
        }
        return locationManager
            .rx.didChangeAuthorizationStatus
            .startWith(status)
        }
        .asDriver(onErrorJustReturn: CLAuthorizationStatus.notDetermined)
        .map {
            switch $0 {
            case .authorizedAlways:
                return true
            default:
                return false
            }
    }

    location = locationManager.rx.didUpdateLocations
        .asDriver(onErrorJustReturn: [])
        .flatMap {
            return $0.last.map(Driver.just) ?? Driver.empty()
        }
        .map { $0.coordinate }
    locationManager.requestAlwaysAuthorization()
    locationManager.startUpdatingLocation()
}
}
这里的service层就是将之前扩展的LocationManager再次封装。值得一提的是,这里的authorized是使用deferred创建的。
deferred
deferred会等到有订阅者的时候再通过工厂方法创建Observable对象,每个订阅者订阅的对象都是内容相同而完全独立的序列。
因此,每次订阅authorized信息时,都会发送独立的序列,确保每次都会响应。
总结
该Example可以当作封装Delegate的介绍,因此可以总结一下封装流程如下:
- 创建代理Proxy,需要继承继承DelegateProxy,并且遵守DelegateProxyType协议
- 定义subject对象,即订阅者(订阅代理)又是订阅源(被外部订阅)
之后的什么扩展,service层就看大家的需要而定制了,但是以上的两步是必须的。最后,有不正确的地方,欢迎指正~
Demo地址
https://github.com/maple1994/RxSwfitTest

