在MXNET的官方文档网站有非常多的实例,我们从最简单的MNIST开始,地址在这里(与“mxnet/example/image-classification”目录下的代码不同,但是更容易理解)。本文不求详解,只求对Mxnet的基本流程有个大概的了解。
准备数据
首先下载数据库并解压缩,得到train_lbl,train_img两组变量。
import numpy as np
import os
import urllib
import gzip
import struct
def download_data(url, force_download=True):
    fname = url.split("/")[-1]
    if force_download or not os.path.exists(fname):
        urllib.urlretrieve(url, fname)
    return fname

def read_data(label_url, image_url):
    with gzip.open(download_data(label_url)) as flbl:
        magic, num = struct.unpack(">II", flbl.read(8))
        label = np.fromstring(flbl.read(), dtype=np.int8)
    with gzip.open(download_data(image_url), 'rb') as fimg:
        magic, num, rows, cols = struct.unpack(">IIII", fimg.read(16))
        image = np.fromstring(fimg.read(), dtype=np.uint8).reshape(len(label), rows, cols)
    return (label, image)

path='http://yann.lecun.com/exdb/mnist/'
(train_lbl, train_img) = read_data(
    path+'train-labels-idx1-ubyte.gz', path+'train-images-idx3-ubyte.gz')
(val_lbl, val_img) = read_data(
    path+'t10k-labels-idx1-ubyte.gz', path+'t10k-images-idx3-ubyte.gz')
MXNet利用 iterator来进行给神经网络送batch数据,每个batch包含数张图像以及其相应的标签用于训练。iterator可以实现数据预取,实现数据读取和数据处理的管线化(pipeline)从而提高处理速度。
- 数据库参数:比如数据库路径,输入尺寸
- Batch参数: 比如batch 大小
- 增强参数: 对输入图像进行额外处理,比如镜像、截断操作
- 后端参数: 控制后端线程的行为
- 辅助参数: 提供用于调试的参数设定,如verbose设定是否要输出parser信息。
import mxnet as mx
def to4d(img):
    return img.reshape(img.shape[0], 1, 28, 28).astype(np.float32)/255
batch_size = 100
train_iter = mx.io.NDArrayIter(to4d(train_img), train_lbl, batch_size, shuffle=True)
val_iter = mx.io.NDArrayIter(to4d(val_img), val_lbl, batch_size)
上面的代码就实现了非常简单的两个iterator,train_iter和val_iter分别用于训练和验证。
设计网络
Mxnet的网络设计就像乐高积木,一块一块的堆叠就可以
# Create a place holder variable for the input data
data = mx.sym.Variable('data')
# Flatten the data from 4-D shape (batch_size, num_channel, width, height)
# into 2-D (batch_size, num_channel*width*height)
data = mx.sym.Flatten(data=data)

# The first fully-connected layer
fc1  = mx.sym.FullyConnected(data=data, name='fc1', num_hidden=128)
# Apply relu to the output of the first fully-connnected layer
act1 = mx.sym.Activation(data=fc1, name='relu1', act_type="relu")

# The second fully-connected layer and the according activation function
fc2  = mx.sym.FullyConnected(data=act1, name='fc2', num_hidden = 64)
act2 = mx.sym.Activation(data=fc2, name='relu2', act_type="relu")

# The thrid fully-connected layer, note that the hidden size should be 10, which is the number of unique digits
fc3  = mx.sym.FullyConnected(data=act2, name='fc3', num_hidden=10)
# The softmax and loss layer
mlp  = mx.sym.SoftmaxOutput(data=fc3, name='softmax')
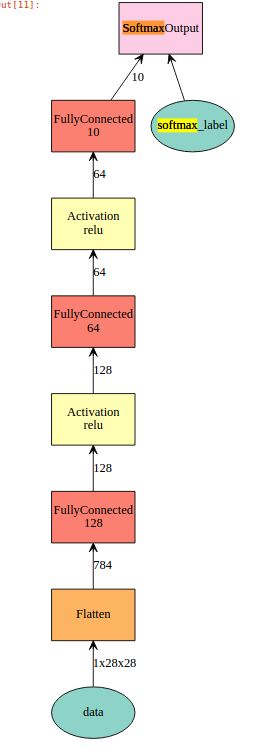
可视化上述代码设计的网络
# We visualize the network structure with output size (the batch_size is ignored.)
shape = {"data" : (batch_size, 1, 28, 28)}
mx.viz.plot_network(symbol=mlp, shape=shape)
一共三层,前面两层FullyConnected + Relu,最后一层为FullyConnected+Softmax。
训练
最后通过model.fit来进行训练,并打印出Log文件
import logging
logging.getLogger().setLevel(logging.DEBUG)

model = mx.model.FeedForward(
    symbol = mlp,       # network structure
    num_epoch = 10,     # number of data passes for training
    learning_rate = 0.1 # learning rate of SGD
)
model.fit(
    X=train_iter,       # training data
    eval_data=val_iter, # validation data
    batch_end_callback = mx.callback.Speedometer(batch_size, 200) # output progress for each 200 data batches
)
