内容:
一、UILabel
二、UITextField
三、UIButton
四、UIImageView
UILabel :
*先创建一个view画纸containerView
    //创建一个UILabel、标签视图
    UILabel *label = [[[UILabel alloc] initWithFrame:CGRectMake(50, 100, 250, 100)]autorelease];

    //设置label的背景颜色
    label.backgroundColor = [UIColor redColor];

    //设置label的文本
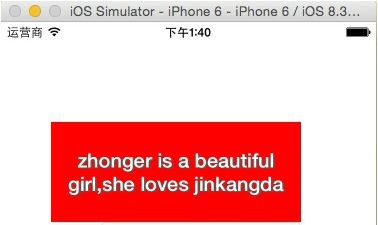
    label.text = @"zhonger is a beautiful girl,she loves jinkangda";

    //设置label的文本颜色
    label.textColor = [UIColor whiteColor];

    //设置label的文本对齐方式,默认左对齐
    label.textAlignment = NSTextAlignmentCenter;

    //设置label的字体,默认17
//    label.font = [UIFont systemFontOfSize:20];
    //加粗
    label.font = [UIFont boldSystemFontOfSize:20];

    //设置label多行显示,默认是1,单行显示
    label.numberOfLines = 0;

    //设置label的文本阴影的颜色和偏移量
    label.shadowColor = [UIColor darkGrayColor];
    //阴影向x正⽅向偏移2,向y正⽅向偏移1。
    label.shadowOffset = CGSizeMake(2, 1);

    //设置折行模式
    label.lineBreakMode = NSLineBreakByWordWrapping;

    [containerView addSubview:label];
**使用添加的延展方法来添加一个标签视图:**
**AppDelegate.m中****:**
**1、声明**
@interface AppDelegate ()
//创建UILabel
- (UILabel *)createLabelWithText:(NSString *)text frame:(CGRect)frame textColor:(UIColor*)textColor textAlignment:(NSTextAlignment)textAlignment numberOfLines:(NSInteger)numberOfLines font:(UIFont *)font;
@end

**2、实现**
@implementation AppDelegate
//实现UILabel
- (UILabel *)createLabelWithText:(NSString *)text frame:(CGRect)frame textColor:(UIColor*)textColor textAlignment:(NSTextAlignment)textAlignment numberOfLines:(NSInteger)numberOfLines font:(UIFont *)font {
    UILabel *label = [[UILabel alloc] initWithFrame:frame];
    label.text = text;
    label.textColor = textColor;
    label.textAlignment = textAlignment;
    label.numberOfLines = numberOfLines;
    label.font = font;
    return [label autorelease];
}

**3、使用**
- (BOOL)application:(UIApplication *)application didFinishLaunchingWithOptions:(NSDictionary*)launchOptions {
    ... ...

    UILabel *label1 = [self createLabelWithText:@"猪八达点秋香" frame:CGRectMake(100, 300, 200,40) textColor:[UIColor magentaColor] textAlignment:NSTextAlignmentCenter numberOfLines:0 font:[UIFont boldSystemFontOfSize:21]];
    [containerView addSubview:label1];

    ... ...
}
****
    ... ...
@end
UITextField:
    //创建一个输入框,UITextField
    UITextField *textField = [[UITextField alloc] initWithFrame:CGRectMake(100, 200, 200,40)];

    //告知用户这个输入框应该输入的信息
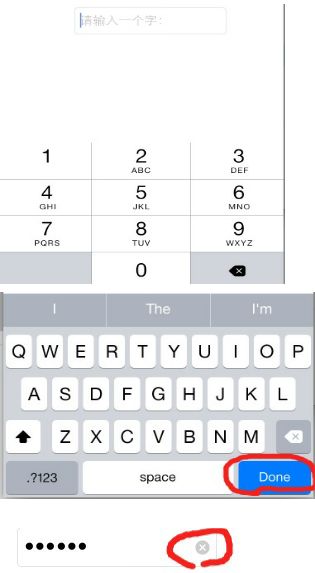
    textField.placeholder = @"请输入一种花的名字:";
    //设置输入框的边框样式
    textField.borderStyle = UITextBorderStyleRoundedRect;
    //设置输入框是否重新输入的时候清空内容
    textField.clearsOnBeginEditing = YES;
    //设置密文输入
    textField.secureTextEntry = YES;

UITextInputTraits:
    //设置键盘样式
    textField.keyboardType = UIKeyboardTypeNumberPad;
    //设置键盘上的return键样式
    textField.returnKeyType = UIReturnKeyDone;
    //设置键盘上的清除样式模式
    textField.clearButtonMode = UITextFieldViewModeAlways;

    [containerView addSubview:textField];
    [textField release];
UITextField常⽤代理⽅法:
//当textField将要开始编辑的时候告诉委托⼈
- (BOOL)textFieldShouldBeginEditing:(UITextField *)textField;

//当textField已经编辑的时候告诉委托⼈
- (void)textFieldDidBeginEditing:(UITextField *)textField;

//当textField将要完成编辑的时候告诉委托⼈
- (BOOL)textFieldShouldEndEditing:(UITextField *)textField;

//当textField已经完成编辑的时候告诉委托⼈
- (void)textFieldDidEndEditing:(UITextField *)textField;

//将某个范围内的字符替换为另一段字符
- (BOOL)textField:(UITextField *)textField shouldChangeCharactersInRange:(NSRange)range replacementString:(NSString *)string;

//当按下键盘上的清除键时告诉委托人
- (BOOL)textFieldShouldClear:(UITextField *)textField;

//当点击键盘上回车按键时候告诉委托⼈
- (BOOL)textFieldShouldReturn:(UITextField *)textField;
UIButton:
    //创建一个UIButton对象
****
    UIButton *button = [UIButton buttonWithType:UIButtonTypeCustom];

    //设置frame
    button.frame = CGRectMake(100, 300, 200, 150);

    //设置button显示的文本(标题)
    [button setTitle:@"一月" forState:UIControlStateNormal];
    [button setTitleColor:[UIColor blackColor] forState:UIControlStateNormal];
/*这里注意:
    UIButtonTypeCustom 比 UIButtonTypeSystem更灵活
    UIButtonTypeSystem会设置一些默认样式,如,字体颜色为 蓝色
    即 UIButtonTypeSystem 不给定标题颜色也可显示,但是 UIButtonTypeCustom 就不行了
*/

    //设置了背景图片为普通状态,按钮未被点击时的状态
    [button setBackgroundImage:[UIImage imageNamed:@"xigua.png"] forState:UIControlStateNormal];
    //设置了背景图片为高亮状态,按钮被点击时的状态
    [button setBackgroundImage:[UIImage imageNamed:@"BtnOff"] forState:UIControlStateHighlighted];
/*
这里注意:
UIControlStateHighlighted 高亮状态下,点住不动才可显示图片
如果两个状态设置了不同图片,点击出现闪烁图片改变效果
如果图片是png格式的,后缀可不写
*/

    //设置了背景图片,是否出现闪烁的效果,即是否出现点击是的高亮状态,默认YES
    button.adjustsImageWhenHighlighted = NO;

    //设置button的前景图片
    [button setImage:[UIImage imageNamed:@"xigua.png"] forState:UIControlStateNormal];
/*
这里注意:
设置button的背景图片,不论图片大小,都填充显示,显示的与button等大
设置button的前景图片,如果图片的大小大于设置的button的frame,那么图片会被压缩到与button等大,如果图片大小小于button的frame,保持原大小
在UIButtonTypeCustom状态下显示原图,在UIButtonTypeSystem状态下显示图片轮廓
*/

    //关键方法,为button添加一个事件
    [button addTarget:self action:@selector(click:) forControlEvents:UIControlEventTouchUpInside];
    [containerView addSubview:button];
/*
这里注意:
MVC,V即view,C即control
Button是UIView的子类,View不执行方法,交给Control去执行,解耦合
addTarget:(执行对象) action:(方法) forControlEvents:(点击方式)
UIControlEventTouchUpInside 点击方式为:点击后松手
*/
UIImageView:
UIImageView是iOS中用于显示图片的类,iOS中几乎所有看到的图片,都是由这个类来显示的。
 //每次使用都需要加载,不过使用完可以进行释放,不会对内存造成太大的压力,大图片使用,不常用图片
    NSString *path = [[NSBundle mainBundle] resourcePath];
    NSString *imagePath = [NSString stringWithFormat:@"%@/600.jpeg",path];
    UIImage *image = [[UIImage alloc] initWithContentsOfFile:imagePath];

    //不需要每次加载,但是当程序结束时才释放,小图片使用,常用图片
    UIImage *image1 = [UIImage imageNamed:@"600.jpeg"];

    //图片不能直接显示在屏幕上需要载体
    //载体
    UIImageView *imageView = [[UIImageView alloc] initWithImage:image1];
    //图片显示在屏幕上的大小是由载体控制的
    imageView.frame = CGRectMake(10, 10, 300, 500);
****
    //内容模式
    /*
     默认效果:UIViewContentModeScaleToFill - 拉伸充满整个载体
     UIViewContentModeScaleAspectFill - 拉伸不改变比例,充满最大的一边
     UIViewContentModeScaleAspectFit - 拉伸不改变比例,充满最小的一边
     */
    imageView.contentMode = UIViewContentModeScaleAspectFill;
UIImageView的动态图(实现动画):
animationImages //设置一组动态图片
animationDuration //设置播放一组动态图片的时间
animationRepeatCount //设置重复次数
startAnimating //开始动画
stopAnimating //结束动画
//做动态图
    UIImageView *imageView = [[UIImageView alloc] initWithFrame:CGRectMake(100, 100, 173, 173)];

    //指定展示图片
//    imageView.image = [UIImage imageNamed:@"dog-26(被拖移).tiff"];


    //UIImageView动画 - 播放序列图
    NSMutableArray *mArr = [NSMutableArray arrayWithCapacity:0];
    for (int i = 1; i < 30; i ++) {
        //获取图片名称
        NSString *picStr = [NSString stringWithFormat:@"dog-%d(被拖移).tiff",i];
        //获取每一张图片对象
        UIImage *image = [UIImage imageNamed:picStr];
        //将图片添加到数组
        [mArr addObject:image];
    }
    //设置动画播放数组,指定做动画的所有图片
    imageView.animationImages = mArr;
    //指定动画时间(秒)
    imageView.animationDuration = 2.0;
    //重复次数,默认为0,一直重复,,直到使用stopAnimating
    imageView.animationRepeatCount = 0;
    //开启动画
    [imageView startAnimating];

    [containerView addSubview:imageView];
    [imageView release];


