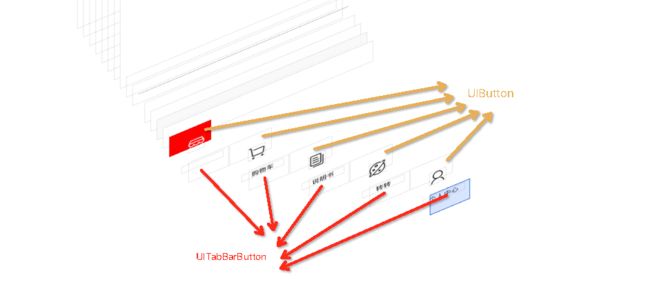
日常开发中的系统自带的tabbar基本可以满足需求,但有时也需要特殊的tabbar来展示。
一.自定义单个的tabbarItem
1.创建 LeeBaseTabBarViewController : UITabBarController
tabbar的样式设计{

}
- (void)viewDidLoad {
    [super viewDidLoad];
    [self addChildViewControllerWithClassname:[HomeViewController description] imagename:@"icon_tab_home_default" title:@"首页"];
    [self addChildViewControllerWithClassname:[PersonalViewController description] imagename:@"icon_tab_personal_default" title:@"个人"];

    //使用自定义的tabbar来替换
    LeeTabBar *tabBar = [[LeeTabBar alloc]init];
    [self setValue:tabBar forKeyPath:@"tabBar"];
}

// 根据需求添加相应的子控制器
- (void)addChildViewControllerWithClassname:(NSString *)classname
                                  imagename:(NSString *)imagename
                                      title:(NSString *)title {

    UIViewController *vc = [[NSClassFromString(classname) alloc] init];
    LeeBaseNavigationViewController *nav = [[LeeBaseNavigationViewController alloc] initWithRootViewController:vc];
    nav.tabBarItem.title = title;
    nav.tabBarItem.image = [UIImage imageNamed:imagename];
    nav.tabBarItem.selectedImage = [[UIImage imageNamed:[imagename stringByReplacingOccurrencesOfString:@"default" withString:@"selected"]] imageWithRenderingMode:UIImageRenderingModeAlwaysOriginal];
    [self addChildViewController:nav];
}
2.创建LeeTabBar : UITabBar
@interface LeeTabBar ()
@property (nonatomic, weak) UIButton *middleBtn;
@end

@implementation LeeTabBar
- (instancetype)initWithFrame:(CGRect)frame {
    self = [super initWithFrame:frame];
    if (self) {
        UIButton *middleBtn  = [[UIButton alloc] init];
        [middleBtn setBackgroundImage:[UIImage imageNamed:@"icon_publish"] forState:UIControlStateNormal];
        middleBtn.size = middleBtn.currentBackgroundImage.size;
        [middleBtn addTarget:self action:@selector(middleBtnClick) forControlEvents:UIControlEventTouchUpInside];
        [self addSubview:middleBtn];
        _middleBtn = middleBtn;
    }
    return self;
}

- (void)middleBtnClick {

}

//重新布局
- (void)layoutSubviews {
    [super layoutSubviews];

    // 设置中间按钮的位置
    _middleBtn.centerX = self.width / 2;
    _middleBtn.centerY = self.height / 3;

    // 设置其他tabbarItem的位置和大小
    CGFloat tabBarItemW = self.width / 3;
    CGFloat tabBarItemIndex = 0;
    for (UIView *child in self.subviews) {
        Class class = NSClassFromString(@"UITabBarButton");
        if ([child isKindOfClass:class]) {
            child.width = tabBarItemW;
            child.left = tabBarItemW * tabBarItemIndex;
            tabBarItemIndex++;
            if (tabBarItemIndex == 1) {
                tabBarItemIndex++;
            }
        }
    }
}
@end
在LeeTabbar中打印self.subviews。可以发现有两个UITabBarButton, 分别为左右tabbarItem。中间添加的那个为UIButton。 所以点击的时候并不会走UITabBarDelegate这个代理,因此在LeeTabBar的按钮点击方法中需要调用自己写的代理,并在LeeBaseTabBarViewController中实现。
二.替换整个tababr
1.创建 LeeTabBarController : UITabBarController
@implementation LeeTabBarController
- (void)viewDidLoad {
    [super viewDidLoad];
    [self addChildViewControllerWithClassname:[HomeViewController description]];
    [self addChildViewControllerWithClassname:[ShopViewController description]];
    [self addChildViewControllerWithClassname:[ManualViewController description]];
    [self addChildViewControllerWithClassname:[ZhuanzhuanViewController description]];
    [self addChildViewControllerWithClassname:[PersonalViewController description]];

   //将自定义的View覆盖在self.tabBar上
    CGRect rect = self.tabBar.bounds;
    Tabbar *myView = [[Tabbar alloc] init];
    myView.delegate = self;
    myView.frame = rect;
    myView.backgroundColor = kWhiteColor;
    [self.tabBar addSubview:myView];

    NSArray *defaultArray = @[@"icon_tab_home_default",
                              @"icon_tab_shop_default",
                              @"icon_tab_manual_default",
                              @"icon_tab_zhuan_default",
                              @"icon_tab_person_default"];
    NSArray *selectedArray = @[@"icon_tab_home_selected",
                               @"icon_tab_shop_selected",
                               @"icon_tab_manual_selected",
                               @"icon_tab_zhuan_selected",
                               @"icon_tab_person_selected"];
    NSArray *titleArray = @[@"首页",@"购物车",@"说明书",@"转转",@"个人中心"];

    //给self.tabbar上的按钮添加图片文字
for (int i=0; i2.创建Tabbar:UIView
#import
@class Tabbar;
@protocol TabbarDelegate
- (void) tabBar:(Tabbar *)tabBar selectedFrom:(NSInteger) from to:(NSInteger)to;
@end
@interface Tabbar : UIView
-(void)addButtonWithImage:(UIImage *)image selectedImage:(UIImage *) selectedImage title:(NSString *)title;
@property (weak ,nonatomic) id delegate;
@end

#import "Tabbar.h"
#import "TabbarBtn.h"
@interface Tabbar ()
@property (nonatomic, weak) UIButton *selectedBtn; //设置之前选中的按钮
@end
@implementation Tabbar
- (void)addButtonWithImage:(UIImage *)image selectedImage:(UIImage *)selectedImage title:(NSString *)title{
   //创建自定义的UIButton
    TabbarBtn *btn = [[TabbarBtn alloc]init];
    [btn setImage:image forState:UIControlStateNormal];
    [btn setImage:selectedImage forState:UIControlStateSelected];
    [btn setTitle:title forState:UIControlStateNormal];
    [btn setTitle:title forState:UIControlStateSelected];
    [btn setTitleColor:kBlackColor forState:UIControlStateNormal];
    [btn setTitleColor:kWhiteColor forState:UIControlStateSelected];
    [self addSubview:btn];

    [btn addTarget:self action:@selector(clickBtn:) forControlEvents:UIControlEventTouchUpInside];

    if (self.subviews.count == 1) { //默认选中第一个
        [self clickBtn:btn];
    }
}

//布局
- (void)layoutSubviews {
    [super layoutSubviews];
    int count = (int)self.subviews.count;
    for (int i = 0; i < count; i++) {
        UIButton *btn = self.subviews[i];
        btn.tag = i;
        CGFloat x = i * self.bounds.size.width / count;
        CGFloat y = 0;
        CGFloat width = self.bounds.size.width / count;
        CGFloat height = self.bounds.size.height;
        btn.frame = CGRectMake(x, y, width, height);
    }
}

- (void)clickBtn:(UIButton *)sender {
    for (UIButton *child in self.subviews) {
        child.selected = NO;
        child.backgroundColor = kWhiteColor;
    }
    sender.selected = YES;
    sender.backgroundColor = kRedColor;
    if ([self.delegate respondsToSelector:@selector(tabBar:selectedFrom:to:)]) {
        [self.delegate tabBar:self selectedFrom:self.selectedBtn.tag to:sender.tag];
    }
    self.selectedBtn = sender;
}
@end
3.创建TabbarBtn : UIButton
#import "TabbarBtn.h"
@implementation TabbarBtn
- (void)layoutSubviews{
    [super layoutSubviews];

    CGPoint center;
    center.x = self.frame.size.width /2  ;
    center.y = self.imageView.frame.size.height/2 + 2;
    self.imageView.center = center;

    CGRect newFrame = [self titleLabel].frame;
    newFrame.origin.x = 0;
    newFrame.origin.y = self.imageView.frame.size.height +2;
    newFrame.size.width = self.frame.size.width;

    self.titleLabel.frame = newFrame;
    self.titleLabel.textAlignment = NSTextAlignmentCenter;
    self.titleLabel.font = [UIFont systemFontOfSize:13];
}
@end


