我是用 jupyter notebook写的,各个功能模块清楚分明,顺便推荐给大家。 以图片分类为例:
主要依赖于:
- scikit-learn
- scikit-image
- matplotlib
- jupyter notebook
- numpy
- cv2 (倾向于使用 skimage image 代替之, skimage 使用的是 图像坐标 (通过行列检索),cv2使用笛卡尔坐标检索(x,y))
直接开始正文:
导入依赖库
- 写个 lib.ipynb 将依赖库都放进去
%matplotlib inline
import platform

SYS = platform.system()

if 'Linux' in SYS:
    %run /home/v/WORKSPACE/GIT/LIB/lib.ipynb
else:
    %run d:/WORKSPACE/git/LIB/lib.ipynb
t1 = toc()
注意事项:
- lib.ipynb 是依赖库函数所在文件
- 为了方便linux 和 win 都能运行,所以加入最后几行。
- toc()函数是自己写的函数,为了方便整体计时,存放在lib里面,局部计时有%%timeit命令。
数据库(图片)路径
trainset = ps('image path for training ')
testset = ps('image path for testing')
print ("[INFO] There are %d classes in the trainset" % len(os.listdir(trainset)))
注意事项:
- ps函数可有可无,有兴趣的朋友可以留言。
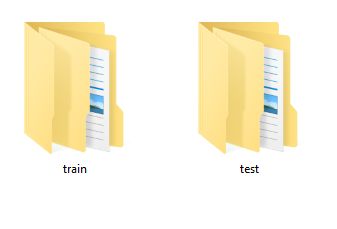
- 每个文件夹存放一个类别的图片,文件夹的命名要体现图片label和category name,这样做会在分类上省事一些,通过下面的特征提取代码,大家可以看到。我的数据库是这样命名的:
这样命名的好处很快可以在特征提取模块看到。
特征提取 -- HOG 特征
%%time
x_train=[]
y_train=[]

for floder_nmae in tqdm(os.listdir(trainset)):
    label= int( floder_nmae.split("__")[0] )

    class_path=os.path.join(trainset,floder_nmae)
    for img_name in os.listdir(class_path):
        img_path=os.path.join(class_path,img_name)

        ##  readin the original image
        ROI = imread(img_path, as_grey=True, resize =True, width =200, height =100)

        x_train.append(HOG(ROI,ori=9, ppc=(20, 20), cpb=(2, 2)))
        y_train.append(label)


x_test=[]
y_test=[]

for class_folder in tqdm(os.listdir(testset)):
    label= int( class_folder.split("__")[0] )

    class_path=os.path.join(testset,class_folder)
    for j in os.listdir(class_path):
        img_path=os.path.join(class_path,j)

        ##  readin the original image
        ROI = imread(img_path, as_grey=True, resize =True, width =200, height =100)

        x_test.append(HOG(ROI,ori=9,ppc=(20, 20), cpb=(2, 2)))
        y_test.append(label)

print (" number of train samples : %d " % len(x_train)  )
print (" number  of test samples : %d " % len(x_test)   )
print (" feature dim is : %d " % len(x_train[0])   )
注意事项:
- 文件夹命名的好处现在知道了吧,直接 .split("__")就可以得到类别label
- imread 函数和HOG函数都被我简单封装了下,存在lib里面,原因是不同语言各种各样的 图片读取, resize, 灰度化函数搞得我好乱啊,所以索性同一放在imread函数里面,集 图片读取,灰度化, resize, rescale于一身。如有朋友需要的话,我可以公布下这个函数。HOG函数也是一样,skimage不仅在HOG函数bins的方向上弄得不好,而且函数明明也过于冗长和复杂. ori = orientation, ppc = pixel per cell, cpb = cell per block 没人会质疑我的简化吧。
- 这部分的输出是这样的:
wall time 就是jupyter notebook magic函数的功能,给出当前cell的运行时间。有机会写一系列 jupyter notebook (ipython) magic function的简文(如果有人提出的话)。
分类器的训练(linear SVM)
直接上代码
%%time

clf = svm.LinearSVC()

parameters = {
              'C': np.arange(1, 15, 1),
              'multi_class': ['crammer_singer']
              }

# run randomized search
n_iter_search = 10
clf = RandomizedSearchCV(clf,
                                   param_distributions = parameters,
                                   n_iter = n_iter_search,
                                   n_jobs = 4,
                                   pre_dispatch = '2*n_jobs')

clf.fit(x_train, y_train)
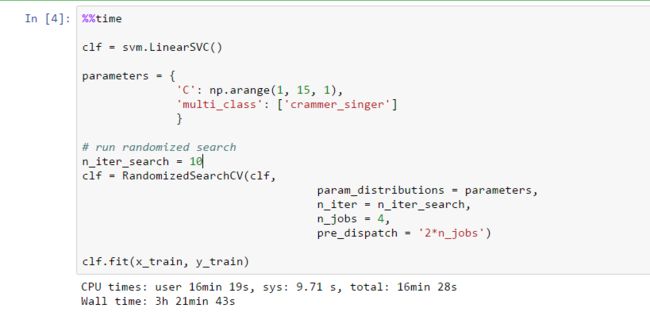
- crammer singer SVM 是为多类别分类设计的,这个我喜欢,因为效果好。
- 现在知道 特征列表和label 列表明明的好处了吧。 x, y, train。体会一下。
- 我特意加入了参数选择这一块,调参是个大问题,如果机器允许,就让他自己去找吧,当然是通过 coss validation的方式, Randomized SearchCV 默认是将训练数据5-fold还是6-fold, 这个参数也可以修改,需要的话可以百度 scikit learn documentation.
- 这部分的输出: 有需要解释的地方可以提问。。。。。。
测试 --测试集
这部分没啥说的, scikit learn 搞的函数接口还是简单易懂的。
y_pred = clf.predict(x_test)
分类结果 accuracy
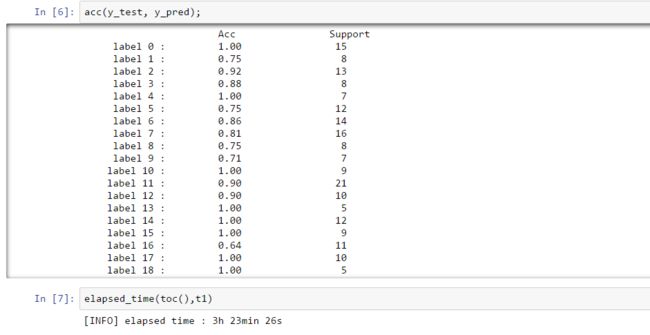
- 这里只提供了我写的 acc函数,scikit learn 没有提供acc的检测接口。 当然还有其他的准则去检验,如:precision, recall, f1 score. 这些还是不如acc 表达的清楚:分对的个数除以要分类的样本个数。
- 依旧,acc被我封装起来了,存在lib.ipynb里面。
- 上结果:
- 不用多解释了吧。
- 函数总体运行时间,通过elapsed_time 得到, 现在知道toc()的作用了吧。


