1、高可用集群介绍
集群Cluster
            集群类型:
                      LB lvs/nginx(http/upstream, stream/upstream)
                      HA 高可用性
                               SPoF: Single Point of Failure  单点失效
                       HPC
            系统可用性的公式:A=MTBF/(MTBF+MTTR)
                      (0,1), 95%
                      几个9(指标): 99%, ..., 99.999%,99.9999%;
            系统故障:
                      硬件故障:设计缺陷、wear out(损耗)、自然灾害……
                      软件故障:设计缺陷 4 集群Cluster
提升系统高用性的解决方案之降低MTTR:
                   手段:冗余redundant
                   active/passive 主备
                    active/active 双主
                    active --> HEARTBEAT --> passive
                    active <--> HEARTBEAT <--> active
高可用的是“服务”:
                    HA nginx service:
                                      vip/nginx process[/shared storage]
         资源:组成一个高可用服务的“组件”
                     (1) passive node的数量
                       (2) 资源切换 5 集群Cluste
shared storage:
                    NAS:文件共享服务器;
                     SAN:存储区域网络,块级别的共享
Network partition:网络分区
                     quorum:法定人数
                                  with quorum: > total/2
                                   without quorum: <= total/2
                      隔离设备: fence
                                    node:STONITH = Shooting The Other
         Node In The Head,断电重启
                                   资源:断开存储的连接
TWO nodes Cluster
                         辅助设备:ping node, quorum disk
Failover:故障切换,即某资源的主节点故障时,将资源转移 至其它节点的操作
Failback:故障移回,即某资源的主节点故障后重新修改上线 后,将之前已转移至其它节点的资源重新切回的过程
HA Cluster实现方案:
            vrrp协议的实现
                     keepalived
                     ais:应用接口规范 完备HA集群
                              RHCS:Red Hat Cluster Suite红帽集群套件
                              heartbeat
                              corosync
2、KeepAlived
keepalived:
vrrp协议:Virtual Router Redundancy Protocol
术语:
虚拟路由器:Virtual Router
虚拟路由器标识:VRID(0-255),唯一标识虚拟路由器
物理路由器:
master:主设备
backup:备用设备
priority:优先级
VIP:Virtual IP
VMAC:Virutal MAC (00-00-5e-00-01-VRID)
通告:心跳,优先级等;周期性
工作方式:抢占式,非抢占式
安全工作:
认证:
无认证
简单字符认证:预共享密钥
MD5
工作模式:
主/备:单虚拟路径器
主/主:主/备(虚拟路径器1),备/主(虚拟路径器2)
keepalived:
vrrp协议的软件实现,原生设计目的为了高可用ipvs服务
功能:
vrrp协议完成地址流动
为vip地址所在的节点生成ipvs规则(在配置文件中预先定义)
为ipvs集群的各RS做健康状态检测
基于脚本调用接口通过执行脚本完成脚本中定义的功能, 进而影响集群事务,以此支持nginx、haproxy等服务 10 KeepAlived
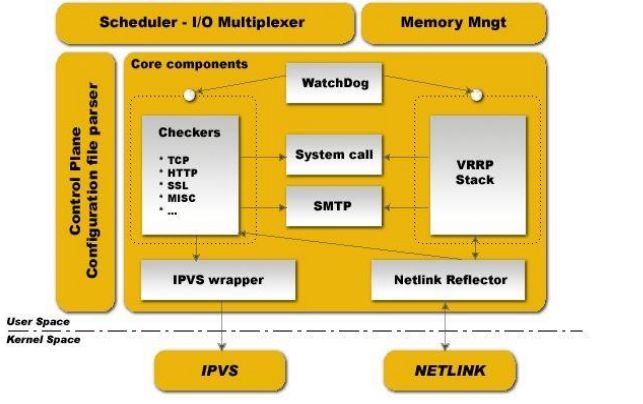
组件:
核心组件: vrrp stack
ipvs wrapper
checkers
控制组件:配置文件分析器
IO复用器
内存管理组件
KeepAlived组成:
IPVS:
IPVS基本上是一种高效的Layer-4交换机,它提供负载平衡的功能。当一个TCP连接的初始SYN报文到达时,IPVS就选择一台服务器,将报文转发给它。此后通过查发报文的IP和TCP报文头地址,保证此连接的后继报文被转发到相同的服务器。这样,IPVS无法检查到请求的内容再选择服务器,这就要求后端的服务器组是提供相同的服务,不管请求被送到哪一台服务器,返回结果都应该是一样的。
3、KeepAlived实现
HA Cluster 配置准备:
(1) 各节点时间必须同步
             ntp, chrony
eg:
   CentOS6:
          #vim /etc/ntp.conf
          添加 server  172.18.0.1  iburst
          #ntpdate 172.18.0.1
          #chkconfig --list ntp
          #chkconfig --list ntp on
          #service ntpd start
或者#crontab -e 做计划任务
CentOS7:
          #vim /etc/chrony.conf
           添加 server 192.168.25.106(对方的服务器地址) iburst
          #systemctl is-enabled chronyd
          #systemctl enable chronyd 设为开机启动
          #systemctl  start chronyd
(2) 确保iptables及selinux不会成为阻碍
         注意:CentOS7上面清除firewalld
(3) 各节点之间可通过主机名互相通信(对KA并非必须)
              建议使用/etc/hosts文件实现
      eg:
           #hostnamectl set-hostname node1
           #vim /etc/hosts
           192.168.25.108  node2(对方的ip和主机名)
(4) 各节点之间的root用户可以基于密钥认证的ssh服务完
            成互相通信(对KA并非必须)
eg:
          node1:
                #ssh-keygen
                #ssh-copy-id -i id_rsa.pub root@node2 (把公钥文件拷贝到对方的服务器上去)
           node2:
                #cd .ssh
                #ls (如果有authorized_keys即成功)
                #ssh-keygen
                #ssh-copy-id -i id_rsa.pub root@node1 (把公钥文件拷贝到对方的服务器上去)

(5) keepalived安装配置:
           #yum -y install keepalived
           CentOS 6.4+ Base源
程序环境:
                主配置文件:/etc/keepalived/keepalived.conf
                主程序文件:/usr/sbin/keepalived
                Unit File:/usr/lib/systemd/system/keepalived.service
                Unit File的环境配置文件:/etc/sysconfig/keepalived
4.KeepAlived配置
配置文件组件部分:
 TOP HIERACHY
            GLOBAL CONFIGURATION
                                  Global definitions
                                  Static routes/addresses
            VRRPD CONFIGURATION
                  VRRP synchronization group(s):vrrp同步组
                  VRRP instance(s):即一个vrrp虚拟 路由器
           LVS CONFIGURATION
                            Virtual server group(s)
                            Virtual server(s):ipvs集群的vs和rs
5.配置语法:
(1)配置虚拟路由器:
vrrp_instance {
...
}
专用参数:
state MASTER|BACKUP:当前节点在此虚拟路由器上的初始状态; 只能有一个是MASTER,余下的都应该为BACKUP
interface IFACE_NAME:绑定为当前虚拟路由器使用的物理接口
virtual_router_id VRID:当前虚拟路由器惟一标识,范围是0-255
priority 100:当前物理节点在此虚拟路由器中的优先级;范围1-254
advert_int 1:vrrp通告的时间间隔,默认1s
(2)authentication { #认证机制
auth_type AH|PASS
auth_pass 仅前8位有效
}
(3)virtual_ipaddress { #虚拟IP
/ brd dev scope label 6.单主配置示例:
! Configuration File for keepalived
global_defs {
              notification_email {
                             root@localhost 收邮件建的邮箱
                }
                    notification_email_from keepalived@localhost 发邮件的邮箱
                    smtp_server 127.0.0.1
                    smtp_connect_timeout 30
                    router_id node1 #主机名,在另一结点为node2
                    vrrp_mcast_group4 224.100.100.100  多播地址
              }
vrrp_instance VI_1 {
                   state MASTER #在另一个结点上为BACKUP
                   interface eth0
                   virtual_router_id 6 #多个节点必须相同
                   priority 100 #优先级,在另一个结点上为90
                   advert_int 1 #通告间隔1s
                   authentication {
                                auth_type PASS #预共享密钥认证
                                auth_pass 571f97b2 秘钥,自己定义,两边一直即可,最多八位
                      }
                    virtual_ipaddress {
                                172.18.100.66/16 dev eth0 label eth0:0
                        }
                    track_interface {
                                       eth0
                        }
                     }
#systemctl start keepalived.service 启动服务
测试:
       # tcpdump -i eth0 -m host 224.100.100.100
       #systemctl status keepalived.service 查看keepalived状态
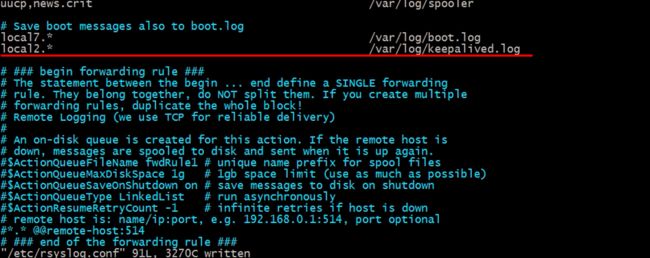
日志记录在指定文件中
更换时触发脚本,并且发邮件
7.KeepAlived双主配置
双主模型示例:
! Configuration File for keepalived
         global_defs {
                   notification_email {
                               root@localhost
                    }
                   notification_email_from keepalived@localhost
                   smtp_server 127.0.0.1
                   smtp_connect_timeout 30
                   router_id node1
                   vrrp_mcast_group4 224.0.100.100
}
vrrp_instance VI_1 {
                     state MASTER
                      interface eth0
                      virtual_router_id 6
                      priority 100
                      advert_int 1
                      authentication {
                              auth_type PASS
                              auth_pass 571f97b2
                       }
                      virtual_ipaddress {
                                   172.16.0.10/16 dev eth0
                       }
           }
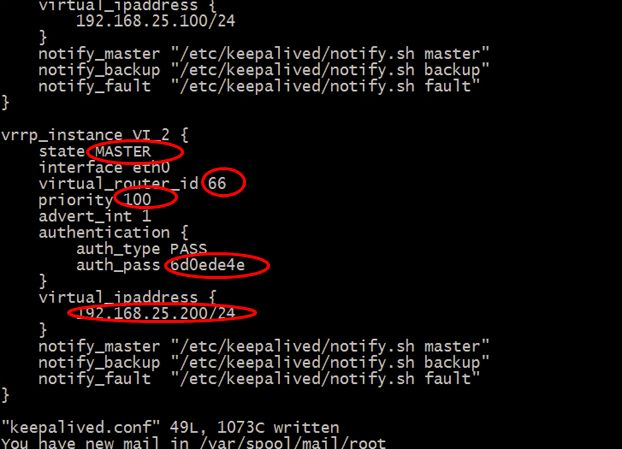
vrrp_instance VI_2 {
                    state BACKUP
                       interface eth0
                        virtual_router_id 8
                        priority 98
                        advert_int 1
                        authentication {
                                 auth_type PASS
                                 auth_pass 578f07b2
                           }
                        virtual_ipaddress {
                                         172.16.0.11/16 dev eth0
                                         }
    }
再主从基础上再添加
8.示例通知脚本
#vim /etc/keepalived/notify.sh
#!/bin/bash
#
contact='root@localhost'
notify() {
         mailsubject="$(hostname) to be $1, vip floating"
         mailbody="$(date +'%F %T'): vrrp transition, $(hostname) changed to be $1"
          echo "$mailbody" | mail -s "$mailsubject" $contact
}
case $1 in
                master)
                              notify master
                               ;;
                backup)
                               notify backup
                                ;;
                  fault)
                                notify fault
                                  ;;
                   *)
                                echo "Usage: $(basename $0) {master|backup|fault}"
                                 exit 1
                                  ;;
                    esac
脚本的调用方法:
               notify_master "/etc/keepalived/notify.sh master"
             notify_backup "/etc/keepalived/notify.sh backup"
             notify_fault "/etc/keepalived/notify.sh fault"
9.KeepAlived支持IPVS
虚拟服务器:
配置参数:
virtual_server IP port |
virtual_server fwmark int
{
...
real_server {
...
}
...
}
常用参数
delay_loop :检查后端服务器的时间间隔
lb_algo rr|wrr|lc|wlc|lblc|sh|dh:定义调度方法
1..静态调度算法:
       RR:Round-robin:轮循
      WRR:Weighted round-robin:加权轮循-----按照性能分配,为其计算出权重
       DH:Destination hashing:目标地址hashing-----将某个固定IP的请求转发给一个相同的real server,用于具有缓存服务器的
       SH:Source hashing:源地址hashing
2.动态调度算法:根据分发算法和real server的负载状态设置出调度决策,Director对每一个连接进行追踪监控是否处于活动状态(ESTABLESHED)
                 LC:Least connection:最少连接-----监控每一个real server当前处于活动状态连接和非活动状态连接数,然后计算出其当前负载:active*256+inactive=overhead
                 WLC:Weighted least connection:加权最少连接------overhead/weight,考虑到real serverd的性能,默认集群算法
                 SED:Shortest Expected Delay:最短的期望的延迟----不考虑非活动状态的连接,算法:(active+1)*256/weight=overhead
                  NQ:Never Queue:永不排队-----没有连接时,直接转发
                  LBLC:Locality-Based Least-Connection:基于本地的最少连接,动态DH算法
                  LBLCR:Locality-Based Least-Connection with replication Scheduling:带复制的基于本地最少连接,缓存是共享的
lb_kind NAT|DR|TUN:集群的类型
persistence_timeout :持久连接时长
protocol TCP:服务协议,仅支持TCP
sorry_server :所有RS故障时,备用服务器地址
real_server
{
weightRS权重
notify_up| RS上线通知脚本
notify_down| RS下线通知脚本
HTTP_GET|SSL_GET|TCP_CHECK|SMTP_CHECK|MISC_CHEC K { ... }:定义当前主机的健康状态检测方法
}
KeepAlived配置检测
            HTTP_GET|SSL_GET:应用层检测
            HTTP_GET|SSL_GET {
                            url {
                                     path :定义要监控的URL
                                     status_code :判断上述检测机制为健康状态的响应码
                                     digest :判断为健康状态的响应的内容的校验码
                                   }
             connect_timeout :连接请求的超时时长
             nb_get_retry :重试次数
             delay_before_retry :重试之前的延迟时长
             connect_ip :向当前RS哪个IP地址发起健康状态检测请求
             connect_port :向当前RS的哪个PORT发起健康状态检测请求
             bindto :发出健康状态检测请求时使用的源地址
             bind_port :发出健康状态检测请求时使用的源端口
             }
TCP_CHECK {
               connect_ip :向当前RS的哪个IP地址 发起健康状态检测请求
               connect_port :向当前RS的哪个PORT发起健 康状态检测请求
               bindto :发出健康状态检测请求时使用的源地址
               bind_port :发出健康状态检测请求时使用的源端口
               connect_timeout :连接请求的超时时长
         }
10.单主模型IPVS示例
! Configuration File for keepalived
global_defs {
           notification_email {
                     root@localhost }
            notification_email_from keepalived@localhost
            smtp_server 127.0.0.1
            smtp_connect_timeout 30
            router_id node1
            vrrp_mcast_group4 224.0.100.10
        }
 vrrp_instance VI_1 {
          state MASTER
          interface eth0
          virtual_router_id 6
          priority 100
          advert_int 1
          authentication {
                          auth_type PASS
                          auth_pass 571f97b2
            }
            virtual_ipaddress {
                    172.16.0.10/16 dev eth0
             }
           notify_master "/etc/keepalived/notify.sh master"
           notify_backup "/etc/keepalived/notify.sh backup"
           notify_fault "/etc/keepalived/notify.sh fault"
}
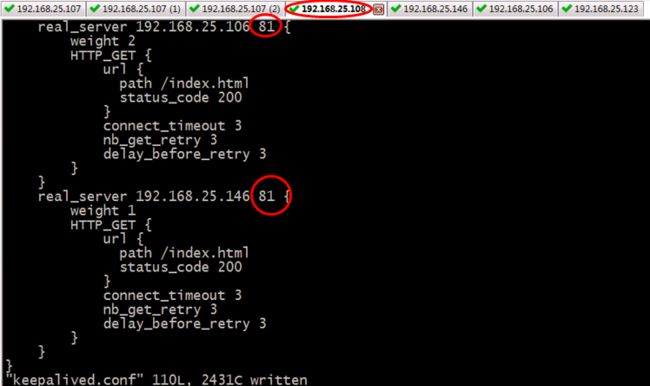
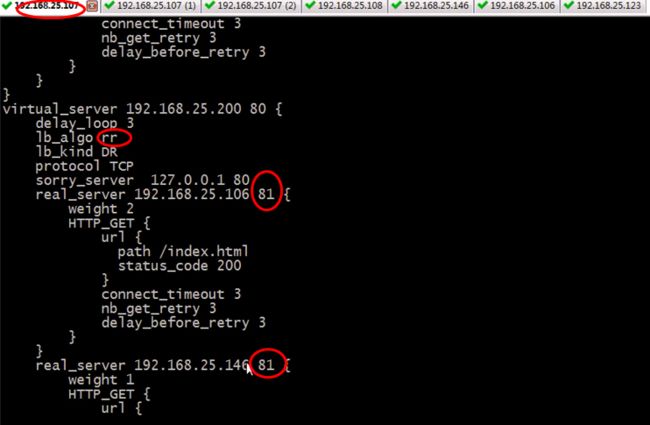
virtual_server 172.16.0.10 80 {
                   delay_loop 3
                   lb_algo rr
                   lb_kind DR  (Designated Router指定路由器)
                   protocol TCP
                   sorry_server 127.0.0.1 80
                   real_server 172.16.0.11 80 {
                                 weight 1
                                 HTTP_GET {
                                                url {
                                                                path /
                                                                 tatus_code 200
                                                     }
                                  connect_timeout 1
                                  nb_get_retry 3
                                  delay_before_retry 1
                                   }
}
real_server 172.16.0.12 80 {
                         weight 1
                         HTTP_GET {
                                   url {
                                               path /
                                               satus_code 200
                                      }
                            connect_timeout 1
                             nb_get_retry 3
                             delay_before_retry 1
                              }
 }
VIP:192.168.25.100
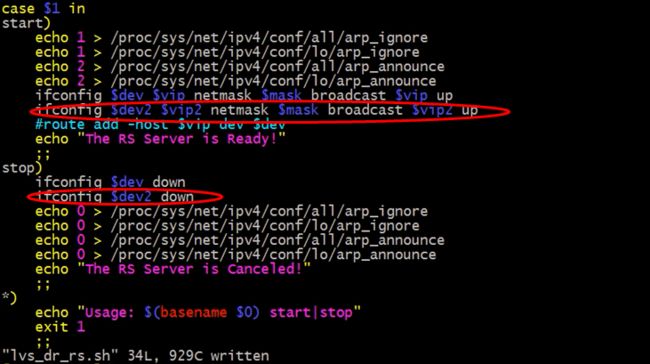
安装http
#bash lvs_dr_rs.sh
#yum install ipsadm
测试:
#curl 192.168.25.100
11.双主模式的lvs集群,拓扑、实现过程
配置示例(一个节点):
! Configuration File for keepalived
global_defs {
             notification_email {
                           root@localhost
                            }
              notification_email_from kaadmin@localhost
              smtp_server 127.0.0.1
              smtp_connect_timeout 30
              router_id node1
              vrrp_mcast_group4 224.0.100.100
            }
vrrp_instance VI_1 {
                   state MASTER
                   interface eth0
                   virtual_router_id 6
                   priority 100
                   advert_int 1
                   authentication {
                              auth_type PASS
                              auth_pass f1bf7fde
                      }
 virtual_ipaddress {
                       172.16.0.80/16 dev eth0 label eth0:0
          }
track_interface {
                  eth0
                         }
notify_master "/etc/keepalived/notify.sh master"
notify_backup "/etc/keepalived/notify.sh backup"
notify_fault "/etc/keepalived/notify.sh fault"
}
 vrrp_instance VI_2 {
                  state BACKUP
                   interface eth0
                   virtual_router_id 8
                   priority 98
                   advert_int 1
                    authentication {
                                    auth_type PASS
                                    auth_pass f2bf7ade
}
virtual_ipaddress {
                         172.16.0.90/16 dev eth0 label eth0:1
}
track_interface {
                  eth0
}
notify_master "/etc/keepalived/notify.sh master"
notify_backup "/etc/keepalived/notify.sh backup"
notify_fault "/etc/keepalived/notify.sh fault"
}
virtual_server fwmark 3 {
delay_loop 2
lb_algo rr
lb_kind DR
nat_mask 255.255.0.0
protocol TCP
sorry_server 127.0.0.1 80
real_server 172.16.0.11 80 {
                        weight 1
                         HTTP_GET {
                         url {
                                  path /
                                   status_code 200
                             }
                            connect_timeout 2
                            nb_get_retry 3
                            delay_before_retry 3
                             }
}
real_server 172.16.0.12 80 {
                             weight 1
                              HTTP_GET {
                              url {
                                        path /
                                         status_code 200
                                 }
                                connect_timeout 2
                                nb_get_retry 3
                                delay_before_retry 3
                                  }
                               }
   }
建立基于IP地址虚拟主机(Apache)
测试:
12.keepalived调用脚本进行资源监控
keepalived调用外部的辅助脚本进行资源监控,并根据监控的结果状态能实现优先动态调整
vrrp_script:自定义资源监控脚本,vrrp实例根据脚本返回值,公共定义 ,可被多个实例调用,定义在vrrp实例之外
track_script:调用vrrp_script定义的脚本去监控资源,定义在实例之内 ,调用事先定义的vrrp_script
分两步:(1) 先定义一个脚本;(2) 调用此脚本
vrrp_script {
script ""
interval INT
weight -INT
}
track_script {
SCRIPT_NAME_1
SCRIPT_NAME_2
}
13.KeepAlived实现Nginx高可用集群
! Configuration File for keepalived
global_defs {
notification_email {
root@localhost
}
notification_email_from keepalived@localhost
smtp_server 127.0.0.1
smtp_connect_timeout 30
router_id node1
vrrp_mcast_group4 224.0.100.100
}
示例:高可用nginx服务
vrrp_script chk_down {
script "[[ -f /etc/keepalived/down ]] && exit 1 || exit 0"
interval 1
weight -20
}
vrrp_script chk_nginx {
script "killall -0 nginx && exit 0 || exit 1"
interval 1
weight -20
fall 2 #2次检测失败为失败
rise 1 #1次检测成功为成功
}
示例:高可用nginx服务
vrrp_instance VI_1 {
state MASTER
interface eth0
virtual_router_id 14
priority 100
advert_int 1
authentication {
auth_type PASS
auth_pass 571f97b2
}
virtual_ipaddress {
172.18.0.93/16 dev eth0
}
track_script {
chk_down
chk_nginx
}
notify_master "/etc/keepalived/notify.sh master"
notify_backup "/etc/keepalived/notify.sh backup"
notify_fault "/etc/keepalived/notify.sh fault"
}
11:RS1 22:RS2 123:测试 107,108 前端调度器
启用反向代理功能
