话说昨日,健哥让我分享下怎么用rspec写模型的测试,顿时一脸懵逼,因为只会些拳脚猫功夫,赶紧百度谷歌相关知识,七凑八凑,凑出来下面这篇总结,参考过的文档和博客如下(感兴趣的可以去看看):
- rspec入门教程: http://www.jianshu.com/p/1db9ee327357
- 1000 个小时学会 Rails - 003 RSpec 行为驱动测试简介: https://ruby-china.org/topics/2848
- RSpec 中 let 和 subject 的区别:https://ruby-china.org/topics/9271
- Ruby on Rails 自动化测试: https://ihower.tw/rails4/testing.html
- let和before的区别: http://stackoverflow.com/questions/5974360/rspec-difference-between-let-and-before-block
Step1. 新建一个rails应用
话不多说,让我们创建一个rails 新应用,从头开始体验这一奇妙的旅程;
rails new demo
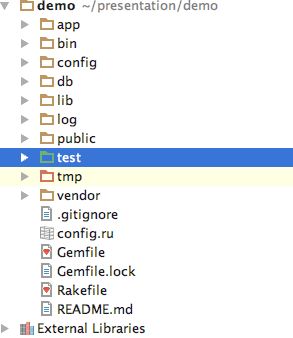
该应用结构如下:
可以看到,在rails中,默认使用的测试工具是Test::Unit,而不是Rspec,怎么替换掉呢?
Step 2: 安装 Rspec
在Rails的配置文件Gemfile配置文件中,配置下面信息
group :development, :test do
    gem 'byebug', platform: :mri
    gem 'rspec-rails', '3.5.1'
    # gem 'factory_girl_rails', '4.7.0'
    # gem 'faker', '1.6.6'
end
我们没有必要单独的安装RSpec, 因为它是rspec-rails的依赖件会被自动安装, 执行bundle install 或者bundle install --without production来安装使用的gem.
执行安装RSpec的命令:
rails generate rspec:install
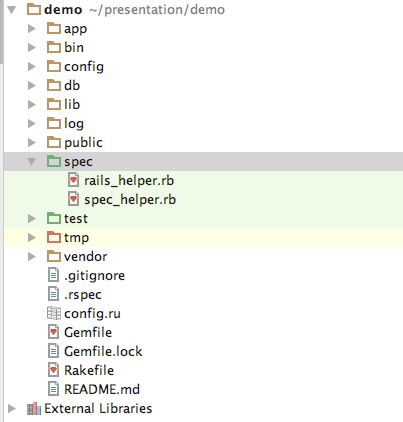
该命令执行完毕之后,会产生一个文件夹spec,该文件夹下面有spec/spec_helper.rb这个文件,spec_helper.rb用来设置测试的配置信息.
下面是spec的固定的规范,固定的格式.
describe XXX do
  it XXX do ......
  end
end
包含了一个 describe 块以及其中的一个测试用例(sample),以 it "..." do 开头的代码块就是一个用例.
可以看到,spec文件夹以及相关文件创建完成。
Step 3:创建模型和方法
既然我们要介绍模型测试的方法,那么让我们创建一个模型: Girl(女孩,相信大家都比较喜欢),来做一个简单的测试演示:
rails generate model Girl
该命令创建的文件如下:
note:在spec/models/ 创建的 girl_spec.rb文件就是我们写测试用例的地方(一般这种文件的后缀常用_spec)。
创建模型后, 执行迁移命令:
bin/rake db:migrate
下面让我们开始编写模型方法:
既然是girl,大家肯定都关心其是否单身,是否漂亮。
如果单身的话,就代表自己有机会追到她,如果既单身又漂亮的话,一般就会符合我等屌丝的口味。
我们定义这两个属性,以及对应的方法;
app/models/girl.rb 文件内容如下:
class Girl < ApplicationRecord
    attr_accessor :single, :beautiful
    def initialize(params)
        self.single = params[:single]
        self.beautiful = params[:beautiful]
    end
    # 是否有机会
    def have_chance?
        self.single
    end
    # 是否符合你的口味
    def suit_my_taste??
        self.single && self.beautiful
    end
end
Step 4: 编写测试用例 并执行
针对我们编写的两个模型方法,我们开始在girl_spec.rb文件中编写相应的测试:
以 it "..." do 开头的代码块就是一个用例.
首先构建一个单身,但不漂亮的女孩,来作为我们的测试数据;
expect 语句 可以对返回的结果进行期望值处理,满足expect语句,即代表通过此测试用例;
require 'rails_helper'
RSpec.describe Girl, type: :model do
  # 测试用例1
  # 创建了一个 单身 但不漂亮的 女孩, 来验证 have_chance? 方法
  it "have chance? {single but not beautiful}" do
    params = { single: true, beautiful: false }
    girl = Girl.new(params)
    expect(girl.have_chance?).to eq(true)
  end
end
rspec测试命令格式: ruby rspec file_path/file_name
运行如下测试命令:运行girl_spec.rb文件中的所有测试用例
rspec spec/models/girl_spec.rb
运行结果如下图:
和
Test::Unit一样,用一个极富深意的点,告诉我们测试通过!太棒了!这是我们写的第一个
RSpec测试,欢呼!
1 example, 0 failures 代表: 总共1个测试用例,有0个运行失败;
接下来,书写第2个测试用例-(测试该女孩是否符合你的口味)
在
girl_spec.rb文件中,添加第2个测试用例:
require 'rails_helper'
RSpec.describe Girl, type: :model do

  # 测试用例1
  # 创建了一个 单身 但不漂亮的 女孩, 来验证 have_chance? 方法
  it "have chance? {single but not beautiful}" do
    params = { single: true, beautiful: false }
    girl = Girl.new(params)
    expect(girl.have_chance?).to eq(true)
  end

  # 测试用例2
  # 创建了一个 单身 但不漂亮的 女孩, 来验证 suit_my_taste? 方法
  it "suit my taste? {single but not beautiful}" do
    params = { single: true, beautiful: false }
    girl = Girl.new(params)
    expect(girl.suit_my_taste?).to eq(true)
  end
end
运行如下测试命令:运行girl_spec.rb文件中的所有测试用例
rspec spec/models/girl_spec.rb
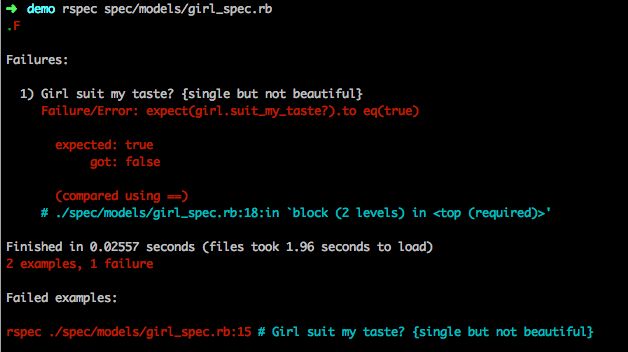
运行结果如下图:
如图所示:首行返回了
.F, "."代表第1个测试用例通过,"F"第2个测试用例没通过(False)
在
Failures(失败详情中 )可以看到:
expected:true, got:false,(期望值true, 实际获得false), 所以没通过。
2 examples, 1 failure 代表: 总共2个测试用例,有1个运行失败;
解释:很显然,在我们expect语句中,期望值是true,实际上,该女孩单身,但不漂亮;
suit_my_taste?方法 会返回false; 所以无法通过expect语句,则该测试用例会返回false,代表没通过此测试用例;
接下来,在第3个测试用例中,创建一个 既单身又漂亮的女孩 来测试 suit_my_taste? 方法 的返回结果;
require 'rails_helper'
RSpec.describe Girl, type: :model do

  # 测试用例1
  # 创建了一个 单身 但不漂亮的 女孩, 来验证 have_chance? 方法
  it "have chance? {single but not beautiful}" do
    params = { single: true, beautiful: false }
    girl = Girl.new(params)
    expect(girl.have_chance?).to eq(true)
  end

  # 测试用例2
  # 创建了一个 单身 但不漂亮的 女孩, 来验证 suit_my_taste? 方法
  it "suit my taste? {single but not beautiful}" do
    params = { single: true, beautiful: false }
    girl = Girl.new(params)
    expect(girl.suit_my_taste?).to eq(true)
  end

  # 测试用例3
  # 创建了一个 既单身又漂亮的 女孩, 来验证 suit_my_taste? 方法
  it "suit my taste? {single but not beautiful}" do
    params = { single: true, beautiful: true }
    girl = Girl.new(params)
    expect(girl.suit_my_taste?).to eq(true)
  end
end
Tips 1:如果只想运行girl_spec.rb测试文件中的某一个测试用例,该怎么处理?
rspec 测试单个用例的命令格式: ruby rspec file_path/file_name:LineNumber 即:加上冒号和it语句块对应的行号;
运行如下测试命令:运行girl_spec.rb文件中的第3个测试用例:(第3个it ...do 对应的行号为23)
rspec spec/models/girl_spec.rb:23
运行结果如下图:
解释:"."代表 该测试用例通过。
Step 5: 优化
Tip 2: 为了遵循Ruby的 DRY原则(Don't repeat yourself), 下面介绍一下before,subject,let的用法;
1. before的用法
before(:each)会在每个测试用例执行前, (每段it之前執行)
before(:all) 会所有测试用例执行前,只执行一次,(整段describe前只執行一次)
假设要为构建出的不同实例对象,测试它们的每个模型方法,
在此,我选用before(:all)来优化代码:
require 'rails_helper'

RSpec.describe Girl, type: :model do

  before(:all) do
    params_1 = { single: true, beautiful: false }
    params_2 = { single: true, beautiful: true }
    @girl_1 = Girl.new(params_1)
    @girl_2 = Girl.new(params_2)
  end

  ########################################################
  # 测试用例1-1
  # 创建了一个 单身 但不漂亮的 女孩, 来验证 have_chance? 方法
  it "have chance? {single but not beautiful}" do
    expect(@girl_1.have_chance?).to eq(true)
  end

  # 测试用例1-2
  # 创建了一个 单身 但不漂亮的 女孩, 来验证 suit_my_taste? 方法
  it "suit my taste? {single but not beautiful}" do
    expect(@girl_1.suit_my_taste?).to eq(true)
  end

  ########################################################
  # 测试用例2-1
  # 创建了一个 单身 但不漂亮的 女孩, 来验证 have_chance? 方法
  it "have chance? {single but not beautiful}" do
    expect(@girl_2.have_chance?).to eq(true)
  end

  # 测试用例2-2
  # 创建了一个 既单身又漂亮的 女孩, 来验证 suit_my_taste? 方法
  it "suit my taste? {single but not beautiful}" do
    expect(@girl_2.suit_my_taste?).to eq(true)
  end

end
运行如下测试命令:运行girl_spec.rb文件中的所有测试用例
rspec spec/models/girl_spec.rb
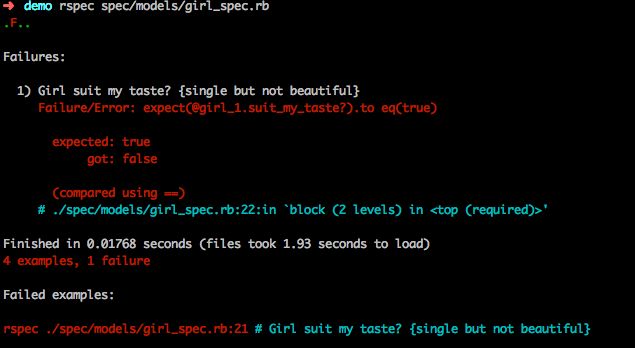
运行结果如下图:
解释:".F.."代表第2个测试用例没通过,其他测试用例均通过。
2. subject用法
subject { ... } 定义了一个叫做 subject 的方法, 它返回了代码块内定义的那个对象.
subject可以用来配合should进行隐式调用,何为隐式调用?(见参考链接3,本文暂不讲述)
如果你要使用主动式的 expect,那么可以给subject起名字(非隐式调用):
在上述girl_spec.rb文件中 添加如下代码 也可行:
# 使用 subject
  subject(:girl_1){ @girl_1 }
  subject(:girl_2){ @girl_2 }

  it "girl_1.have chance?" do
    expect(girl_1.have_chance?).to eq(true)
  end
  it "girl_1.suit my taste?" do
    expect(girl_1.suit_my_taste?).to eq(true)
  end

  it "girl_2.have chance?" do
    expect(girl_2.have_chance?).to eq(true)
  end
  it "girl_2.suit my taste?" do
    expect(girl_2.suit_my_taste?).to eq(true)
  end
3. let的用法
let和before 有区别,详见参考链接5
在上述girl_spec.rb 文件中 添加如下代码 也可行:
  # 使用let
  let(:girl1){ Girl.new({ single: true, beautiful: false }) }
  let(:girl2){ Girl.new({ single: true, beautiful: true }) }

  it "girl1.have chance?" do
    expect(girl1.have_chance?).to eq(true)
  end
  it "girl1.suit my taste?" do
    expect(girl1.suit_my_taste?).to eq(true)
  end

  it "girl2.have chance?" do
    expect(girl2.have_chance?).to eq(true)
  end
  it "girl2.suit my taste?" do
    expect(girl2.suit_my_taste?).to eq(true)
  end
结语
是不是不过瘾?大家是否也发现,要对自己的模型方法进行一个完善的测试,需要构建合法的数据,手动构建数据的量太少,无法满足大量测试数据的需求,于是乎,工厂女孩(factory_girl)就要出场了, 另外一个角色就是faker(这个可不是LOL界的faker大魔王), 它能够构建类似真实的数据,两者结合,威力无穷,欲知后事如何,且听下回分解...


