写在前面
本文基于《R语言可视化手册》来进行练习以及重复其中的代码。
library(tidyverse)
## ─ Attaching packages ─────────────── tidyverse 1.2.1 ─
## ✔ ggplot2 3.1.0       ✔ purrr   0.3.2
## ✔ tibble  2.1.1       ✔ dplyr   0.8.0.1
## ✔ tidyr   0.8.3       ✔ stringr 1.4.0
## ✔ readr   1.3.1       ✔ forcats 0.4.0
## ─ Conflicts ──────────────── tidyverse_conflicts() ─
## ✖ dplyr::filter() masks stats::filter()
## ✖ dplyr::lag()    masks stats::lag()
library(gcookbook)
条形图
绘制频数条形图
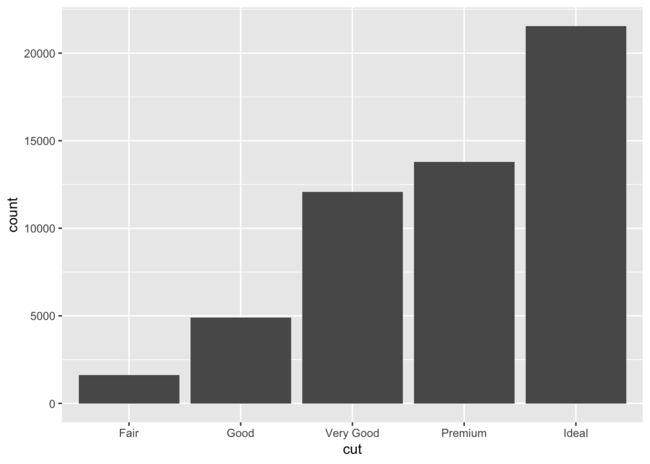
在绘制条形图的时候如果设置stat = 'identity'则是绘制的是计数的条形图。意思就是说需要一个Y是来代表某一个数据。如果要绘制频数条形图的时候。则需要设置为stat = 'bin'。这个是默认的。因此不用设置即可。这种情况下,是不需要设置Y的
ggplot(diamonds, aes(x = cut)) + geom_bar()
按照某一中方式重新排序
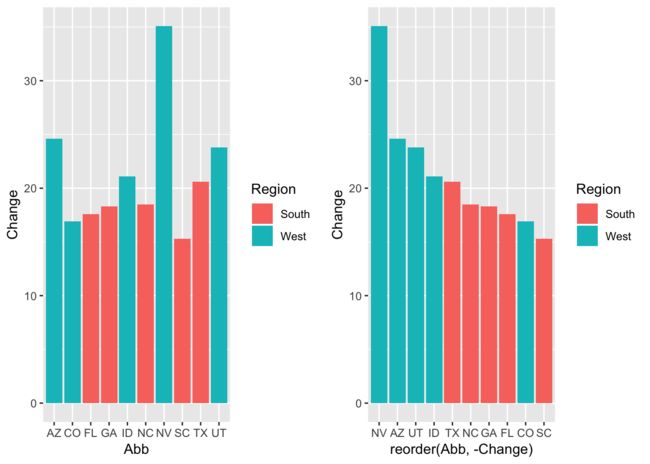
在ggplot2当中,对于X轴的排序是按照其字母顺序或者说是按照数字大小进行排序的。有时候我们想要重新排序。这个时候就需要用到reorder函数。这个函数可以帮助我们对于X轴的值按照某一种方式进行排序。
upc <- uspopchange %>% filter(rank(Change) > 40)
upc
##             State Abb Region Change
## 1         Arizona  AZ   West   24.6
## 2        Colorado  CO   West   16.9
## 3         Florida  FL  South   17.6
## 4         Georgia  GA  South   18.3
## 5           Idaho  ID   West   21.1
## 6          Nevada  NV   West   35.1
## 7  North Carolina  NC  South   18.5
## 8  South Carolina  SC  South   15.3
## 9           Texas  TX  South   20.6
## 10           Utah  UT   West   23.8
p1 <- ggplot(upc, aes(Abb, Change, fill = Region)) + geom_bar(stat = "identity")
p2 <- ggplot(upc, aes(reorder(Abb, -Change), Change, fill = Region)) +
    geom_bar(stat = "identity") ###按照Change的降序来对Abb进行排序
cowplot::plot_grid(p1,p2, ncol = 2)
绘制克利夫兰点图
克利夫兰点图实质上就是点图再加一个辅助线。重要是通过geom_segment + geom_point来实现
tophit <- tophitters2001[1:25, c("name", "lg", "avg")]
head(tophit)
##             name lg    avg
## 1   Larry Walker NL 0.3501
## 2  Ichiro Suzuki AL 0.3497
## 3   Jason Giambi AL 0.3423
## 4 Roberto Alomar AL 0.3357
## 5    Todd Helton NL 0.3356
## 6    Moises Alou NL 0.3314
p1 <- ggplot(tophit, aes(avg, reorder(name, avg))) + geom_point(size = 3) +
    theme_bw() +
    theme(panel.grid.major.x = element_blank(),
          panel.grid.minor.x = element_blank(),
          panel.grid.major.y = element_line(color = "grey60", linetype = "dashed"))
p2 <- ggplot(tophit, aes(avg, reorder(name, avg))) +
    geom_segment(aes(yend = name), xend = 0, color = "grey50") +
    geom_point(size = 3, aes(color = lg)) +
    theme_classic()
cowplot::plot_grid(p1,p2)
折线图
因子变量绘制折线图
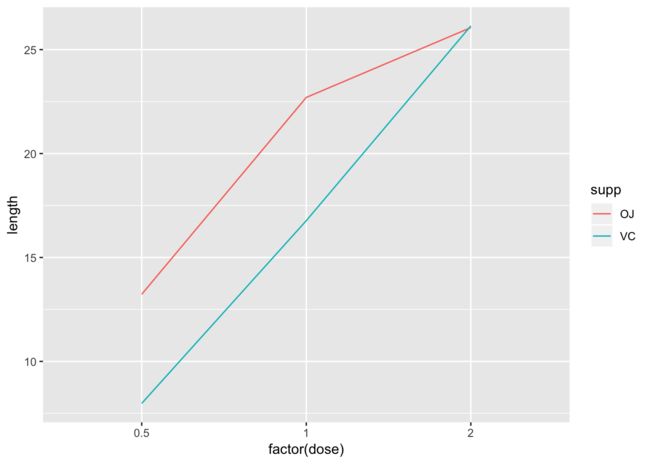
因子变量绘制折线图的时候,如果要加颜色进行区分的时候。需要也同时指定group不然在一个group里面没办法绘制不同的颜色。
tg <- ToothGrowth %>% group_by(supp, dose) %>% dplyr::summarise(length = mean(len))
ggplot(tg, aes(factor(dose), length, color = supp)) + geom_line()
## geom_path: Each group consists of only one observation. Do you need to
## adjust the group aesthetic?
ggplot(tg, aes(factor(dose), length, color = supp, group = supp)) + geom_line()
绘制面积图
可以通过geom_area来绘制面积图。
sunspotyear <- data.frame(
    year = as.numeric(time(sunspot.year)),
    Sunspot = as.numeric(sunspot.year)
)
ggplot(sunspotyear, aes(year, Sunspot)) + geom_area(fill = "blue", alpha = .2) + geom_line()
添加可信区间线
通过geom_ribbon我们可以显示曲线的置信区间。同时由于geom_ribbon会掩盖中间线因此也可以通过geom_line自己制作。
clim <- climate %>% filter(Source == "Berkeley") %>% select(Year, Anomaly10y, Unc10y)
p1 <- ggplot(clim, aes(Year, Anomaly10y)) +
    geom_ribbon(aes(ymin = Anomaly10y-Unc10y, ymax = Anomaly10y+Unc10y), alpha = 0.2) + geom_line()
p2 <- ggplot(clim, aes(Year, Anomaly10y)) +
    geom_line(aes(y = Anomaly10y - Unc10y), color = "grey50", linetype = "dotted") +
    geom_line(aes(y = Anomaly10y + Unc10y), color = "grey50", linetype = "dotted") + geom_line()
cowplot::plot_grid(p1, p2)
散点图
处理图形重叠
绘制散点图的时候。经常会遇到大量的数据重叠到一起的情况。这个时候,我们可以通过一定的处理先把结果更好的呈现。其中可以用到的方法是: - 使用半透明的点 - 将数据分箱(bin),并用矩形表示 - 将数据分箱(bin),并用六边形表示 - 使用箱式图 - 使用密度图 - 使用密度热图
p <- ggplot(diamonds, aes(carat, price))
p1 <- p + geom_point()
p2 <- p + geom_point(alpha = .01)
p3 <- p + stat_bin2d(bins = 100)
p4 <- p + stat_binhex()
p5 <- p + geom_point(shape = 16, alpha = .2) +
    stat_density2d(col = "blue")
p6 <- p + stat_density2d(geom = "tile",
                         aes(fill = ..density..),
                         contour = F)
cowplot::plot_grid(p,p1,p2,p3,p4,p5,p6, ncol = 3)
把已有的模型添加到散点图上
如果已经有了一个模型的话,那么需要使用predict函数来把模型拟合到原来的图形上。
model <- lm(heightIn ~ ageYear + I(ageYear^2), data = heightweight)
model
##
## Call:
## lm(formula = heightIn ~ ageYear + I(ageYear^2), data = heightweight)
##
## Coefficients:
##  (Intercept)       ageYear  I(ageYear^2)
##     -10.3136        8.6673       -0.2478
predicted <- data.frame(ageYear = seq(min(heightweight$ageYear), max(heightweight$ageYear), length.out = 100))
###计算变量heightIn的预测值
predicted$heightIn <- predict(model, predicted)
head(predicted)
##    ageYear heightIn
## 1 11.58000 56.82624
## 2 11.63980 57.00047
## 3 11.69960 57.17294
## 4 11.75939 57.34363
## 5 11.81919 57.51255
## 6 11.87899 57.67969
####数据和模型一行放到图上
p <- ggplot(heightweight, aes(ageYear, heightIn)) + geom_point()
p + geom_line(data = predicted, size = 1, color = "blue") +
    stat_smooth(method = "lm", color = "red", se = F)
描述数据分布
绘制简单的直方图
使用geom_histogram来绘制简单的直方图。绘制的时候默认的是绘制30个分组。我们可以通过bin来修改这个分组。同时也是可以通过binwidth修改组间距也是可以达到同样的效果的。
p <- ggplot(faithful, aes(waiting))
p1 <- p + geom_histogram(binwidth = 8, fill = "white", col = "black")
p2 <- p + geom_histogram(bins = 15, fill = "white", col = "black")
cowplot::plot_grid(p1, p2, ncol = 2)
绘制基本的箱式图
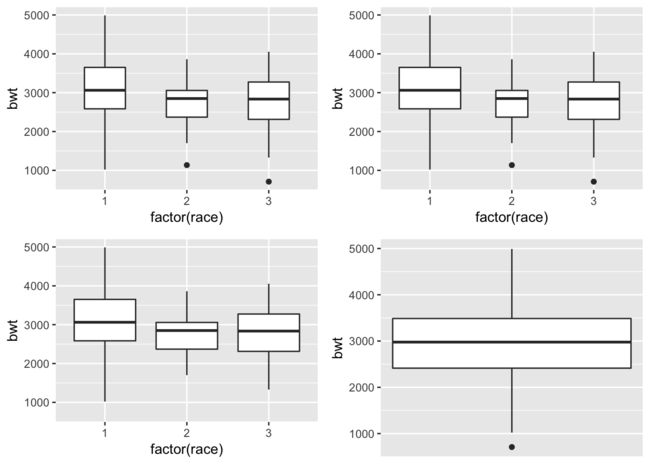
geom_boxplot可是绘制基本的箱式图。函数当中的需要注意的: - 异常值的调整:函数当中包括outlier.color/outlier.fill/outlier.shape/outlier.size/outlier.alpha/outlier.size来对异常值进行调整 - 对于箱式图宽度的调整:如果想要让箱式图的宽度可以根据样本量来变化。那么可以设置varwidth。默认的是F。单纯的像调整宽度可是使用width即可。 - 单个箱式图的绘制绘制单个箱式图的时候。需要给x赋值为常数。x=1即可
library(MASS)
##
## Attaching package: 'MASS'
## The following object is masked from 'package:dplyr':
##
##     select
p <- ggplot(birthwt, aes(factor(race), bwt))
p1 <- p + geom_boxplot(width = .5)
p2 <- p + geom_boxplot(varwidth = T)
p3 <- p + geom_boxplot(outlier.color = NA, outlier.fill = NA)
p4 <- ggplot(birthwt, aes(x = 1, y = bwt)) + geom_boxplot() +
    scale_x_continuous(breaks = NULL) + theme(axis.title.x = element_blank())
cowplot::plot_grid(p1,p2,p3,p4, ncol = 2)
箱式图添加均值
通过stat_summary可以对数据进行统计后添加图形。
ggplot(birthwt, aes(factor(race), bwt)) + geom_boxplot() +
    stat_summary(fun.y = "mean", geom = "point", shape = 23, size = 3, fill = "white")
小提前图的调整
geom_violin可是绘制小提琴图。绘制的时候需要注意的是: - 保留小提琴的尾部:默认的小提琴图的坐标轴范围是它的最大值和最小值。因此其尾部是扁平的。通过trim可以保留其尾部。 - 小提琴的面积:默认的情况下,小提琴的面积各组之间是经过标准化后一样的。如果想要不一样的话。可是使用scale = "count"来进行调整 - 小提琴的平滑程度:通过adjust来调整其平滑程度。数值越大越平滑
p <- ggplot(heightweight, aes(sex, heightIn))
p1 <- p + geom_violin()
p2 <- p + geom_violin(trim = T)
p3 <- p + geom_violin(scale = "count")
p4 <- p + geom_violin(adjust = .5)
cowplot::plot_grid(p1,p2,p3,p4, ncol = 2)
点图的绘制(两个图分开)
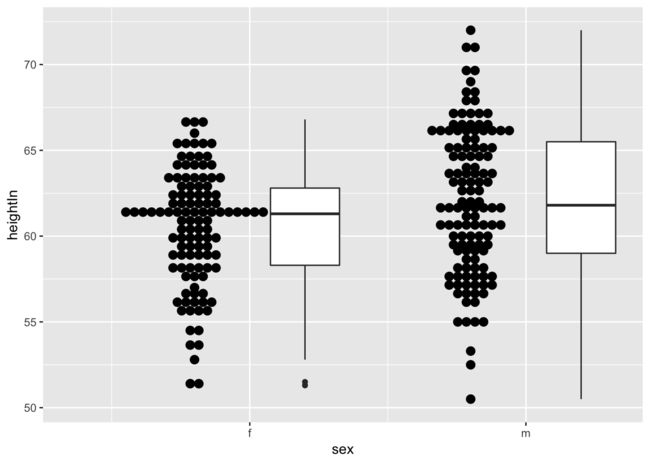
geom_dotplot可以绘制点图。如果需要绘制分组的点图的时候。则需要指定binaxis = "y"让点沿着Y轴堆砌。 需要注意的是,如果x轴是数值型变量的时候,必须指定group。不然的话。是没办法进行分组的。
ggplot(heightweight, aes(sex, heightIn, group = sex)) +
    geom_boxplot(aes(x = as.numeric(sex) + .2), width = .25) +
    geom_dotplot(aes(x = as.numeric(sex) - .2), binaxis = "y", binwidth = .5, stackdir = "center") +
    scale_x_continuous(breaks = 1:nlevels(heightweight$sex),
                       labels = levels(heightweight$sex))
添加注释
- 在绘制完一个图片之后,有时候我们需要在图片上进行注释。这个时候就用到
annotate函数。这个函数接受三种注释分别是:text文字;segment线段;rect矩形 - 如果的类型具有映射关系的是话。可以使用相对应的
geom_即可。
文字注释
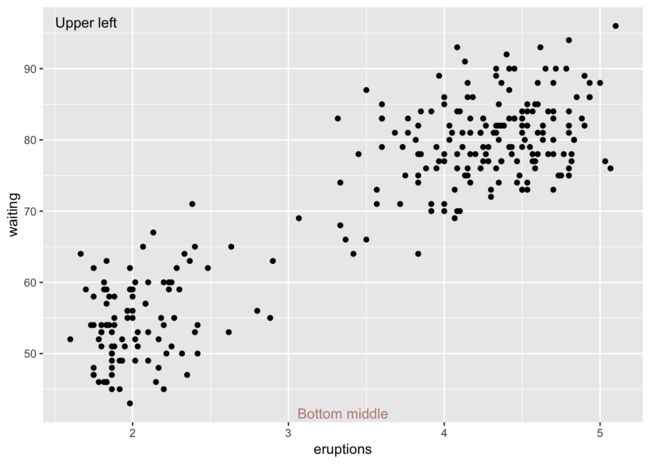
使用annotate("text")来添加注释。需要注意的是: - 一般而言接受x,y,lable三个基本参数。 - 当我们需要添加单独的文本对象的时候,千万不要使用geom_text - 如果是一个连续性变量的坐标轴的时候,可以通过使用Inf和-Inf来在绘图的边缘添加注释文字。同时也可以通过hjust和vjust来进行上下作用调整。
ggplot(faithful, aes(x = eruptions, waiting)) + geom_point() +
    annotate("text", x = -Inf, y = Inf, label = "Upper left", hjust = -.2, vjust = 2) +
    annotate("text", x = mean(range(faithful$eruptions)), y = -Inf, vjust = -.4, label = "Bottom middle", alpha = .5, color = "darkred")
线段注释
- 如果是添加一条直线的话,可以通过
geom_vline/geom_hline来添加。同时指定xintercept/yintercept截距以及slope角度即可。 - 如果要自定义线段的的话就需要用到
annotate("segment")即可。同样的现在也有geom_segment可以这使用。 -
geom_segment还接受lineend(‘round’, ‘butt’, ‘square’)和linejoin(‘round’, ‘butt’, ‘square’)参数来对线条进行修改
p <- climate %>% filter(Source == "Berkeley") %>% ggplot(., aes(Year, Anomaly10y)) + geom_line()
p1 <- p + annotate("segment", x = 1850, xend = 1820,y = -.8, yend = -.95, color = "blue", size = 2, arrow = arrow()) +
    annotate("segment", x = 1950, xend = 1980, y = -.25, yend = -.25,
             arrow = arrow(ends = "both", angle = 90, length = unit(.2, "cm")))
p2 <- p + geom_segment( x = 1850, xend = 1820,y = -.8, yend = -.95, color = "blue", size = 2, arrow = arrow(), lineend = "round") +
    geom_segment(x = 1950, xend = 1980, y = -.25, yend = -.25,
             arrow = arrow(ends = "both", angle = 90, length = unit(.2, "cm")))
cowplot::plot_grid(p1, p2, ncol = 1)
添加一个矩形
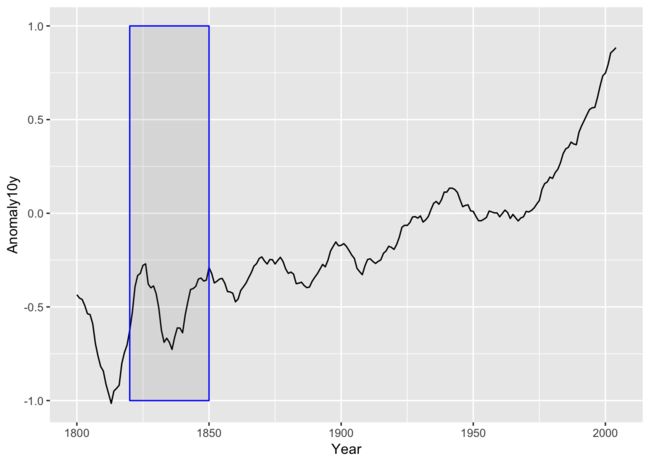
annotate("rect")和geom_rect都可以往图形上添加矩形。
需要注意的是添加的元素基本上就是图层的叠加。所以如果出图的时候需要明白那个在上哪个在下。
p <- climate %>% filter(Source == "Berkeley") %>% ggplot(., aes(Year, Anomaly10y)) + geom_line()
p1 <- p + annotate("rect", xmin = 1850, xmax = 1820, ymin = -1, ymax = 1, color = "blue", alpha = .1); p1
坐标轴
修改坐标轴的范围
我们Y轴为例,通过ylim和scale_y_continuous都可以修改坐标的范围。两者设置一个就可以。不同的是scale_y_continuous可以设置更多的参数。另外在修改坐标轴范围的时候。如果设置后某些数据没有在坐标轴中,ggplot2默认的会把剩下的数据当作新的数据来重新作图。如果只是想在原来的数据上进行缩放的话。可是使用coord_cartesian(ylim)进行设置。
同样的如果是一个离散线的坐标轴可以通过scale_x_discrete(limits)来进行修改。
p <- ggplot(PlantGrowth, aes(group, weight)) + geom_boxplot()
p1 <- p + ylim(5,6.5)
p2 <- p + coord_cartesian(ylim = c(5,6.5))
cowplot::plot_grid(p,p1,p2, ncol = 3)
## Warning: Removed 13 rows containing non-finite values (stat_boxplot).
反转一个连续性坐标轴
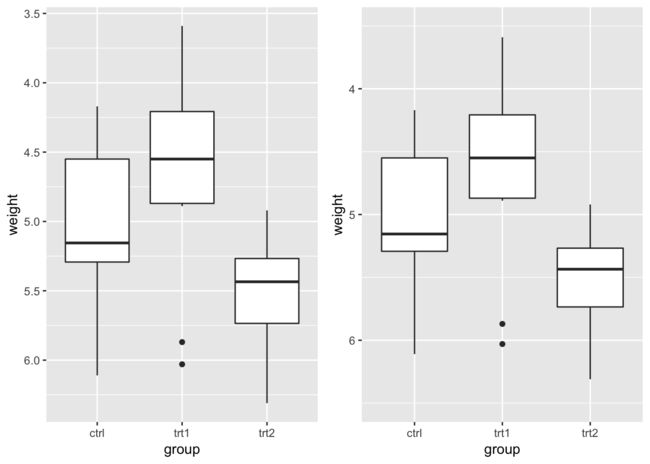
使用scale_y_reverse或者在指定坐标轴范围的时候先指定大范围,再指定小范围都可以用来反转坐标轴
p1 <- p + scale_y_reverse()
p2 <- p + ylim(6.5,3.5)
cowplot::plot_grid(p1,p2,ncol = 2)
使用对数坐标轴
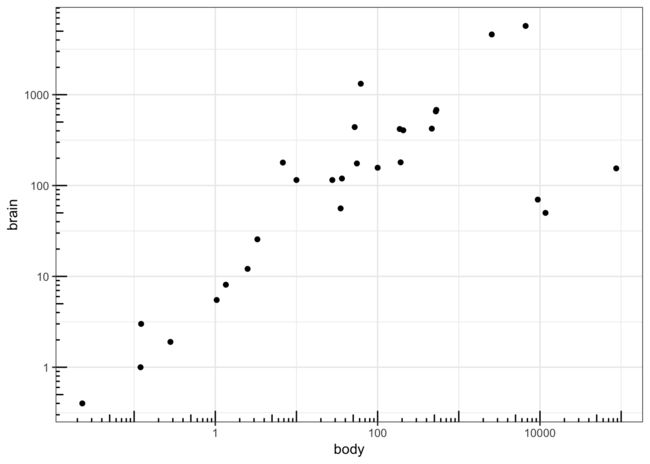
通过使用scale_x/y_log10来使用对数坐标轴。但是一般来说其坐标轴的刻度显示是很怪的。我们可以通过trans_format来进行调整。
另外一种方法是把数据直接先log10变换。然后正常显示
library(MASS)
p <- ggplot(Animals, aes(body, brain)) + geom_point()
p1 <- p + scale_x_log10() + scale_y_log10()
library(scales)
##
## Attaching package: 'scales'
## The following object is masked from 'package:purrr':
##
##     discard
## The following object is masked from 'package:readr':
##
##     col_factor
p2 <- p + scale_x_log10(breaks = 10^(-1:5),
                        labels = trans_format("log10", math_format(10^.x)))
p3 <- ggplot(Animals, aes(log10(body), log10(brain))) + geom_point()
cowplot::plot_grid(p,p1,p2,p3, ncol = 2)
对数坐标轴添加刻度
使用annotation_logticks可以为坐标轴添加刻度
p + scale_x_log10() + scale_y_log10() + annotation_logticks() + theme_bw()
图例
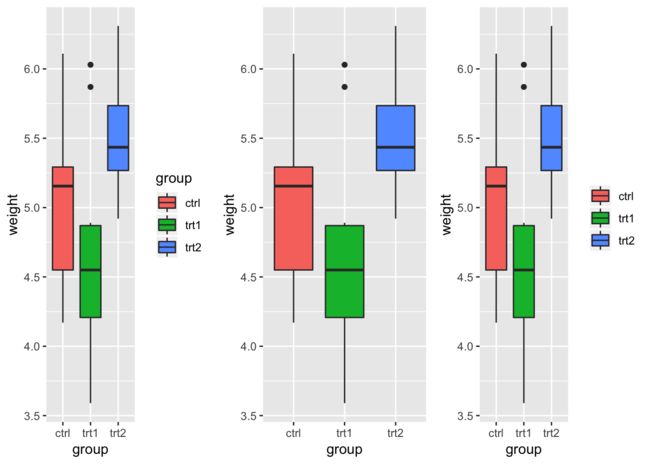
去掉图例
- 如果需要去掉图例的话可以使用
guides。在函数中指定需要出去的是那个类型的图例即可。例如guides(fill = F)则代表去掉填充色的图例 - 如果是想要去掉图例的标题的话,同时可以使用
guides函数。例如如果要去除形状的图例标题,则代码是guides(shape = guide_legend(title = NULL))
p <- ggplot(PlantGrowth, aes(group, weight, fill = group)) + geom_boxplot()
p1 <- p + guides(fill = F)
p2 <- p + guides(fill = guide_legend(title = NULL))
cowplot::plot_grid(p,p1,p2,ncol = 3)
分面
修改分面的标签
通过facet_grid(labeller)来修改分面的标签。同时其实也可以通过先生成一个新的分面标签在进行修改的
