在这里我们使用一个例子来说明动画的实现过程。这个例子为点击对应的图片会展示该图片对应的大图。使用系统的跳转效果是这样展示的。
接下来我们便要自定义动画来展示图片了。
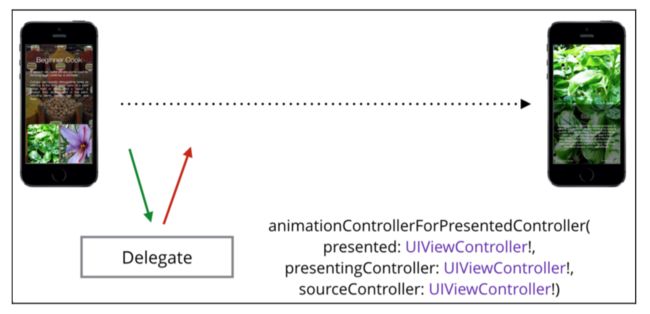
UIKit可以让我们通过实现代理协议来定义自己的展示方式,我们只需要实现UIViewControllerTransitioningDelegate就可以了。每次我们要present一个新的视图控制器时,UIKit都会通过代理协议来询问我们是否要使用自定义的过渡方式,
UIKit会调用方法animationControllerForPresentedController:(UIViewController *)presented presentingController:(UIViewController *)presenting sourceController:(UIViewController *)source,如果这个方法返回的值是nil,则会使用系统默认的过渡动画,如果不是,UIKit则会使用自定义的动画对象来过渡。
而这里的对象是我们实现的类,这个类实现了协议UIViewControllerAnimatedTransitioning,这里会调用方法transitionDuration:来确定动画的执行时间,在调用方法animateTransition:,我们所实现的动画方式就是定义在这里面。
接下来我们就是看PresentationAnimation类的具体实现了。
先来了解一下animateTransition:的唯一一个参数,这个参数是UIViewControllerContextTransitioning类型的,通过它们可以得到过渡动画中很多数据
//动画过渡效果将在这个View上进行
UIView *containerView = [transitionContext containerView];

//获取将要被替换的视图
UIView *fromView = [transitionContext viewForKey:UITransitionContextFromViewKey];
//获取将要展现的视图
UIView *toView = [transitionContext viewForKey:UITransitionContextToViewKey];

//获取将要被替换的视图控制器
UIViewController *fromViewController = [transitionContext viewControllerForKey:UITransitionContextFromViewControllerKey];
//获取将要展现的视图控制器
UIViewController *toViewController = [transitionContext viewControllerForKey:UITransitionContextToViewControllerKey];
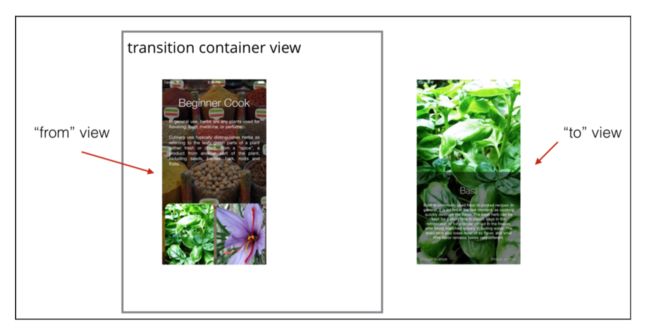
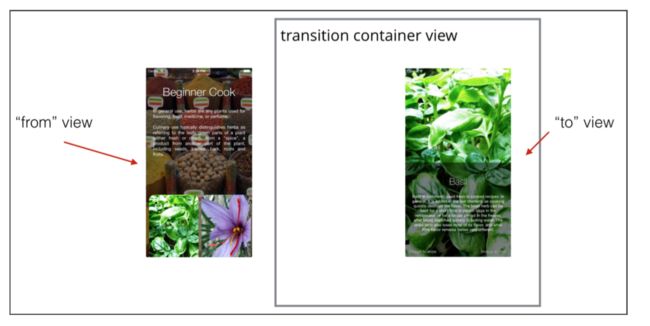
再来了解一下这个过渡执行的过程,当两个视图控制器之间的过渡开始时,当前已经存在的视图将会被添加到containerView上,而新的视图控制器的视图此时也被创建,只是不可见而已。
上面的这一步是自动执行的,接下来的就是我们的任务了,将新的视图添加到containerView上,至于使用什么样的方式使新视图出现和使旧视图消失,就看我们想要什么效果了。
默认情况下,过渡动画执行完之后,旧视图会在containerView上移除,我们会在下面的小例子中进行验证。
用个简单的小例子来说明用法,淡入淡出的方式
实现方法animateTransition:
- (void)animateTransition:(id)transitionContext
{
//动画过渡效果将在这个View上进行
UIView *containerView = [transitionContext containerView];

//获取将要被替换的视图
UIView *fromView = [transitionContext viewForKey:UITransitionContextFromViewKey];
//获取将要展现的视图
UIView *toView = [transitionContext viewForKey:UITransitionContextToViewKey];

[containerView addSubview:toView];
toView.alpha = 0.0f;

//取动画的时间,作为我们自定义的动画的时间
[UIView animateWithDuration:[self transitionDuration:transitionContext] animations:^{
    toView.alpha = 1.0f;
} completion:^(BOOL finished) {
    //这样的是为了如中途取消可设置为未完成,这样可恢复原状
    [transitionContext completeTransition:![transitionContext transitionWasCancelled]];
}];
}
实现效果:
我们在代码[transitionContext completeTransition:![transitionContext transitionWasCancelled]];后面加上这些代码来验证fromView是否已经移除
if ([[containerView subviews]containsObject:fromView]) {
   NSLog(@"旧视图未移除");
}else{
   NSLog(@"旧视图已移除");
}
会发现打印了 “旧视图已移除”
当然我们也可以实现稍微复杂一点的动画,只需要重新方法animateTransition:的实现就可以了
UIView *containerView = [transitionContext containerView];
UIView *toView = [transitionContext viewForKey:UITransitionContextToViewKey];

CGRect initialFrame = self.originFrame;
CGRect finalFrame = toView.frame;

CGFloat xScaleFactor = initialFrame.size.width/finalFrame.size.width;
CGFloat yScaleFactor = initialFrame.size.height/finalFrame.size.height;

CGAffineTransform scaleTransform = CGAffineTransformMakeScale(xScaleFactor, yScaleFactor);

toView.transform = scaleTransform;
toView.center = CGPointMake(CGRectGetMidX(initialFrame)*0.5, CGRectGetMidY(initialFrame)*0.5);

[containerView addSubview:toView];

[UIView animateWithDuration:[self transitionDuration:transitionContext] delay:0 usingSpringWithDamping:0.4 initialSpringVelocity:0.0 options:0 animations:^{
    toView.transform = CGAffineTransformIdentity;
    toView.center = CGPointMake(CGRectGetMidX(finalFrame), CGRectGetMidY(finalFrame));
} completion:^(BOOL finished) {
    [transitionContext completeTransition:![transitionContext transitionWasCancelled]];
}];
效果如下:
我们发现在dismiss时,所采取的方式仍然是系统的方式,所以我们要修改它们只需要实现animationControllerForDismissedController就可以了,其实是和上面的一样的。 继续重写方法animateTransition:的实现。
if (self.presenting) {
    UIView *containerView = [transitionContext containerView];
    UIView *toView = [transitionContext viewForKey:UITransitionContextToViewKey];
    CGRect initialFrame = self.originFrame;
    CGRect finalFrame = toView.frame;

    CGFloat xScaleFactor = initialFrame.size.width/finalFrame.size.width;
    CGFloat yScaleFactor = initialFrame.size.height/finalFrame.size.height;

    CGAffineTransform scaleTransform = CGAffineTransformMakeScale(xScaleFactor, yScaleFactor);

    toView.transform = scaleTransform;
    toView.center = CGPointMake(CGRectGetMidX(initialFrame)*0.5, CGRectGetMidY(initialFrame)*0.5);

    [containerView addSubview:toView];

    [UIView animateWithDuration:[self transitionDuration:transitionContext] delay:0 usingSpringWithDamping:0.4 initialSpringVelocity:0.0 options:0 animations:^{
        toView.transform = CGAffineTransformIdentity;
        toView.center = CGPointMake(CGRectGetMidX(finalFrame), CGRectGetMidY(finalFrame));
    } completion:^(BOOL finished) {
        [transitionContext completeTransition:![transitionContext transitionWasCancelled]];
    }];
}
else{
    UIView *containerView = [transitionContext containerView];
    UIView *toView = [transitionContext viewForKey:UITransitionContextToViewKey];
    UIView *fromView = [transitionContext viewForKey:UITransitionContextFromViewKey];

    [containerView addSubview:toView];
    //添加toView之后,fromView将看不到,所以将其移到前面
    [containerView bringSubviewToFront:fromView];

    [UIView animateWithDuration:2 delay:0 usingSpringWithDamping:0.4 initialSpringVelocity:0 options:0 animations:^{
        CGAffineTransform transform = CGAffineTransformIdentity;
        transform = CGAffineTransformScale(transform, 0.1, 0.1);
        fromView.transform = transform;
    } completion:^(BOOL finished) {
        [transitionContext completeTransition:![transitionContext transitionWasCancelled]];
    }];

}
效果如下:
源代码地址在这里


