【原创文章,转载请注明原文章地址,谢谢!】
前面所有的Jersey的使用,我们都是独立使用Jersey,包括资源类,Provider等。我们所有的示例代码都没有依赖于任何服务对象。本节将介绍Jersey集成Spring。
Spring集成Jersey
在正常应用中,Jersey只是作为服务端接口存在,而接口需要调用Service来完成具体的业务。在Jersey中,默认使用的是HK2这个DI/AOP框架来完成服务管理和注入的,所以我们前面看到的@Contract,@Service等,都是HK2框架提供的。但是我们平时用的更多的,肯定是Spring容器,所以我们需要把Jersey和Spring集成起来。
但是注意一点,Jersey和Spring集成,更多的应该叫做Jersey来集成Spring,或者叫Jersey来启动Spring框架,使用的是HK2-Spring Bridge(HK2-Spring桥)依赖完成的。所以,我们一般不会把Jersey和SpringMVC混合起来使用,如果有类似网站门户和WebAPI共存的情况下,也会区分两个项目。
那首先来看下Jersey怎么集成Spring:
- 引入Jersey-Spring依赖:
    org.glassfish.jersey.ext
    jersey-spring4
    2.26
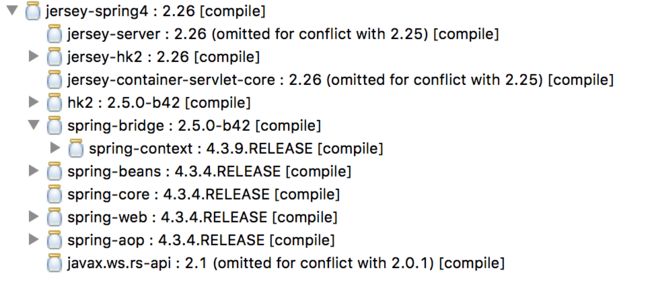
通过依赖包的名称,我们可以看出来,这里集成的是Spring4版本。当这个包引入之后,我们看看增加了哪些包到项目中:
如果我们需要使用自己的Spring版本,或者自己来控制Spring的依赖,我们可以在
这里需要注意一下,第一次配置Spring+Jersey的时候,很容易出现java.lang.NoClassDefFoundError: org/glassfish/jersey/internal/inject/Binder异常,造成的原因是因为Jersey的版本不一致。注意jersey-spring4的版本都是2.26的,而我们之前使用的jersey都是2.25的,所以需要把各个版本调整一致即可:
        org.glassfish.jersey.media
        jersey-media-multipart
        2.26


        org.glassfish.jersey.containers
        jersey-container-servlet
        2.26


        org.glassfish.jersey.media
        jersey-media-json-jackson
        2.26


        org.glassfish.jersey.ext
        jersey-spring4
        2.26


        javax.servlet
        servlet-api
        2.5
        provided
使用xml方式
首先创建一个简单的服务接口和对应实现:
public interface ISomeService {

    void doSomething(String msg);
}
创建对应的实现:
public class SomeServiceImpl implements ISomeService {

    @Override
    public void doSomething(String msg) {
        System.out.println("do some thing:" + msg);
    }

}
创建资源类:
@Path("spring")
public class SpringResource {

    @Autowired
    private ISomeService someService;

    @Autowired
    private ApplicationContext ctx;

    public void setSomeService(ISomeService someService) {
        this.someService = someService;
    }

    @Path("resource1")
    @GET
    public String resource1(@QueryParam("msg") String msg) {
        System.out.println(this);
        System.out.println(ctx.getBeansOfType(SpringResource.class));
        this.someService.doSomething(msg);
        return "success";
    }
}
在这个类中,注意几个点:
1,使用@Autowired标签尝试从spring容器中注入ISomeService;
2,同时注入ApplicationContext,并且在我们的资源方法中,使用ctx.getBeansOfType来查看我们的SpringResource是否被Spring管理;
添加一个Spring的配置文件applicationContext.xml,并在其中添加两个bean:
因为使用@Autowire标签,所以没有使用
配置web.xml:
    JerseyServletContainer
    org.glassfish.jersey.servlet.ServletContainer

        jersey.config.server.provider.packages
        cn.wolfcode.jersey


        contextConfigLocation
        classpath:applicationContext.xml


        jersey.config.server.provider.classnames
        org.glassfish.jersey.media.multipart.MultiPartFeature


    JerseyServletContainer
    /webapi/*
注意两个参数:
1,jersey.config.server.provider.classnames,使用该参数添加Provider和Feature;
2,contextConfigLocation:通过该参数设置Spring的配置文件地址。注意,jersey中默认的spring配置文件地址就是classpath:applicationContext.xml
测试:当请求GET localhost:8082/webapi/spring/resource1?msg=wolfcode.cn,我们可以看到后台控制台输出:
cn.wolfcode.jersey._10spring.SpringResource@7bf502a0
{cn.wolfcode.jersey._10spring.SpringResource#0=cn.wolfcode.jersey._10spring.SpringResource@b090cd5}
do some thing:wolfcode.cn
如果只是简单看一眼这个输出,仿佛输出都是正确的,并且也正确的返回了success字符串。
注意:当我们再仔细看这段输出,就会发现,我们实际使用的SpringResource其实并不是Spring容器中的SpringResource,所以我们能得出这样的结论:如果只是在applicationContext.xml中配置资源类,资源类本身是不会被Spring管理的,但是资源类中的@Autowired标签是起作用了的。
所以,我们需要修改我们的资源类,在资源类上再添加@Component标签:
@Component
@Path("spring")
public class SpringResource {
再次执行测试请求:
cn.wolfcode.jersey._10spring.SpringResource@7002e440
{cn.wolfcode.jersey._10spring.SpringResource#0=cn.wolfcode.jersey._10spring.SpringResource@7002e440}
do some thing:wolfcode.cn
cn.wolfcode.jersey._10spring.SpringResource@7002e440
{cn.wolfcode.jersey._10spring.SpringResource#0=cn.wolfcode.jersey._10spring.SpringResource@7002e440}
do some thing:wolfcode.cn
可以看到,这次确实Jersey使用的资源对象就是Spring容器中管理的资源对象了。
注意:可能这里的写法很奇怪,就是我们在applicationContext.xml中配置了SpringResource类,在SpringResource类上面又添加了@Component注解。如果要使用xml的配置方式,也就必须要这样做了。
使用全注解方式
上面的配置我们发现,要让资源类注入依赖的服务对象,是很简单的,只需要把依赖的服务对象配置到spring容器中,并使用@Autowired标签即可。但是如果要让Jersey的资源类也被Spring容器管理(才能享受AOP等功能),就需要在资源类上添加@Component,并且在Spring的配置文件中再次配置该bean。
下面我们换成全注解的方式。首先修改我们的applicationContext.xml:
配置组件扫描;
其次,修改服务对象,添加@Service注解:
@Service
public class SomeServiceImpl implements ISomeService {
这次,我们的资源类不用修改:
@Component
@Path("spring")
public class SpringResource {
也需要添加@Component注解;
执行测试请求:
cn.wolfcode.jersey._10spring.SpringResource@1a1b0074
{springResource=cn.wolfcode.jersey._10spring.SpringResource@1a1b0074}
do some thing:wolfcode.cn
cn.wolfcode.jersey._10spring.SpringResource@1a1b0074
{springResource=cn.wolfcode.jersey._10spring.SpringResource@1a1b0074}
do some thing:wolfcode.cn
测试通过。
使用ResourceConfig方式
上面的测试案例中,我们使用的web.xml方式来配置的,接下来,我们使用ResourceConfig的方式。资源类,服务类,Spring配置文件都不用修改,修改我们的ResoureConfig类:
@ApplicationPath("webapi")
public class RestApplication extends ResourceConfig {

    public RestApplication() {
        this.packages("cn.wolfcode.jersey");
        this.register(MultiPartFeature.class);
        this.property("contextConfigLocation","classpath:applicationContext.xml");
        this.register(MyRequestTestFilter.class).register(MyResponseTestFilter.class);
    }
}
在其中添加contextConfigLocation参数,指向Spring配置文件即可。
Provider的注入
当Jersey容器交给Spring管理之后,Jersey中的各种Provider也可以交给Spring容器管理。
我们创建一个过滤器:
@Provider
@Component
public class MyResponseTestFilter implements ContainerResponseFilter {

    @Autowired
    private ApplicationContext ctx;

    @Override
    public void filter(ContainerRequestContext requestContext,
            ContainerResponseContext responseContext) throws IOException {
        System.out.println("===my response filter test===");
        System.out.println(this);
        System.out.println(ctx.getBeansOfType(MyResponseTestFilter.class));
    }

}
注意,在该过滤器上,我们添加了@Provider和@Component注解。很明显,@Provider是提供给Jersey自动发现的,@Component是让该Filter交给Spring容器管理。
再来看这次我们的ResourceConfig类:
@ApplicationPath("webapi")
public class RestApplication extends ResourceConfig {

    public RestApplication() {
        this.packages("cn.wolfcode.jersey");
        this.register(MultiPartFeature.class);
        this.property("contextConfigLocation","classpath:applicationContext.xml");
        this.register(MyRequestTestFilter.class);
    }
}
注意,在ResourceConfig中,我们并没有配置MyResponseTestFilter;
我们来执行一次测试请求:
cn.wolfcode.jersey._10spring.SpringResource@b6653b0
{springResource=cn.wolfcode.jersey._10spring.SpringResource@b6653b0}
do some thing:wolfcode.cn
===my response filter test===
cn.wolfcode.jersey._10spring.MyResponseTestFilter@128994a0
{myResponseTestFilter=cn.wolfcode.jersey._10spring.MyResponseTestFilter@128994a0}
注意===my response filter test===之后的这块内容,可以看到,我们的responsefilter确实已经配置成功,并且可以发现,Jersey使用的filter实例确实是由Spring容器管理和提供的。
小结
在本节中,我们简单的看了一下Jersey和Spring容器的集成,其实真正起作用的还是HK2提供的SpringBridge类。如果有兴趣想了解Jersey和Spring的集成原理,可以看看org.glassfish.jersey.server.spring.SpringComponentProvider类的源码。
因为Springboot使用越来越多,下一节,我们介绍Springboot对Jersey的集成。

