版本记录
| 版本号 | 时间 |
|---|---|
| V1.0 | 2018.01.16 |
前言
很多时候我们都需要绘制圆环或者饼状图,可以静态直接显示,也有时候需要加上一定的动画效果。这一篇就简单的说一下动画效果,希望能帮助到大家,有不足的地方欢迎指正。
单色圆环的绘制
下面我们就看一下单色圆环的动画效果展示,还是先看代码。
1. ViewController
@interface ViewController ()

@end

@implementation ViewController

- (void)viewDidLoad
{
    [super viewDidLoad];

    //圆周
    JJCircleView *circleView = [[JJCircleView alloc] initWithFrame:self.view.bounds];
    [self.view addSubview:circleView];
}

@end
2. JJCircleView.m
#import "JJCircleView.h"

@interface JJCircleView()

@property (nonatomic, strong) CAShapeLayer *arcLayer;

@end

@implementation JJCircleView

- (instancetype)initWithFrame:(CGRect)frame
{
    if (self = [super initWithFrame:frame]) {
        self.backgroundColor = [UIColor blackColor];
        [self initUI];
    }
    return self;
}

#pragma mark -  Object Private Function

- (void)initUI
{
    [self drawRoundView:CGPointMake(200.0, 300.0) withStartAngle:0 withEndAngle:M_PI * 2 withRadius:100.0];
}

- (void)drawRoundView:(CGPoint)centerPoint withStartAngle:(CGFloat)startAngle withEndAngle:(CGFloat)endAngle withRadius:(CGFloat)radius
{
    UIBezierPath *path = [UIBezierPath bezierPath];
    [path addArcWithCenter:centerPoint radius:radius startAngle:startAngle endAngle:endAngle clockwise:YES];
    self.arcLayer = [CAShapeLayer layer];
    self.arcLayer.path = path.CGPath;
    self.arcLayer.strokeColor = [UIColor yellowColor].CGColor;
    self.arcLayer.lineWidth = 2;
    self.arcLayer.frame = self.bounds;
    [self.layer addSublayer:self.arcLayer];

    //动画显示圆则调用
    [self drawLineAnimation:self.arcLayer];
}

- (void)drawLineAnimation:(CALayer*)layer
{
    CABasicAnimation *bas = [CABasicAnimation animationWithKeyPath:@"strokeEnd"];
    bas.duration = 3;
    bas.fromValue = [NSNumber numberWithInteger:0];
    bas.toValue = [NSNumber numberWithInteger:1];
    [layer addAnimation:bas forKey:@"key"];
}

@end
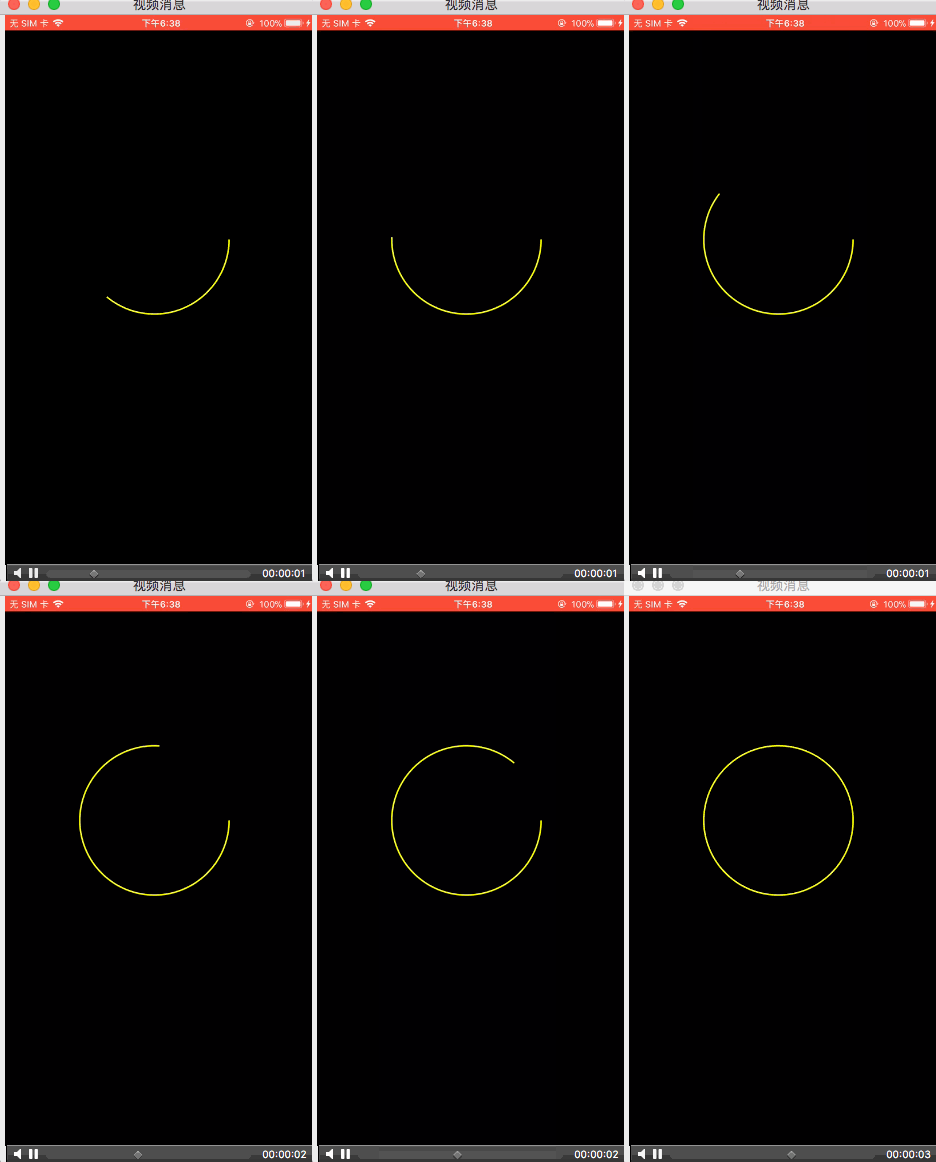
下面看一下实现效果
彩色圆环的绘制
我们还是先看一下代码。
1. ViewController.m
@interface ViewController ()

@end

@implementation ViewController

- (void)viewDidLoad
{
    [super viewDidLoad];

    //饼状图
    NSArray *dataArr = @[@0.2, @0.3, @0.4, @0.1];
    NSArray *colorArr = @[[UIColor redColor], [UIColor magentaColor], [UIColor purpleColor], [UIColor blueColor]];
    JJPieView *pieView = [[JJPieView alloc] initWithFrame:self.view.bounds dataItems:dataArr colorItems:colorArr];
    [self.view addSubview:pieView];
}

@end
2. JJPieView.m
#import "JJPieView.h"

@interface JJPieView()

@property (nonatomic, assign) CGFloat total;
@property (nonatomic, strong) CAShapeLayer *bgCircleLayer;
@end

@implementation JJPieView

#pragma mark -  Object Private Function

- (instancetype)initWithFrame:(CGRect)frame dataItems:(NSArray *)dataItems colorItems:(NSArray *)colorItems
{
    self = [super initWithFrame:frame];
    if (self) {
        self.backgroundColor = [UIColor whiteColor];

        //1.pieView中心点
        CGFloat centerWidth = self.bounds.size.width * 0.5;
        CGFloat centerHeight = self.bounds.size.height * 0.5;
        CGFloat centerX = centerWidth;
        CGFloat centerY = centerHeight;
        CGPoint centerPoint = CGPointMake(centerX, centerY);
        CGFloat radiusBasic = centerWidth > centerHeight ? centerHeight : centerWidth;

        //计算颜色占比总和
        _total = 0.0f;
        for (int i = 0; i < dataItems.count; i++) {
            _total += [dataItems[i] floatValue];
        }

        //线的半径为扇形半径的一半,线宽是扇形半径,这样就能画出圆形了
        //2.背景路径
        CGFloat bgRadius = radiusBasic * 0.5;
        UIBezierPath *bgPath = [UIBezierPath bezierPathWithArcCenter:centerPoint
                                                              radius:bgRadius
                                                          startAngle:-M_PI_2
                                                            endAngle:M_PI_2 * 3
                                                           clockwise:YES];
        _bgCircleLayer = [CAShapeLayer layer];
        _bgCircleLayer.fillColor   = [UIColor clearColor].CGColor;
        _bgCircleLayer.strokeColor = [UIColor lightGrayColor].CGColor;
        _bgCircleLayer.strokeStart = 0.0f;
        _bgCircleLayer.strokeEnd   = 1.0f;
        _bgCircleLayer.zPosition   = 1;
        _bgCircleLayer.lineWidth   = 3.0;
        _bgCircleLayer.path        = bgPath.CGPath;


        //3.子扇区路径
        CGFloat otherRadius = radiusBasic * 0.5 - 3.0;
        UIBezierPath *otherPath = [UIBezierPath bezierPathWithArcCenter:centerPoint
                                                                 radius:otherRadius
                                                             startAngle:-M_PI_2     //从竖直方向开始,顺时钟方向转动
                                                               endAngle:M_PI_2 * 3  //结束角度,正向270度
                                                              clockwise:YES];

        CGFloat start = 0.0f;
        CGFloat end = 0.0f;
        for (int i = 0; i < dataItems.count; i++) {
            //4.计算当前end位置 = 上一个结束位置 + 当前部分百分比
            end = [dataItems[i] floatValue] / _total + start;

            //图层
            CAShapeLayer *pie = [CAShapeLayer layer];
            [self.layer addSublayer:pie];
            pie.fillColor   = [UIColor clearColor].CGColor;
            if (i > colorItems.count - 1 || !colorItems  || colorItems.count == 0) {//如果传过来的颜色数组少于item个数则随机填充颜色
                CGFloat redValue = arc4random_uniform(255)/255.0;
                CGFloat greenValue = arc4random_uniform(255)/255.0;
                CGFloat blueValue = arc4random_uniform(255)/255.0;
                pie.strokeColor = [UIColor colorWithRed:redValue green:greenValue blue:blueValue alpha:1.0].CGColor;
            }
            else {
                pie.strokeColor = ((UIColor *)colorItems[i]).CGColor;
            }
            pie.strokeStart = start;
            pie.strokeEnd   = end;
            pie.lineWidth   = otherRadius * 2.0f;
            pie.zPosition   = 2;
            pie.path        = otherPath.CGPath;


            //计算百分比label的位置
            CGFloat centerAngle = M_PI * (start + end);
            CGFloat labelCenterX = bgRadius * 1.2 * sinf(centerAngle) + centerX;
            CGFloat labelCenterY = -bgRadius * 1.2 * cosf(centerAngle) + centerY;
            UILabel *label = [[UILabel alloc] initWithFrame:CGRectMake(0, 0, radiusBasic * 0.3f, radiusBasic * 0.3f)];
            label.center = CGPointMake(labelCenterX, labelCenterY);
            label.text = [NSString stringWithFormat:@"%ld%%",(NSInteger)((end - start + 0.005) * 100)];
            label.textAlignment = NSTextAlignmentCenter;
            label.textColor = [UIColor whiteColor];
            label.layer.zPosition = 3;
            [self addSubview:label];

            //计算下一个start位置 = 当前end位置
            start = end;
        }
        self.layer.mask = _bgCircleLayer;

        //开始绘画
        [self stroke];

    }
    return self;
}

- (void)stroke
{
    //画图动画
    CABasicAnimation *animation = [CABasicAnimation animationWithKeyPath:@"strokeEnd"];
    animation.duration  = 3;
    animation.fromValue = @0.0f;
    animation.toValue   = @1.0f;
    animation.timingFunction = [CAMediaTimingFunction functionWithName:kCAMediaTimingFunctionEaseInEaseOut];
    animation.removedOnCompletion = YES;
    [_bgCircleLayer addAnimation:animation forKey:@"circleAnimation"];
}

@end
下面我们就看一下实现效果
饼状图的绘制
我们还是先看代码,这个代码和彩色圆环绘制的代码是一样的,只需要改动一个地方,如下所示。
_bgCircleLayer.lineWidth = radiusBasic;
下面看一下实现效果。
这个也是动态的显示的。
后记
未完,待续~~~


